
忙しい現代社会では、家庭で美味しい食事を作るのは大変なことです。いろいろな料理を食べたいですが、料理本やたくさんのレシピサイトを見るのは時間がかかりますし、面倒です。手持ちの食材や食べたいものをもとに、新しいレシピを見つけるもっといい方法があったらどうでしょう?
このブログでは、Java Spring BootとNoSQLデータベースで構築された、動的なレシピと食材の検索プラットフォームの開発について掘り下げます。タイトルからエキサイティングなレシピを発見したり、すでにパントリーにある食材を活用したりできるユーザーフレンドリーなエクスペリエンスの具体的な作り方について掘り下げます。
キッチンのための強力な検索エンジンを構築するための技術的な側面を探ります。Webアプリケーションのための堅牢なフレームワークであるSpring Bootの世界をナビゲートし、レシピデータを扱う上でNoSQLデータベースが提供する柔軟性を発見します。
要件
以下の機能要件があります:
- CSVからレシピと材料をインポートする
- レシピと食材の表示と検索
範囲外 * ユーザー認証と承認 * ユーザー管理 (登録、ログインなど)
プロジェクトセットアップ
インストールに必要なもの
- Java 17以降、Maven 3.5+、Dockerエンジン、お気に入りのテキストエディタ(Intellij IDEA、またはVSCode)。
Spring Bootプロジェクトの作成
Spring Bootはアプリケーションを高速にビルドする方法を提供します。Spring Bootはファイルを編集するコードを生成しません。その代わりに、アプリケーションを起動すると、Spring BootがBeanと設定を動的に配線し、アプリケーションコンテキストに適用します。Spring Bootを使えば、ビジネス機能にもっと集中でき、インフラをあまり気にする必要がありません。
start.spring.ioに移動します。このサービスは、アプリケーションに必要なすべての依存関係を取り込み、ほとんどのセットアップを行います。generateをクリックすると、Spring Bootプロジェクトが生成され、zip形式でダウンロードされます。このプロジェクトを解凍し、任意のIDEにインポートします。
GridDBとやりとりするために、このプロジェクトにGridDB Java Clientを追加する必要がある。mavenのpom.xmlに以下の依存関係を追加します。
<dependency>
  <groupId>com.github.griddb</groupId>
  <artifactId>gridstore</artifactId>
  <version>5.3.0</version>
</dependency>
<dependency>
  <groupId>com.github.f4b6a3</groupId>
  <artifactId>tsid-creator</artifactId>
  <version>5.2.5</version>
</dependency>
<dependency>
  <groupId>de.siegmar</groupId>
  <artifactId>fastcsv</artifactId>
  <version>3.1.0</version>
</dependency>
データモデリング
前述の検索機能をサポートするために、2つのメインテーブルを持つデータベーススキーマを設計することができます。以下はデータベースの設計例です:
レシピテーブル
このテーブルには、一意な識別子、名前、説明、その他の関連する詳細を含む、各食材に関する情報が格納されます。 ユーザーはレシピ名に基づいてこのテーブルをクエリすることで、レシピを検索することができます。
Label |
Name |
Type |
Nullable |
Default |
Comment |
|---|---|---|---|---|---|
| Recipe ID | id | varchar | No |
System generated unique identifier | |
| Recipe Name | name | varchar | No |
Recipe Name | |
| Recipe description | description | varchar | Yes |
” | Description, ex: direction |
| Create Time | createdAt | datetime | No |
current_timestamp() | Created Time |
| Created By | userId | varchar | No |
” | Created By User |
| Recipe Image | image | blob | Yes |
” | Blob image |
◉ 成分表
このテーブルには各レシピの一意な識別子、名前、測定値などの情報が保存されます。 このテーブルの各レコードは特定のレシピで使用される特定の食材を表します。 ユーザーはこのテーブルを食材名で検索することで、手持ちの食材からレシピを検索することができます。
Label |
Name |
Type |
Nullable |
Default |
Comment |
|---|---|---|---|---|---|
| Ingredient ID | id | varchar | No |
System generated unique identifier | |
| Ingredient Name | name | varchar | No |
Name | |
| Ingredient measurement | measurement | varchar | Yes |
” | Measurement of the ingredient |
| Create Time | createdAt | datetime | No |
current_timestamp() | Created Time |
| Recipe Id | recipeId | varchar | No |
” | Belong to a Recipe |
ウェブアプリケーションの構築
GridDBによるデータ・アクセス
まず、GridDB の基礎となるテーブルやコンテナを表す Java POJO クラスを作成します。Lombokの@Dataアノテーションを付けると、すべてのフィールドのゲッター、便利なtoStringメソッド、すべての非一時的なフィールドをチェックするhashCodeとequalsの実装が自動的に生成されます。また、すべての非終端フィールドのセッターとコンストラクターも生成します。
前のデータベース設計に従ってデータ・アクセス・クラスを作成します。
@Data
public class User {
    @RowKey
    String id;
    String email;
    String fullName;
    Date createdAt;
}

@Data
public class Recipe {
    @RowKey
    String id;
    String name;
    String description;
    Blob image;
    String userId;
    Date createdAt;
}

@Data
public class Ingredient {
    @RowKey
    String id;
    String name;
    String measurement;
    String recipeId;
    Date createdAt;
}
次に、データベース操作の中心的な設定として GridDBConfig クラスを作成します。このクラスは以下のことを行います: * GridDBインスタンスへのデータベース接続を管理するためのGridStoreクラスを作成します。コンテナは、リレーショナル・データベースのテーブルに相当します。* Collectionの作成・更新時には、Collectionのカラムレイアウトに対応する名前とオブジェクトを指定します。また、各コレクションに対して、頻繁に検索され、TQLのWHEREセクションの条件で使用される列のインデックスを追加します。
@Configuration
public class GridDBConfig {

  @Value("${GRIDDB_NOTIFICATION_MEMBER}")
  private String notificationMember;

  @Value("${GRIDDB_CLUSTER_NAME}")
  private String clusterName;

  @Value("${GRIDDB_USER}")
  private String user;

  @Value("${GRIDDB_PASSWORD}")
  private String password;

  @Bean
  public GridStore gridStore() throws GSException {
    // Acquiring a GridStore instance
    Properties properties = new Properties();
    properties.setProperty("notificationMember", notificationMember);
    properties.setProperty("clusterName", clusterName);
    properties.setProperty("user", user);
    properties.setProperty("password", password);
    GridStore store = GridStoreFactory.getInstance().getGridStore(properties);
    return store;
  }

  @Bean
    public Collection<String, User> userCollection(GridStore gridStore) throws GSException {
        Collection<String, User> collection = gridStore.putCollection("users", User.class);
        collection.createIndex("email");
        return collection;
    }

    @Bean
    public Collection<String, Recipe> recipeCollection(GridStore gridStore) throws GSException {
        gridStore.dropCollection(AppConstant.RECIPES_CONTAINER);
        Collection<String, Recipe> collection = gridStore.putCollection(AppConstant.RECIPES_CONTAINER, Recipe.class);
        collection.createIndex("name");
        return collection;
    }

    @Bean
    public Collection<String, Ingredient> ingredientCollection(GridStore gridStore) throws GSException {
        gridStore.dropCollection(AppConstant.INGREDIENTS_CONTAINER);
        Collection<String, Ingredient> collection =
                gridStore.putCollection(AppConstant.INGREDIENTS_CONTAINER, Ingredient.class);
        collection.createIndex("name");
        return collection;
    }
}
CSVからレシピをシードします
インポートしたいCSV形式は以下の通りです:
| Title | Directions | Quantity1 | Unit1 | Ingredient1 | Quantity2 | Unit2 | Ingredient2 | Quantity3 | Unit3 | Ingredient3 | Quantity4 | Unit4 | Ingredient4 |
|---|---|---|---|---|---|---|---|---|---|---|---|---|---|
| Baked Green Beans | 1 | pound | fresh green beans | 2-Jan | cup | water | 1 | tsp | onion, minced | ||||
| Egg Roll Filling | 16 | ounces | shrimp | 3 | tbsp | oil | 2 | cups | diced celery |
エキスの成分
for (final NamedCsvRecord csvRecord : namedCsv) {
  List<createingredientrequest> ingredients = new ArrayList<>(19);
  for (int idxOfIngredient = 1; idxOfIngredient <= 19; idxOfIngredient++) {
      if (csvRecord.getField("Quantity" + idxOfIngredient).isBlank()) {
          break;
      }
      String quantityStr = csvRecord.getField("Quantity" + idxOfIngredient);
      String unitOfMeasure = csvRecord.getField("Unit" + idxOfIngredient);
      String ingredientName = csvRecord.getField("Ingredient" + idxOfIngredient);
      ingredients.add(CreateIngredientRequest.builder()
              .name(ingredientName)
              .measurement(quantityStr + " " + unitOfMeasure)
              .build());
  }
}</createingredientrequest>
このコードスニペットは、createIngredientRequestオブジェクトのリスト「instruments」を作成します。1から19までの数字の範囲を繰り返し、csvRecordオブジェクトの特定のフィールドが空白かどうかをチェックします。空白でない場合は、csvRecord オブジェクトから量、計量単位、および食材名を抽出し、新しい CreateIngredientRequest オブジェクトを食材リストに追加します。
レシピの抽出と保存
for (final NamedCsvRecord csvRecord : namedCsv) {
  List<string> fields = csvRecord.getFields();
  String recipeName = fields.get(0);
  String recipeDesc = fields.get(1);
  try {
      User user = userService.getRandomUser();
      recipeService.createWithIngredients(
              user,
              CreateRecipeRequest.builder()
                      .name(recipeName)
                      .description(recipeDesc)
                      .build(),
              ingredients);
  } catch (GSException e) {
      log.info("Recipe: {} = {}", recipeName, recipeDesc);
      ingredients.forEach(ingredient -> {
          log.info("{}", ingredient);
      });
      e.printStackTrace();
  }
}</string>
その内訳は以下の通りです:
- csvRecord.getFields() を使用して、現在の CSV レコードからフィールドを取得します。
- 最初のフィールドをrecipeNameに、2番目のフィールドをrecipeDescに割り当てます。
- userService.getRandomUser()を呼び出し、ランダムユーザーを取得します。
- recipeNameとrecipeDescを使用して新しいCreateRecipeRequestを作成します。
- recipeService.createWithIngredients()を呼び出し、与えられたユーザー、リクエスト、材料でレシピを作成します。
- このコードはcsvRecord,userService,recipeService,and ingredientsが適切に初期化され、周囲のコードでアクセス可能であることを仮定しています。
レシピ検索のコード
レシピ検索のUI
<div class="my-3">
<h2 class="text-center">Recipes</h2>
</p>
<form method="get" th:action="@{/recipes}">
<input name="keyword" placeholder="Find by recipe name" size="30" th:value="${keyword}" type="text">
<input name="keywordIngredient" placeholder="Find by ingredient" size="30" th:value="${keywordIngredient}" type="text">
<button class="btn btn-info" type="submit">Search</button>
<a th:href="@{/recipes}" class="btn btn-info">Reset</a>
</form>
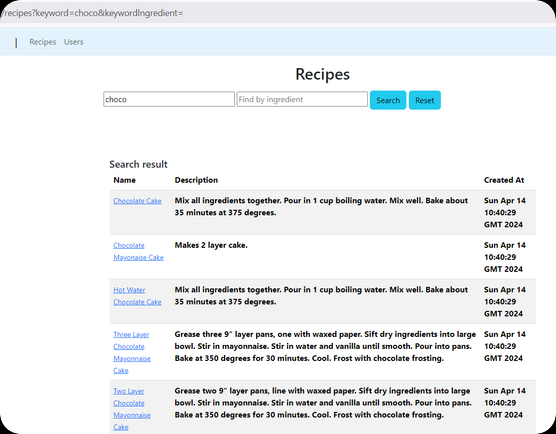
</div>このHTMLコードでは、2つの入力欄と2つのボタンがあるフォームを示しています。フォームは get メソッドを使用し、送信されると /recipes に移動する。ボタンをクリックすると、/recipesに情報を求めるメッセージが送信されます。 最初のボックスにはレシピ名のようなキーワードを入力します。入力するスペースがあり、入力したものが${keyword}というものに接続されます。つまり、何かを入力すると、そのキーワードが検索されます。 番目のボックスは食材を入力するためのものです。成分を入力することができ、それは${keywordIngredient}というものに接続されている。最初のボタンはsubmitボタンです。クリックするとフォームが送信されます。
<div th:if="${recipes.size() > 0}" class="container">
<h5 class="m-0 font-weight-bold">Search result</h6>
<table class="table table-hover table-responsive-xl table-striped">
<thead class="thead-light">
<tr>
<th scope="col">Name</th>
<th scope="col">Description</th>
<th scope="col">Created At</th>
</tr>
</thead>
<tbody class="table-group-divider">
<tr th:each="recipe : ${recipes}">
<td>
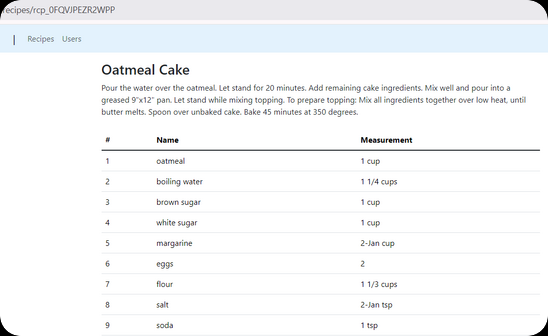
<a class="small" th:href="@{/recipes/{id}(id=${recipe.id})}" th:text="${recipe.name}"></a>
</td>
<th scope="row">[[${recipe.description}]]</th>
<th id="createdAt" scope="row">[[${recipe.createdAt}]]</th>
</tr>
</tbody>
</table>
</div>このコードはレシピ検索結果をウェブページに表示するためのパターンのようなものです。まず、表示するレシピがあるかどうかをチェックします。もしあれば、テーブルにきれいに並べます。テーブルの各行にはレシピの名前、内容、いつ作られたかが書かれています。th:each`の部分はレシピのリストを通り、それぞれのレシピの情報を行に表示します。
レシピのウェブコントローラーを検索する
@Controller
@RequestMapping("/recipes")
@RequiredArgsConstructor
public class RecipesController {
  private final RecipeService recipeService;

  @GetMapping
  String recipes(Model model, String keyword, String keywordIngredient) {
      List<recipe> recipes = recipeService.fetchAll(keyword, keywordIngredient);
      model.addAttribute("recipes", recipes);
      if (keywordIngredient != null && !keywordIngredient.isBlank()) {
          model.addAttribute("keywordIngredient", keywordIngredient);
      } else {
          model.addAttribute("keyword", keyword);
      }
      return "recipes";
  }
}</recipe>
RecipesController は検索フォームから送信されたデータを受け取ります。その後、データベースから全てのレシピを取得し、オプションで keyword や keywordIngredient でフィルタリングします。
レシピ検索のサービスレイヤー
public List<recipe> fetchAll(String searchRecipe, String searchIngredient) {
        List</recipe><recipe> recipes = new ArrayList<>(0);
        try {
            if (searchIngredient != null && !searchIngredient.isBlank()) {
                log.info("Search by ingredient: {}", searchIngredient.toLowerCase());
                Query<ingredient> queryIngredient = ingredientCollection.query(
                        "SELECT * FROM " + AppConstant.INGREDIENTS_CONTAINER + " WHERE LOWER(name) LIKE '%"
                                + searchIngredient.toLowerCase() + "%'",
                        Ingredient.class);
                RowSet</ingredient><ingredient> rowIngredientSet = queryIngredient.fetch();
                while (rowIngredientSet.hasNext()) {
                    Recipe recipe = fetchOne(rowIngredientSet.next().getRecipeId());
                    if (recipe != null) {
                        recipes.add(recipe);
                    }
                }
                return recipes;
            }

            String tql = "SELECT * ";
            if (searchRecipe != null && !searchRecipe.isBlank()) {
                log.info("Search by recipe:{}", searchRecipe.toLowerCase());
                tql = "SELECT * FROM " + AppConstant.RECIPES_CONTAINER + " WHERE LOWER(name) LIKE '%"
                        + searchRecipe.toLowerCase() + "%'";
            }

            Query<recipe> query = recipeCollection.query(tql, Recipe.class);
            RowSet</recipe><recipe> rowSet = query.fetch();
            while (rowSet.hasNext()) {
                recipes.add(rowSet.next());
            }
        } catch (GSException e) {
            log.error("Error search recipes", e);
        }
        return recipes;
    }</recipe></ingredient></recipe>
このコードでは、fetchAllという関数を定義している。この関数はsearchRecipeとsearchIngredientの2つを入力として受け取ります。まず、searchIngredientの部分に何か入力されているかどうかをチェックします。もし入力されていれば、そのフィールドに入力されたものと一致する食材を検索します(大文字小文字は無視されるので、”apple “と “Apple “は同じになります)。そして、その材料を使ったレシピを探し、リストに追加します。searchIngredientに何も入力しなかった場合は、代わりにsearchRecipeの部分をチェックします。ここでは、レシピ名フィールドに入力されたものと一致するレシピを検索します(ここでも大文字小文字は無視されます)。検索されたレシピはリストに追加されます。検索中に何か問題が発生した場合、関数はエラーについてのメッセージを書きます。最後に、関数は見つかったレシピのリストを返します(検索に一致するものがない場合は空になるかもしれません)。
Docker Composeを使ったプロジェクトの実行
プロジェクトを立ち上げるために、一般的なコンテナエンジンである Docker を利用します。以下のコマンドで docker イメージをビルドします:
docker compose -f docker-compose-dev.yml buildアプリを実行します:
docker compose -f docker-compose-dev.yml upウェブサイトの準備完了 http://localhost:8080
結論
このブログポストでは、動的なレシピ検索プラットフォームを作成する手順を探りました。Webアプリケーションのための強力なフレームワークであるSpring BootとGridDBがどのように組み合わされ、ユーザーフレンドリーな検索体験を生み出すことができるかを見てきました。
これはほんの始まりに過ぎず、このプラットフォームをさらに拡張することができます。ユーザーアカウント、レシピの評価やレビューのような機能を追加したり、外部APIと統合して栄養情報やレシピ画像を表示することもできます。 ウェブアプリケーションのコード全体はGithub.
ブログの内容について疑問や質問がある場合は Q&A サイトである Stack Overflow に質問を投稿しましょう。 GridDB 開発者やエンジニアから速やかな回答が得られるようにするためにも "griddb" タグをつけることをお忘れなく。 https://stackoverflow.com/questions/ask?tags=griddb