はじめに
今回は、TensorFlowJSとGridDBを使ってモデルを学習し、赤ワインの品質を予測します。このチュートリアルでは、以下のNodeJS用ライブラリを使用します。
- TensorflowJS – モデルのトレーニングに使用します。
- DanfoJS – DataFrameの操作に使用します。
記事の全コードはこちら をご覧ください。
データサイエンスやMLの実験を容易にするためにはNode Notebooksを使った作業が便利です。Visual Studio CodeはNode Notebooksをサポートする素晴らしいエディタなので、この記事ではそれを使用することにします。注: Danfo JS と Tensorflow JS は最低でもnodeのバージョン 12 が必要で、griddb はnodeのバージョン 10 で動きます。
const dfd = require("danfojs-node")
var fs     = require('fs');
const tf = dfd.tensorflow
const tfvis = require('@tensorflow/tfjs-vis')使用するデータセットは、This Kaggle Datasetのものを使用する予定です。
まずは、データセットをCSVで読み込み、GridDBに挿入するところから始めます。
GridDBにデータをロードし、GridDBからデータをフェッチする
まず、GridDB サーバに接続します。同じマシン(localhost)上で動作させています。
var griddb = require('griddb_node');

const createCsvWriter = require('csv-writer').createObjectCsvWriter;
const csvWriter = createCsvWriter({
  path: 'out.csv',
  header: [
    {id: "fixed acidity", title:"fixed acidity"},
    {id: "volatile acidity", title:"volatile acidity"},
    {id: "citric acid", title:"citric acid"},
    {id: "residual sugar", title:"residual sugar"},
    {id: "chlorides", title:"chlorides"},
    {id: "free sulfur dioxide", title:"free sulfur dioxide"},
    {id: "total sulfur dioxide" , title:"total sulfur dioxide"},
    {id: "density", title:"density"},
    {id: "pH", title:"pH"},
    {id: "sulphates", title:"sulphates"},
    {id: "alcohol", title:"alcohol"},
    {id: "quality", title:"quality"}
  ]
});

const factory = griddb.StoreFactory.getInstance();
const store = factory.getStore({
    "host": '239.0.0.1',
    "port": 31999,
    "clusterName": "defaultCluster",
    "username": "admin",
    "password": "admin"
});
// For connecting to the GridDB Server we have to make containers and specify the schema.
const conInfo = new griddb.ContainerInfo({
    'name': "redwinequality",
    'columnInfoList': [
      ["name", griddb.Type.STRING],
      ["fixedacidity", griddb.Type.DOUBLE],
      ["volatileacidity", griddb.Type.DOUBLE],
      ["citricacid", griddb.Type.DOUBLE],
      ["residualsugar", griddb.Type.DOUBLE],
      ["chlorides", griddb.Type.DOUBLE],
      ["freesulfurdioxide", griddb.Type.INTEGER],
      ["totalsulfurdioxide", griddb.Type.INTEGER],
      ["density", griddb.Type.DOUBLE],
      ["pH", griddb.Type.DOUBLE],
      ["sulphates", griddb.Type.DOUBLE],
      ["alcohol", griddb.Type.DOUBLE],
      ["quality", griddb.Type.INTEGER],
    ],
    'type': griddb.ContainerType.COLLECTION, 'rowKey': true
});


// ////////////////////////////////////////////


const csv = require('csv-parser');

const fs = require('fs');
var lst = []
var lst2 = []
var i =0;
fs.createReadStream('./dataset/winequality-red.csv')
  .pipe(csv())
  .on('data', (row) => {
    lst.push(row);
  })
  .on('end', () => {

    var container;
    var idx = 0;

    for(let i=0;i<lst.length;i++){
        lst[i]["fixed acidity"] = parseFloat(lst[i]["fixed acidity"])

        lst[i]['volatile acidity'] = parseFloat(lst[i]["volatile acidity"])
        lst[i]['citric acid'] = parseFloat(lst[i]["citric acid"])
        lst[i]['residual sugar'] = parseFloat(lst[i]["residual sugar"])
        lst[i]['chlorides'] = parseFloat(lst[i]["chlorides"])
        lst[i]['free sulfur dioxide'] = parseInt(lst[i]["free sulfur dioxide"])
        lst[i]['total sulfur dioxide'] = parseInt(lst[i]["total sulfur dioxide"])
        lst[i]['density'] = parseFloat(lst[i]["density"])
        lst[i]['pH'] = parseFloat(lst[i]["pH"])
        lst[i]['sulphates'] = parseFloat(lst[i]["sulphates"])
        lst[i]['alcohol'] = parseFloat(lst[i]["alcohol"])
        lst[i]['quality'] = parseFloat(lst[i]["quality"])


        console.log(parseFloat(lst[i]["fixed acidity"]))
    store.putContainer(conInfo, false)
        .then(cont => {
            container = cont;
            return container.createIndex({ 'columnName': 'name', 'indexType': griddb.IndexType.DEFAULT });
        })
        .then(() => {
            idx++;
            container.setAutoCommit(false);
            return container.put([String(idx), lst[i]['fixed acidity'],lst[i]["volatile acidity"],lst[i]["citric acid"],lst[i]["residual sugar"],lst[i]["chlorides"],lst[i]["free sulfur dioxide"],lst[i]["total sulfur dioxide"],lst[i]["density"],lst[i]["pH"],lst[i]["sulphates"],lst[i]["alcohol"],lst[i]["quality"]]);
        })
        .then(() => {
            return container.commit();
        })

        .catch(err => {
            if (err.constructor.name == "GSException") {
                for (var i = 0; i < err.getErrorStackSize(); i++) {
                    console.log("[", i, "]");
                    console.log(err.getErrorCode(i));
                    console.log(err.getMessage(i));
                }
            } else {
                console.log(err);
            }
        });
    }
    store.getContainer("redwinequality")
    .then(ts => {
        container = ts;
      query = container.query("select *")
      return query.fetch();
  })
  .then(rs => {
      while (rs.hasNext()) {
          let rsNext = rs.next();
          lst2.push(

                {
                    'fixed acidity': rsNext[1],
                    "volatile acidity": rsNext[2],
                    "citric acid": rsNext[3],
                    "residual sugar": rsNext[4],
                    "chlorides": rsNext[5],
                    "free sulfur dioxide": rsNext[6],
                    "total sulfur dioxide": rsNext[7],
                    "density": rsNext[8],
                    "pH": rsNext[9],
                    "sulphates": rsNext[10],
                    "alcohol": rsNext[11],
                    "quality": rsNext[12]

                }


          );

      }


        csvWriter
        .writeRecords(lst2)
        .then(()=> console.log('The CSV file was written successfully'));


      return
  }).catch(err => {
      if (err.constructor.name == "GSException") {
          for (var i = 0; i < err.getErrorStackSize(); i++) {
              console.log("[", i, "]");
              console.log(err.getErrorCode(i));
              console.log(err.getMessage(i));
          }
      } else {
          console.log(err);
      }
  });

  });
そして、同じコードでGridDBからデータを取得し、csvファイルに書き込んでいます。このようにした理由は、プロジェクトファイルはnodeのバージョン12で動作し、GridDBのコードはnodeのバージョン10で動作するからです。
let df = await dfd.readCSV("./out.csv")次に、node notebookでcsvファイルを読み込み、その上で探索的データ解析を行います。その後、前処理とモデリングに移行することができます。
GridDBから取得したデータをdfという変数に格納し、データフレームを作成しました。
探索的データ解析
EDAの段階では、データがどのようなものかを把握するために、データをチェックします。一番簡単なのは、何行あって、何列あって、それぞれの列のデータ型は何なのかを確認することです。
データフレームの形状を確認します。1599行と12列のデータであることがわかります。
console.log(df.shape)

//  Output
// [ 1599, 12 ]
では、列を確認します。それぞれの行に異なる数量が与えられています。そして、目標にする品質変数です。
出力
[‘fixed acidity’,’volatile acidity’,’citric acid’,’residual sugar’,’chlorides’,’free sulfur dioxide’, ‘total sulfur dioxide’,’density’,’pH’,’sulphates’,’alcohol’,’quality’]
danfoJSのprint関数は最大10行の印刷が可能なので、列型の印刷は2回に分けて行わなければなりません。
df.loc({columns:['fixed acidity',
'volatile acidity',
'citric acid',
'residual sugar',
'chlorides',
'free sulfur dioxide','total sulfur dioxide',
'density']}).ctypes.print()

//  Output
// ╔══════════════════════╤═════════╗
// ║ fixed acidity        │ float32 ║
// ╟──────────────────────┼─────────╢
// ║ volatile acidity     │ float32 ║
// ╟──────────────────────┼─────────╢
// ║ citric acid          │ float32 ║
// ╟──────────────────────┼─────────╢
// ║ residual sugar       │ float32 ║
// ╟──────────────────────┼─────────╢
// ║ chlorides            │ float32 ║
// ╟──────────────────────┼─────────╢
// ║ free sulfur dioxide  │ int32   ║
// ╟──────────────────────┼─────────╢
// ║ total sulfur dioxide │ int32   ║
// ╟──────────────────────┼─────────╢
// ║ density              │ float32 ║
// ╚══════════════════════╧═════════╝
df.loc({columns:['pH',
'sulphates',
'alcohol',
'quality']}).ctypes.print()
// Output
// ╔═══════════╤═════════╗
// ║ pH │ float32 ║
// ╟───────────┼─────────╢
// ║ sulphates │ float32 ║
// ╟───────────┼─────────╢
// ║ alcohol │ float32 ║
// ╟───────────┼─────────╢
// ║ quality │ int32 ║
// ╚═══════════╧═════════╝ここで、すべての列の統計の要約を見て、その最小値、最大値、平均値、標準偏差などを確認します。
df.loc({columns:['fixed acidity',
'volatile acidity',
'citric acid',
'residual sugar',
'chlorides',
'free sulfur dioxide','total sulfur dioxide',
'density']}).describe().round(2).print()

// Output
// ╔════════════╤═══════════════════╤═══════════════════╤═══════════════════╤═══════════════════╤═══════════════════╤═══════════════════╤═══════════════════╤═══════════════════╗
// ║            │ fixed acidity     │ volatile acidity  │ citric acid       │ residual sugar    │ chlorides         │ free sulfur dio…  │ total sulfur di…  │ density           ║
// ╟────────────┼───────────────────┼───────────────────┼───────────────────┼───────────────────┼───────────────────┼───────────────────┼───────────────────┼───────────────────╢
// ║ count      │ 1599              │ 1599              │ 1599              │ 1599              │ 1599              │ 1599              │ 1599              │ 1599              ║
// ╟────────────┼───────────────────┼───────────────────┼───────────────────┼───────────────────┼───────────────────┼───────────────────┼───────────────────┼───────────────────╢
// ║ mean       │ 8.32              │ 0.53              │ 0.27              │ 2.54              │ 0.09              │ 15.87             │ 46.47             │ 1                 ║
// ╟────────────┼───────────────────┼───────────────────┼───────────────────┼───────────────────┼───────────────────┼───────────────────┼───────────────────┼───────────────────╢
// ║ std        │ 1.74              │ 0.18              │ 0.19              │ 1.41              │ 0.05              │ 10.46             │ 32.9              │ 0                 ║
// ╟────────────┼───────────────────┼───────────────────┼───────────────────┼───────────────────┼───────────────────┼───────────────────┼───────────────────┼───────────────────╢
// ║ min        │ 4.6               │ 0.12              │ 0                 │ 0.9               │ 0.01              │ 1                 │ 6                 │ 0.99              ║
// ╟────────────┼───────────────────┼───────────────────┼───────────────────┼───────────────────┼───────────────────┼───────────────────┼───────────────────┼───────────────────╢
// ║ median     │ 7.9               │ 0.52              │ 0.26              │ 2.2               │ 0.08              │ 14                │ 38                │ 1                 ║
// ╟────────────┼───────────────────┼───────────────────┼───────────────────┼───────────────────┼───────────────────┼───────────────────┼───────────────────┼───────────────────╢
// ║ max        │ 15.9              │ 1.58              │ 1                 │ 15.5              │ 0.61              │ 72                │ 289               │ 1                 ║
// ╟────────────┼───────────────────┼───────────────────┼───────────────────┼───────────────────┼───────────────────┼───────────────────┼───────────────────┼───────────────────╢
// ║ variance   │ 3.03              │ 0.03              │ 0.04              │ 1.99              │ 0                 │ 109.41            │ 1082.1            │ 0                 ║
// ╚════════════╧═══════════════════╧═══════════════════╧═══════════════════╧═══════════════════╧═══════════════════╧═══════════════════╧═══════════════════╧═══════════════════╝
df.loc({columns:['pH','sulphates','alcohol','quality']}).describe().round(2).print()
// Output
// ╔════════════╤═══════════════════╤═══════════════════╤═══════════════════╤═══════════════════╗
// ║ │ pH │ sulphates │ alcohol │ quality ║
// ╟────────────┼───────────────────┼───────────────────┼───────────────────┼───────────────────╢
// ║ count │ 1599 │ 1599 │ 1599 │ 1599 ║
// ╟────────────┼───────────────────┼───────────────────┼───────────────────┼───────────────────╢
// ║ mean │ 3.31 │ 0.66 │ 10.42 │ 5.64 ║
// ╟────────────┼───────────────────┼───────────────────┼───────────────────┼───────────────────╢
// ║ std │ 0.15 │ 0.17 │ 1.07 │ 0.81 ║
// ╟────────────┼───────────────────┼───────────────────┼───────────────────┼───────────────────╢
// ║ min │ 2.74 │ 0.33 │ 8.4 │ 3 ║
// ╟────────────┼───────────────────┼───────────────────┼───────────────────┼───────────────────╢
// ║ median │ 3.31 │ 0.62 │ 10.2 │ 6 ║
// ╟────────────┼───────────────────┼───────────────────┼───────────────────┼───────────────────╢
// ║ max │ 4.01 │ 2 │ 14.9 │ 8 ║
// ╟────────────┼───────────────────┼───────────────────┼───────────────────┼───────────────────╢
// ║ variance │ 0.02 │ 0.03 │ 1.14 │ 0.65 ║
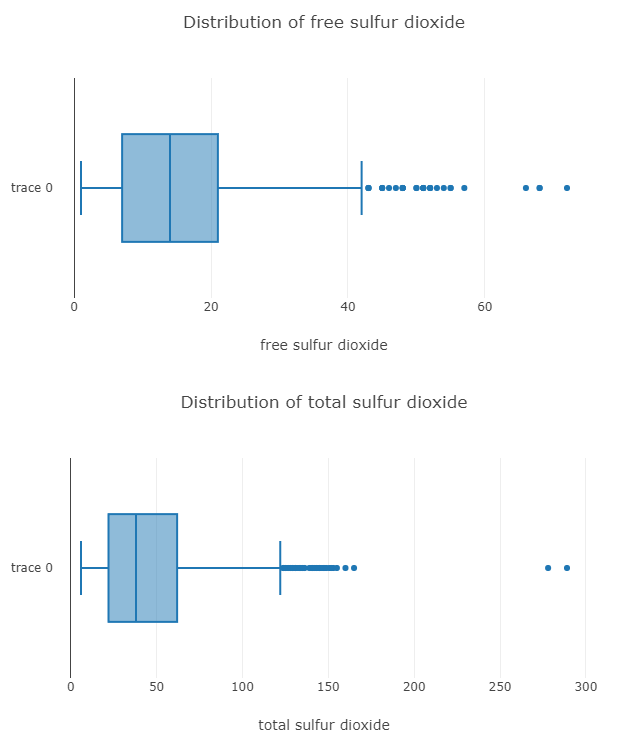
// ╚════════════╧═══════════════════╧═══════════════════╧═══════════════════╧═══════════════════╝さて、分布を可視化するために、箱ひげ図とヒストグラムを使用します。
## Distribution of Column Values
const { Plotly } = require('node-kernel');
let cols = df.columns
for(let i = 0; i < cols.length; i++)
{
    let data = [{
        x: df[cols[i]].values,
        type: 'box'}];
    let layout = {
        height: 400,
        width: 700,
        title: 'Distribution of '+cols[i],
        xaxis: {title: cols[i]}};
    // There is no HTML element named `myDiv`, hence the plot is displayed below.
    Plotly.newPlot('myDiv', data, layout);
}
そして、ここに2つの列の箱ひげ図があります。
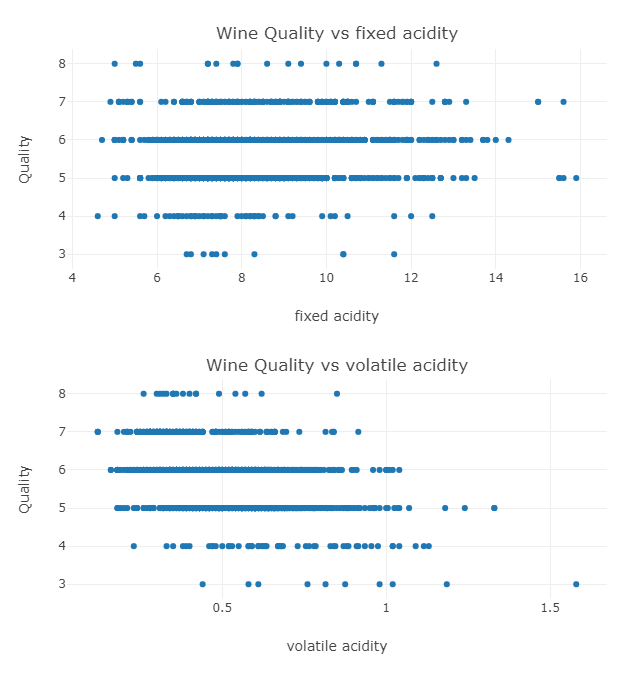
品質と他のカラムの散布図をプロットします。
## Scatter Plot between Wine Quality and Column
let cols = [...cols]
cols.pop('quality')
for(let i = 0; i < cols.length; i++)
{
    let data = [{
        x: df[cols[i]].values,
        y: df['quality'].values,
        type: 'scatter',
        mode: 'markers'}];
    let layout = {
        height: 400,
        width: 700,
        title: 'Red Wine Quality vs '+cols[i],
        xaxis: {title: cols[i]},
        yaxis: {title: 'Quality'}};
    // There is no HTML element named `myDiv`, hence the plot is displayed below.
    Plotly.newPlot('myDiv', data, layout);
}
2つの列の例に対するプロットは以下の通りです。
プロットを見ると、これらの列はワインの品質を予測するために使用することができ、間違いなくモデルを作ることができると言えるでしょう。
データの前処理
データはほとんど整理されているので、NULL値を削除するだけです。
df_drop = df.dropNa({ axis: 0 }).loc({columns:['quality','density']})モデル
入力層と出力層を1つずつ持つ単純なニューラルネットワークを作成します。
function createModel() {
    // Create a sequential model
    const model = tf.sequential();

    // Add a single input layer
    model.add(tf.layers.dense({inputShape: [1], units: 10, useBias: true}));

    // Add an output layer
    model.add(tf.layers.dense({units: 1, useBias: true}));

    return model;
}
// Create the model
const model = createModel();
tfvis.show.modelSummary({name: 'Model Summary'}, model);
Model Summaryには、層と各層のニューロン数が表示されます。
モデルを作成したので、次にデータをテンソル形式に変換して、Tensorflowがモデルを学習できるようにする必要があります。
function convertToTensor(data) {
    // Wrapping these calculations in a tidy will dispose any
    // intermediate tensors.

    return tf.tidy(() => {
      // Step 1. Shuffle the data
      tf.util.shuffle(data);

      // Step 2. Convert data to Tensor
      const inputs = data.map(d => d[0]);
      const labels = data.map(d => d[1]);
      // console.log(inputs);
      // console.log(data);

      const inputTensor = tf.tensor2d(inputs, [inputs.length, 1]);
      const labelTensor = tf.tensor2d(labels, [labels.length, 1]);

      //Step 3. Normalize the data to the range 0 - 1 using min-max scaling
      const inputMax = inputTensor.max();
      const inputMin = inputTensor.min();
      const labelMax = labelTensor.max();
      const labelMin = labelTensor.min();

      const normalizedInputs = inputTensor.sub(inputMin).div(inputMax.sub(inputMin));
      const normalizedLabels = labelTensor.sub(labelMin).div(labelMax.sub(labelMin));

      return {
        inputs: normalizedInputs,
        labels: normalizedLabels,
        // Return the min/max bounds so we can use them later.
        inputMax,
        inputMin,
        labelMax,
        labelMin,
      }
    });


}
そして、モデルがどのように学習するかを指定する関数を作成します。ここでは、損失を予測値と実際の品質値の間の平均二乗誤差とします。
async function trainModel(model, inputs, labels) {
  // Prepare the model for training.
  model.compile({
    optimizer: "adam",
    loss: tf.losses.meanSquaredError,
    metrics: ['mse'],
  });

  const batchSize = 2;
  const epochs = 5;

  await model.fit(inputs, labels, {
    batchSize,
    epochs,
    shuffle: true,
    callbacks: tfvis.show.fitCallbacks(
      { name: 'Training Performance' },
      ['loss', 'mse'],
      { height: 200, callbacks: ['onEpochEnd'] }
    )
  });
  return model;
}
最後に、モデルを学習させます。デモのため、エポック数は5のみに設定しました。これはモデルやデータによって設定する必要があります。また、データセットの最初の100行はテスト用に残しておきます。
const tensorData = convertToTensor(df_drop.values)
const {inputs, labels} = tensorData;
// Train the model
let model = await trainModel(model, inputs.slice([100],[-1]), labels.slice([100],[-1]));
console.log('Done Training');

// Output
// Epoch 1 / 5
// Epoch 2 / 5
// Epoch 3 / 5
// Epoch 4 / 5
// Epoch 5 / 5
// Done Training


// 11819ms 7392us/step - loss=0.0450 mse=0.0450

// 10833ms 6775us/step - loss=0.0190 mse=0.0190

// 10878ms 6803us/step - loss=0.0192 mse=0.0192

// 10642ms 6655us/step - loss=0.0192 mse=0.0192

// 11025ms 6895us/step - loss=0.0193 mse=0.0193
モデルの学習が完了したので、モデルを評価することができます。評価にはevaluate関数を使用し、テストセット(学習時に残った最初の100行のデータセット)でモデルをテストすることができます。
model.evaluate(inputs.slice([0],[100]), labels.slice([0],[100]))[0].print() // Loss
model.evaluate(inputs.slice([0],[100]), labels.slice([0],[100]))[1].print() // Metric

// Output
// Tensor
// 0.018184516578912735今回は、TensorflowJSとGridDBを組み合わせてモデルを学習し、予測を行う方法を学びました。
ブログの内容について疑問や質問がある場合は Q&A サイトである Stack Overflow に質問を投稿しましょう。 GridDB 開発者やエンジニアから速やかな回答が得られるようにするためにも "griddb" タグをつけることをお忘れなく。 https://stackoverflow.com/questions/ask?tags=griddb


