Imagine trying to keep track of all your passwords. It’s a daunting task, isn’t it? With passwords required for social media, online shopping, e-wallet apps, and various computer tools, it’s easy to lose count. Forgetting a password can be frustrating, and having to create a new one every time can be a hassle.
Fortunately, there’s a better and safer way to log in to websites: One-Time Tokens. Unlike traditional passwords, which are used repeatedly, One-Time Tokens provide a unique code that can only be used once. This token is designed to be used within a short timeframe, and once it’s used or expires, it becomes invalid. It’s like a secure, self-destructing message.
So, why are One-Time Tokens a better option than traditional passwords? Here are a few key benefits:
-
Enhanced Security: By reducing our reliance on passwords, we minimize the risk of password-related vulnerabilities. This means no more weak passwords, no more password reuse across different sites, and even if someone intercepts a token, it’s likely to be expired and useless.
-
Improve User Experience: Let’s face it, remembering passwords can be a pain. One-Time Tokens simplify the process, allowing users to click a link or enter a short code, making login a smoother experience.
-
Fewer Password Reset: With One-Time Tokens, the need for password resets decreases significantly. Since users don’t have to constantly remember and re-enter passwords, there’s less to forget in the first place.
Let’s dive into the world of One-Time Tokens login with Spring Security! We will explore what they are and how we can actually implement them.
One-Time Token Login: The Flow
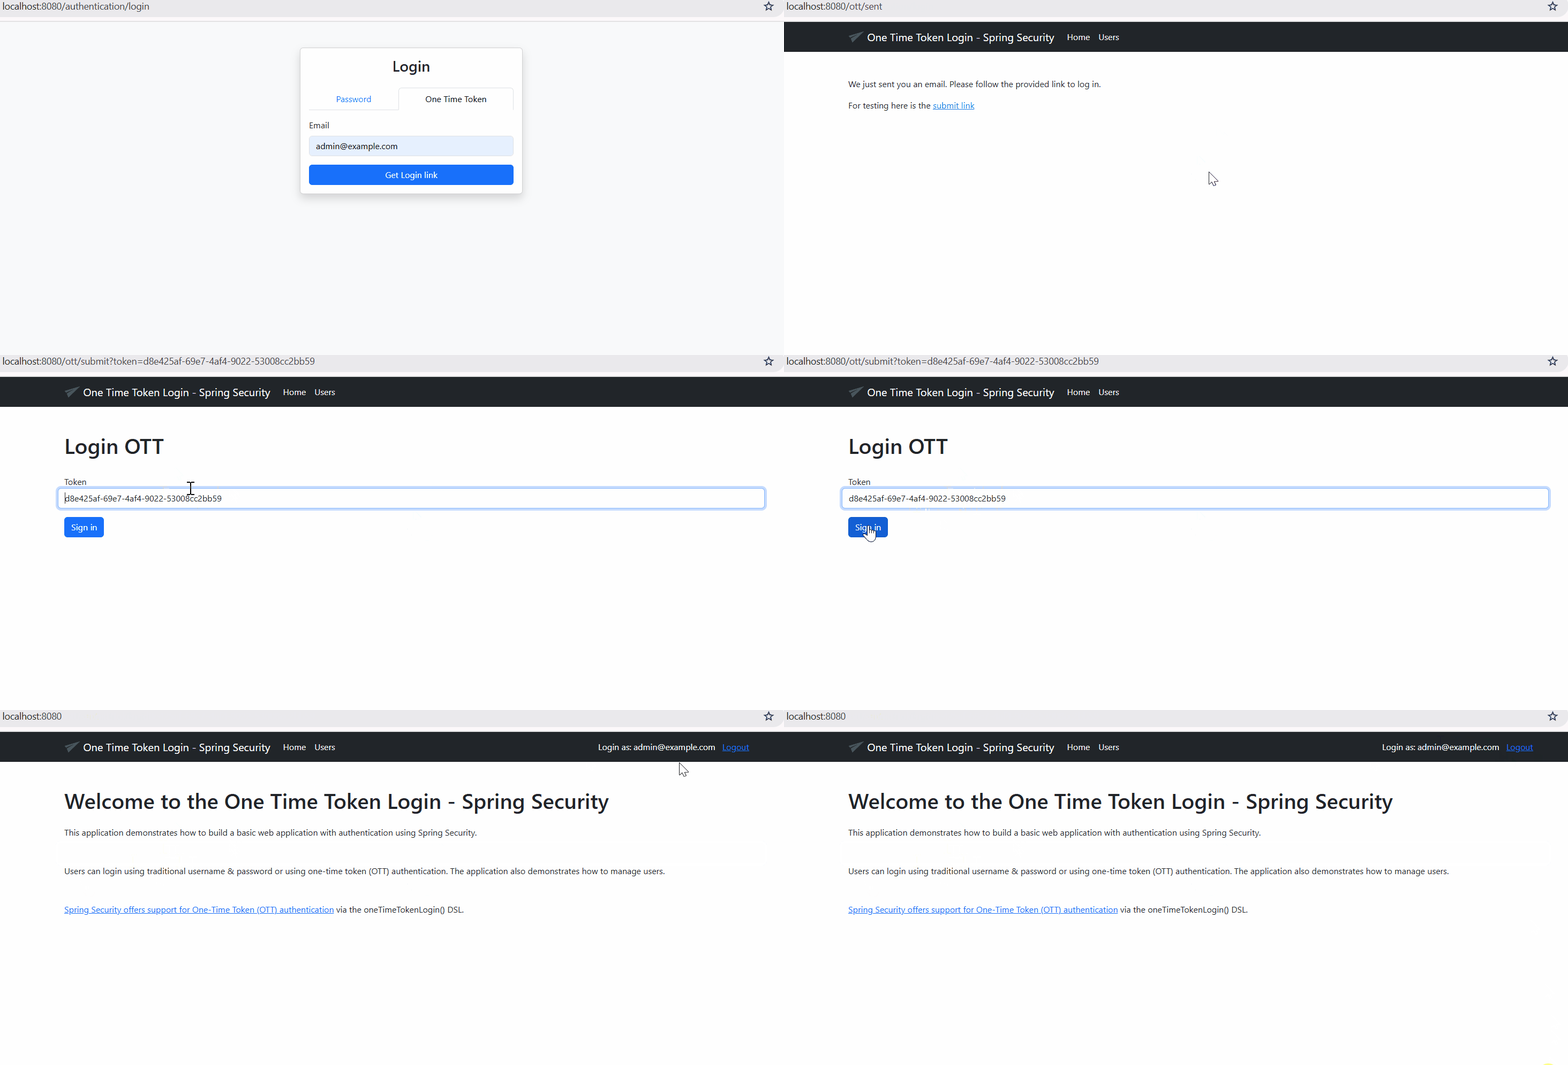
- You navigate to the login page and enter your email address to start the process.
- The application generates a unique, one-time token. This token is a long, random string that’s impossible to guess.
- The system sends this token to you via email, SMS, or WhatsApp.
- You receive the token and enter it on the login page. Often, you’ll just click a magic link in the message that contains the token.
- The web application receives the token and checks:
- Is the token valid? (Does it match one we generated?)
- Has it expired? (One-time tokens have a short lifespan for security)
- Has it already been used? (Remember, it’s one-time use only!)
- If everything checks out, you’re logged in. The web application establishes a session for you.
Let’s Build This Thing!
Maven
To enable the One-Time Token feature, we need to include the spring-boot-starter-security and spring-boot-starter-web dependencies.
<dependencies>
        <dependency>
            <groupId>org.springframework.boot</groupId>
            <artifactId>spring-boot-starter-web</artifactId>
        </dependency>
        <dependency>
            <groupId>org.springframework.boot</groupId>
            <artifactId>spring-boot-starter-security</artifactId>
        </dependency>
</dependencies>
Spring Security Configuration
Next, we configure the Spring Security and enable the form-login and One-Time Token Login:
@Configuration
@EnableWebSecurity
public class SecurityConfig {

  @Bean
  public SecurityFilterChain securityFilterChain(
      HttpSecurity http,
      SendLinkOneTimeTokenGenerationSuccessHandler successHandler,
      CustomOneTimeTokenService customOneTimeTokenService)
      throws Exception {
    AuthenticationSuccessHandler ottLoginsuccessHandler =
        (request, response, authentication) -> response.sendRedirect("/");

    http.csrf(Customizer.withDefaults())
        .authorizeHttpRequests(
            authorize ->
                authorize
                    .requestMatchers("/error", "/", "/images/**", "/js/*.js", "/css/*.css")
                    .permitAll()
                    .requestMatchers(new AntPathRequestMatcher("/authentication/login"))
                    .permitAll()
                    .requestMatchers(new AntPathRequestMatcher("/logout"))
                    .permitAll()
                    .requestMatchers(new AntPathRequestMatcher("/webjars/**"))
                    .permitAll()
                    .requestMatchers(new AntPathRequestMatcher("/ott/sent"))
                    .permitAll()
                    .requestMatchers(new AntPathRequestMatcher("/ott/submit"))
                    .permitAll()
                    .anyRequest()
                    .authenticated())
        .formLogin(
            form ->
                form.loginPage("/authentication/login")
                    .loginProcessingUrl("/login")
                    .failureUrl("/authentication/login?failed")
                    .defaultSuccessUrl("/")
                    .permitAll())
        .headers(
            httpSecurityHeaders -> httpSecurityHeaders.frameOptions(FrameOptionsConfig::disable))
        .logout(Customizer.withDefaults())
        .oneTimeTokenLogin(
            configurer ->
                configurer
                    .tokenGenerationSuccessHandler(successHandler)
                    .tokenService(customOneTimeTokenService)
                    .showDefaultSubmitPage(false)
                    .authenticationSuccessHandler(ottLoginsuccessHandler));

    return http.build();
  }
}@EnableWebSecurityannotation: enable Spring Security’s web security support and provide the Spring MVC integration.SecurityFilterChainbean to add custom filter in Spring Security Context.- Configures
authorizeHttpRequestsdefines which URL path should be secured and which should not. - Configures
formLogin()to customize the form based authentication. ConfiguresloginPage()for redirecting to/authentication/loginif authentication is required. ConfiguresloginProcessingUrlto validate the submitted credentials.failureUrlspecify the URL to send users if authentication fails. - Configures
headers(). We enable all the default headers except the X-Frame-Options headers. .logout(Customizer.withDefaults())provides logout support using default settings. The default is that accessing the URL “/logout” will log the user out by invalidating the HTTP Session, cleaning up anyrememberMeauthentication that was configured, clearing theSecurityContextHolder, and then redirect to/login?success.
Enable One-Time Token Login support and customize it with oneTimeTokenLogin() method :
– tokenGenerationSuccessHandler : Specifies strategy to be used to handle generated one-time tokens. We will create a custom handler that implements OneTimeTokenGenerationSuccessHandler.
– tokenService : Configures the OneTimeTokenService used to generate and consume the OneTimeToken.
– showDefaultSubmitPage(false) : disable the default One-Time Token submit page.
– authenticationSuccessHandler : Specifies the AuthenticationSuccessHandler strategy used to handle a successful user authentication. For demo, we redirect user to the home page.
Custom OneTimeTokenGenerationSuccessHandler
Next, we need to implement a custom OneTimeTokenGenerationSuccessHandler to deliver the token to the end user.
@Component
public class SendLinkOneTimeTokenGenerationSuccessHandler
    implements OneTimeTokenGenerationSuccessHandler {

  private final OttEmailService emailService;
  private final FlashMapManager flashMapManager = new SessionFlashMapManager();

  public SendLinkOneTimeTokenGenerationSuccessHandler(OttEmailService emailService) {
    this.emailService = emailService;
  }

  @Override
  @SneakyThrows
  public void handle(
      HttpServletRequest request, HttpServletResponse response, OneTimeToken oneTimeToken)
      throws IOException, ServletException {
    UriComponentsBuilder builder =
        UriComponentsBuilder.fromUriString(UrlUtils.buildFullRequestUrl(request))
            .replacePath(request.getContextPath())
            .replaceQuery(null)
            .fragment(null)
            .path("/ott/submit")
            .queryParam("token", oneTimeToken.getTokenValue());
    String link = builder.toUriString();
    CompletableFuture.runAsync(() -> emailService.sendEmail(oneTimeToken.getUsername(), link));

    RedirectView redirectView = new RedirectView("/ott/sent");
    redirectView.setExposeModelAttributes(false);
    FlashMap flashMap = new FlashMap();
    flashMap.put("token", oneTimeToken.getTokenValue());
    flashMap.put("ottSubmitUrl", link);
    flashMapManager.saveOutputFlashMap(flashMap, request, response);
    redirectView.render(flashMap, request, response);
  }
}
This component will do a number of things:
- Generate the magic link containing the one-time token.
- Call
emailService.sendEmail()to send the email to the user with magic link. - For demo, we redirect user to the
/ott/sentpage.
Custom Success Page
Create a controller and an HTML template to handle this page. For demo purpose, we forward the token to the custom submit page.
@Controller
@RequestMapping("/ott")
public class OttController {
  @GetMapping("/sent")
  public String sent(Model model) {
    return "ott/sent";
  }

  @GetMapping("/submit")
  public String submit(Model model, @RequestParam("token") String token) {
    model.addAttribute("token", token);
    return "ott/submit";
  }
}
sent.html
<html xmlns_th="http://www.thymeleaf.org" xmlns_layout="http://www.ultraq.net.nz/thymeleaf/layout"
        layout_decorate="~{layout}">
    <head>
        <title>OTT Sent</title>
    </head>
    <body>
        <div layout_fragment="content">
            <p>We just sent you an email. Please follow the provided link to log in.</p>
            <p>For testing here is the <a th_href="${ottSubmitUrl}">submit link</a></p>
        </div>
    </body>
</html>
submit.html
<body>
    <div layout_fragment="content">
        <div class="d-flex flex-wrap mb-4">
            <h1 class="flex-grow-1">Login OTT</h1>
        </div>
        <form th_action="@{/login/ott}" method="post">
            <div class="row mb-3">
                <label for="token" class="form-check-label">Token</label>
                <input type="text" id="token" name="token" th_value="${token}" placeholder="Token" required="true"
                    autofocus="autofocus" class="form-control"/>
            </div>
            <button class="btn btn-primary" type="submit">Sign in</button>
        </form>
    </div>
</body>
Custom OneTimeTokenService
Next, create a custom implementation of OneTimeTokenService interface. By customizing it, we can have a custom expire time, adding more info into token, and implement custom token value.
@Service
public class CustomOneTimeTokenService implements OneTimeTokenService {
  private final Map<String, OneTimeToken> oneTimeTokens = new ConcurrentHashMap<>();

  private Clock clock = Clock.systemUTC();

  @Override
  @NonNull
  public OneTimeToken generate(GenerateOneTimeTokenRequest request) {
    String token = UUID.randomUUID().toString();
    Instant expiresAt = this.clock.instant().plus(5, ChronoUnit.MINUTES);

    OneTimeToken oneTimeToken = new DefaultOneTimeToken(token, request.getUsername(), expiresAt);
    oneTimeTokens.put(token, oneTimeToken);

    return oneTimeToken;
  }

  @Override
  @Nullable
  public OneTimeToken consume(OneTimeTokenAuthenticationToken authenticationToken) {
    log.info("Consume token: {}", authenticationToken.getTokenValue());
    OneTimeToken oneTimeToken = oneTimeTokens.remove(authenticationToken.getTokenValue());
    if (oneTimeToken == null || isExpired(oneTimeToken)) {
      return null;
    }
    return oneTimeToken;
  }

  private boolean isExpired(OneTimeToken oneTimeToken) {
    return this.clock.instant().isAfter(oneTimeToken.getExpiresAt());
  }
}
CustomOneTimeTokenService class responsible for:
- Generating the token and storing it. For demo, we use in memory store.
- Consuming the token, we validate the token expiration and delete the token from the store.
Retrieving Users
Create custom UserDetailsService implementation to load user-specific data.
@Service
@AllArgsConstructor
public class CustomUserDetailService implements UserDetailsService {

  private final UsersContainerClient usersContainerClient;

  @Override
  public UserDetails loadUserByUsername(String email) {
    UserRecord user = usersContainerClient.getUserByEmail(email);
    if (user == null) {
      throw new UsernameNotFoundException("User not found");
    }

    List<SimpleGrantedAuthority> authorities = new java.util.ArrayList<>();
    authorities.add(new SimpleGrantedAuthority("ROLE_USER"));

    if ("admin@example.com".equals(user.email())) {
      authorities.add(new SimpleGrantedAuthority("ROLE_ADMIN"));
    }

    return new org.springframework.security.core.userdetails.User(
        user.email(), user.password(), authorities);
  }
}
The user object is stored and fetched using the UsersContainerClient class, which will handle the interaction with GridDB Cloud.
@Service
public class UsersContainerClient {
  private static final String CONTAINER_NAME = "Users";
  private final RestClient restClient;
  private final String baseUrl;

  public UsersContainerClient(
      @Value("${griddb.base-url}") String baseUrl,
      @Value("${griddb.auth-token}") String authToken) {
    this.baseUrl = baseUrl;
    this.restClient =
        RestClient.builder()
            .baseUrl(this.baseUrl)
            .defaultHeader("Authorization", "Basic " + authToken)
            .defaultHeader("Content-Type", MediaType.APPLICATION_JSON_VALUE)
            .build();
  }

  private <T> T post(String uri, Object body, Class<T> responseType) {
    try {
      return restClient.post().uri(uri).body(body).retrieve().body(responseType);
    } catch (GridDbException e) {
      throw e;
    } catch (Exception e) {
      throw new GridDbException(
          "Failed to execute POST request", HttpStatusCode.valueOf(500), e.getMessage(), e);
    }
  }

  public UserRecord getUserByEmail(String email) {
    String statement =
        String.format("SELECT id, email, name, "password" FROM Users where email == '%s'", email);
    return getOneUser(statement);
  }

  private UserRecord getOneUser(String statement) {
    String type = "sql-select";
    GridDbCloudSQLSelectInput input = new GridDbCloudSQLSelectInput(type, statement);
    var response = post("/sql", List.of(input), GridDbCloudSQLOutPut[].class);
    log.info("Output: {}", response[0]);
    if (response[0].results().size() == 0) {
      return null;
    }
    UserRecord foundUser = null;
    for (List<String> row : response[0].results()) {
      if (row.size() < 4) {
        break;
      }
      foundUser = new UserRecord(row.get(0), row.get(1), row.get(2), row.get(3));
    }
    log.info("Found user: {}", foundUser);
    return foundUser;
  }
}

record GridDbCloudSQLSelectInput(String type, @JsonProperty("stmt") String statement) {}

record GridDbCloudSQLOutPut(
    @JsonProperty("columns") List<GDCColumnInfo> columns,
    @JsonProperty("results") List<List<String>> results,
@JsonProperty("responseSizeByte") long responseSizeByte) {}- To communicate with GridDB Cloud via HTTP requests, we create a Spring
RestClientinstance with HTTP basic authentication. - We
POSTthesql-selectquery and convert the response intoUserRecord
Demo
For demo, we have added demo users (admin@example.com, user@example.com) on application startup. Full code can be access on Github.
Conclusion
One-time tokens are a great leap forward in enhancing online security while keeping things user-friendly. Using frameworks like Spring Security can make it easier to implement these advanced security measures.
When using one-time tokens in production, keep these key factors in mind:
– Token Validity: Decide how long each token should stay active.
– Delivery Reliability: Ensure your token delivery method is dependable.
– Security: Make sure the token generation process is cryptographically secure.
– Storage Safety: Store tokens securely to prevent unauthorized access.
By addressing these aspects, you can create a robust and user-friendly security system.
If you have any questions about the blog, please create a Stack Overflow post here https://stackoverflow.com/questions/ask?tags=griddb .
Make sure that you use the “griddb” tag so our engineers can quickly reply to your questions.

