
In this blog, we will build an AI-powered resume-creation system that automates the tedious and time-consuming tasks involved in manual resume creation. By leveraging multi-agent AI systems, we will streamline the process of information gathering, and content writing to produce resumes with minimal human intervention.
Limitations of Manual Resume Processing
Inefficient Information Gathering
The manual process of collecting and organizing information is time-consuming and requires significant effort.
Inconsistent Formatting
Manual resume creation often leads to formatting inconsistencies. The process requires manual adjustments to maintain professional formatting standards, which can be error-prone and time-consuming.
Content Writing and Rewriting Challenges
The manual process requires significant effort in crafting and editing content. Writing compelling and well-structured content by hand is labor-intensive, requiring multiple revisions and edits.
Automating Resume Creation using AI
Creating a resume manually involves several steps:
- Information Gathering: Collecting and organizing your personal details, job history, skills, and education.
- Formatting: Ensuring the resume looks attractive and professional, often without clear guidelines.
- Content Writing: Crafting and refining content to make it concise, compelling, and relevant.
- Proofreading and Editing: Checking for errors and polishing the resume to a professional standard.
With the AI system, we can automate these steps using multi-agent systems. Each agent performs a specific task, such as extracting information, generating content, or formatting the resume. By coordinating these agents, we can create a fully automated resume creation system.
Running the Resume Creator
Before we dive into the technical details, you can run the resume creator system by following these steps:
1) Clone the repository:
git clone https://github.com/junwatu/resume-creator-multi-agent-ai.git2) Install the dependencies:
cd resume-creator-multi-agent-ai
cd apps
npm install
3) Create a .env file in the apps directory and add the following environment variables:
OPENAI_API_KEY=api-key-here
GRIDDB_WEBAPI_URL=
GRIDDB_USERNAME=
GRIDDB_PASSWORD=
VITE_APP_BASE_URL=http://localhost
VITE_PORT=3000
Please refer to the Prerequisites section for more details on obtaining the OpenAI API key and GridDB credentials.
4) Start the server:
npm run start5) Open your browser and go to http://localhost:3000 to access the resume creator system.
How it Works?
In this blog, we automate the information gathering and content writing for the resume, tasks that are usually manual and time-consuming.
This system diagram illustrates the resume creation process discussed in this blog, showcasing the collaboration between two main AI agents:
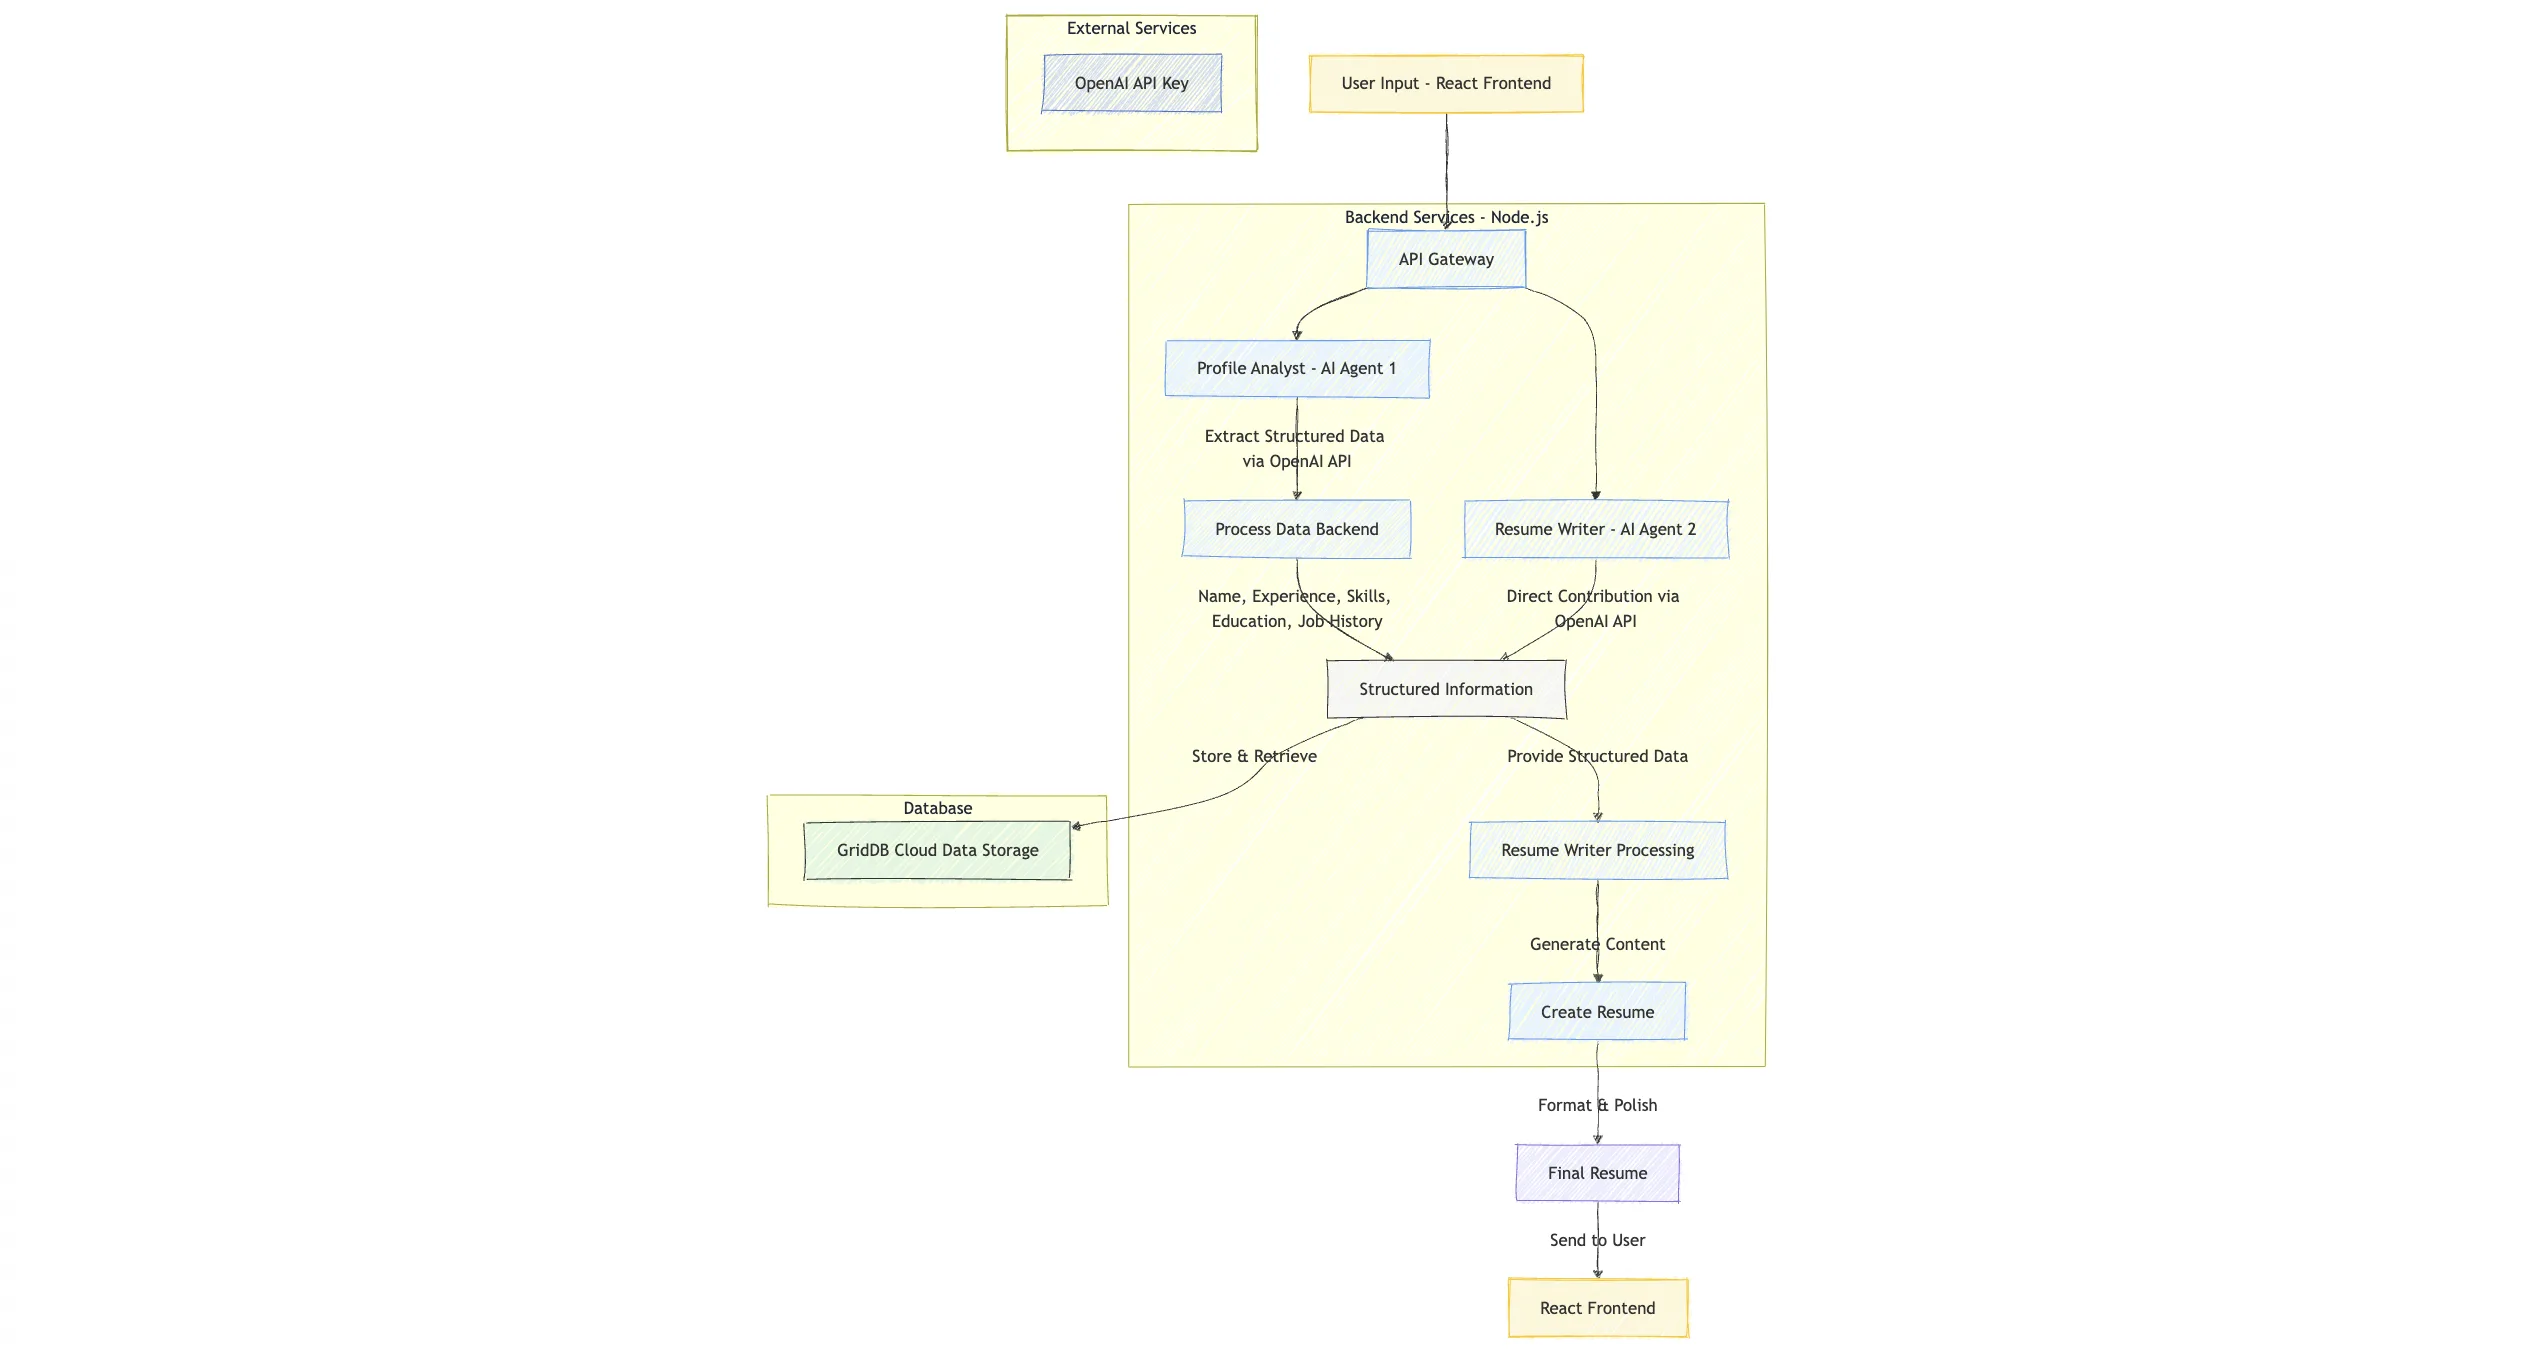
Here’s a brief description:
-
The system starts with User Input and requires an environment setup that includes Team Initialization and OpenAI API Key.
-
Two AI agents work together:
- Profile Analyst (Agent AI 1): Handles data extraction from user input, breaking down information into categories like Name, Experience, Skills, Education, and Job History.
- Resume Writer (Agent AI 2): Takes structured information and handles the writing aspect.
-
The workflow follows these key steps:
- Data Extraction: Organizes raw user input into structured categories. This is the information-gathering step.
- Structured Information: Stores the organized data into the GridDB Cloud database.
- Resume Crafting: Combines the structured data with writing capabilities. This is the content writing step.
- Create Resume: Generates the content.
- Final Resume: Produces the completed document.
Prerequisites
KaibanJS
KaibanJS is the JavaScript framework for building multi-agent AI systems. We will use it to build our resume creation system.
OpenAI
We will use the o1-mini model from OpenAI. It is a smaller version of the o1 model, suitable for tasks that require complex reasoning and understanding.
Create a project, an API key, and enable the o1-mini model in the OpenAI platform. Make sure to save the API key in the .env file.
OPENAI_API_KEY=api-key-hereGridDB Cloud
The GridDB Cloud offers a free plan tier and is officially available worldwide. This database will store the structured information extracted by the Profile Analyst agent and also the final resume generated by the Resume Writer agent.
You need these GridDB environment variables in the .env file:
GRIDDB_WEBAPI_URL=
GRIDDB_USERNAME=
GRIDDB_PASSWORD=
Check the below section on how to get these values.
Sign Up for GridDB Cloud Free Plan
If you would like to sign up for a GridDB Cloud Free instance, you can do so in the following link: https://form.ict-toshiba.jp/download_form_griddb_cloud_freeplan_e.
After successfully signing up, you will receive a free instance along with the necessary details to access the GridDB Cloud Management GUI, including the GridDB Cloud Portal URL, Contract ID, Login, and Password.
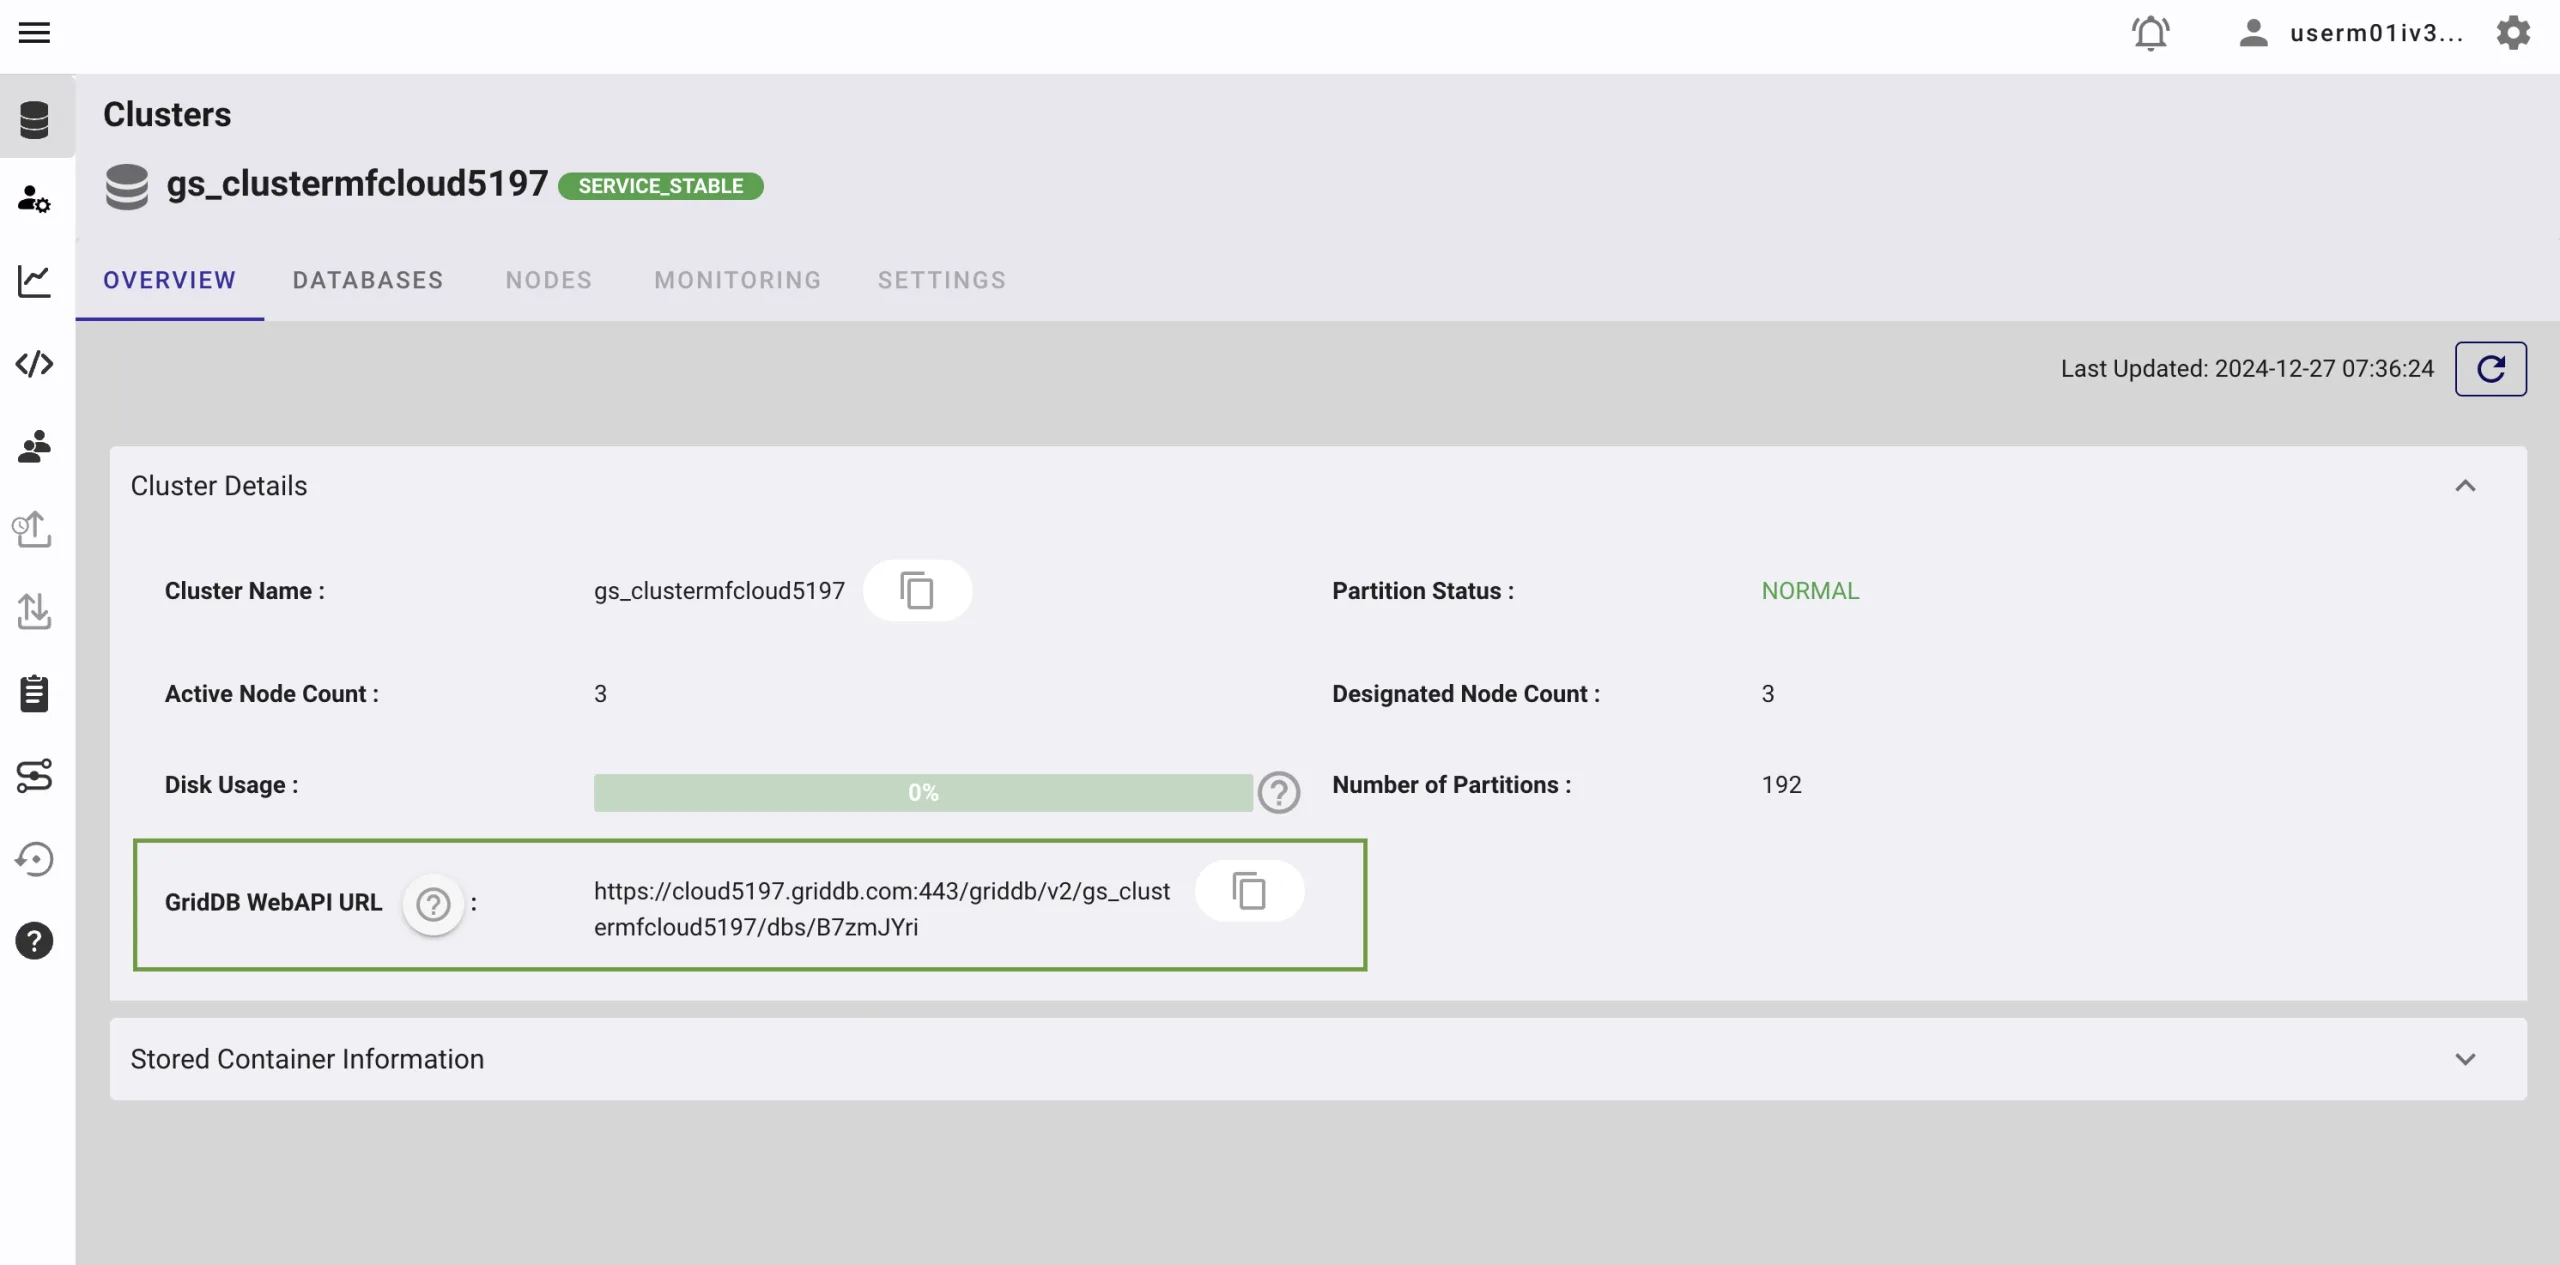
GridDB WebAPI URL
Go to the GridDB Cloud Portal and copy the WebAPI URL from the Clusters section. It should look like this:
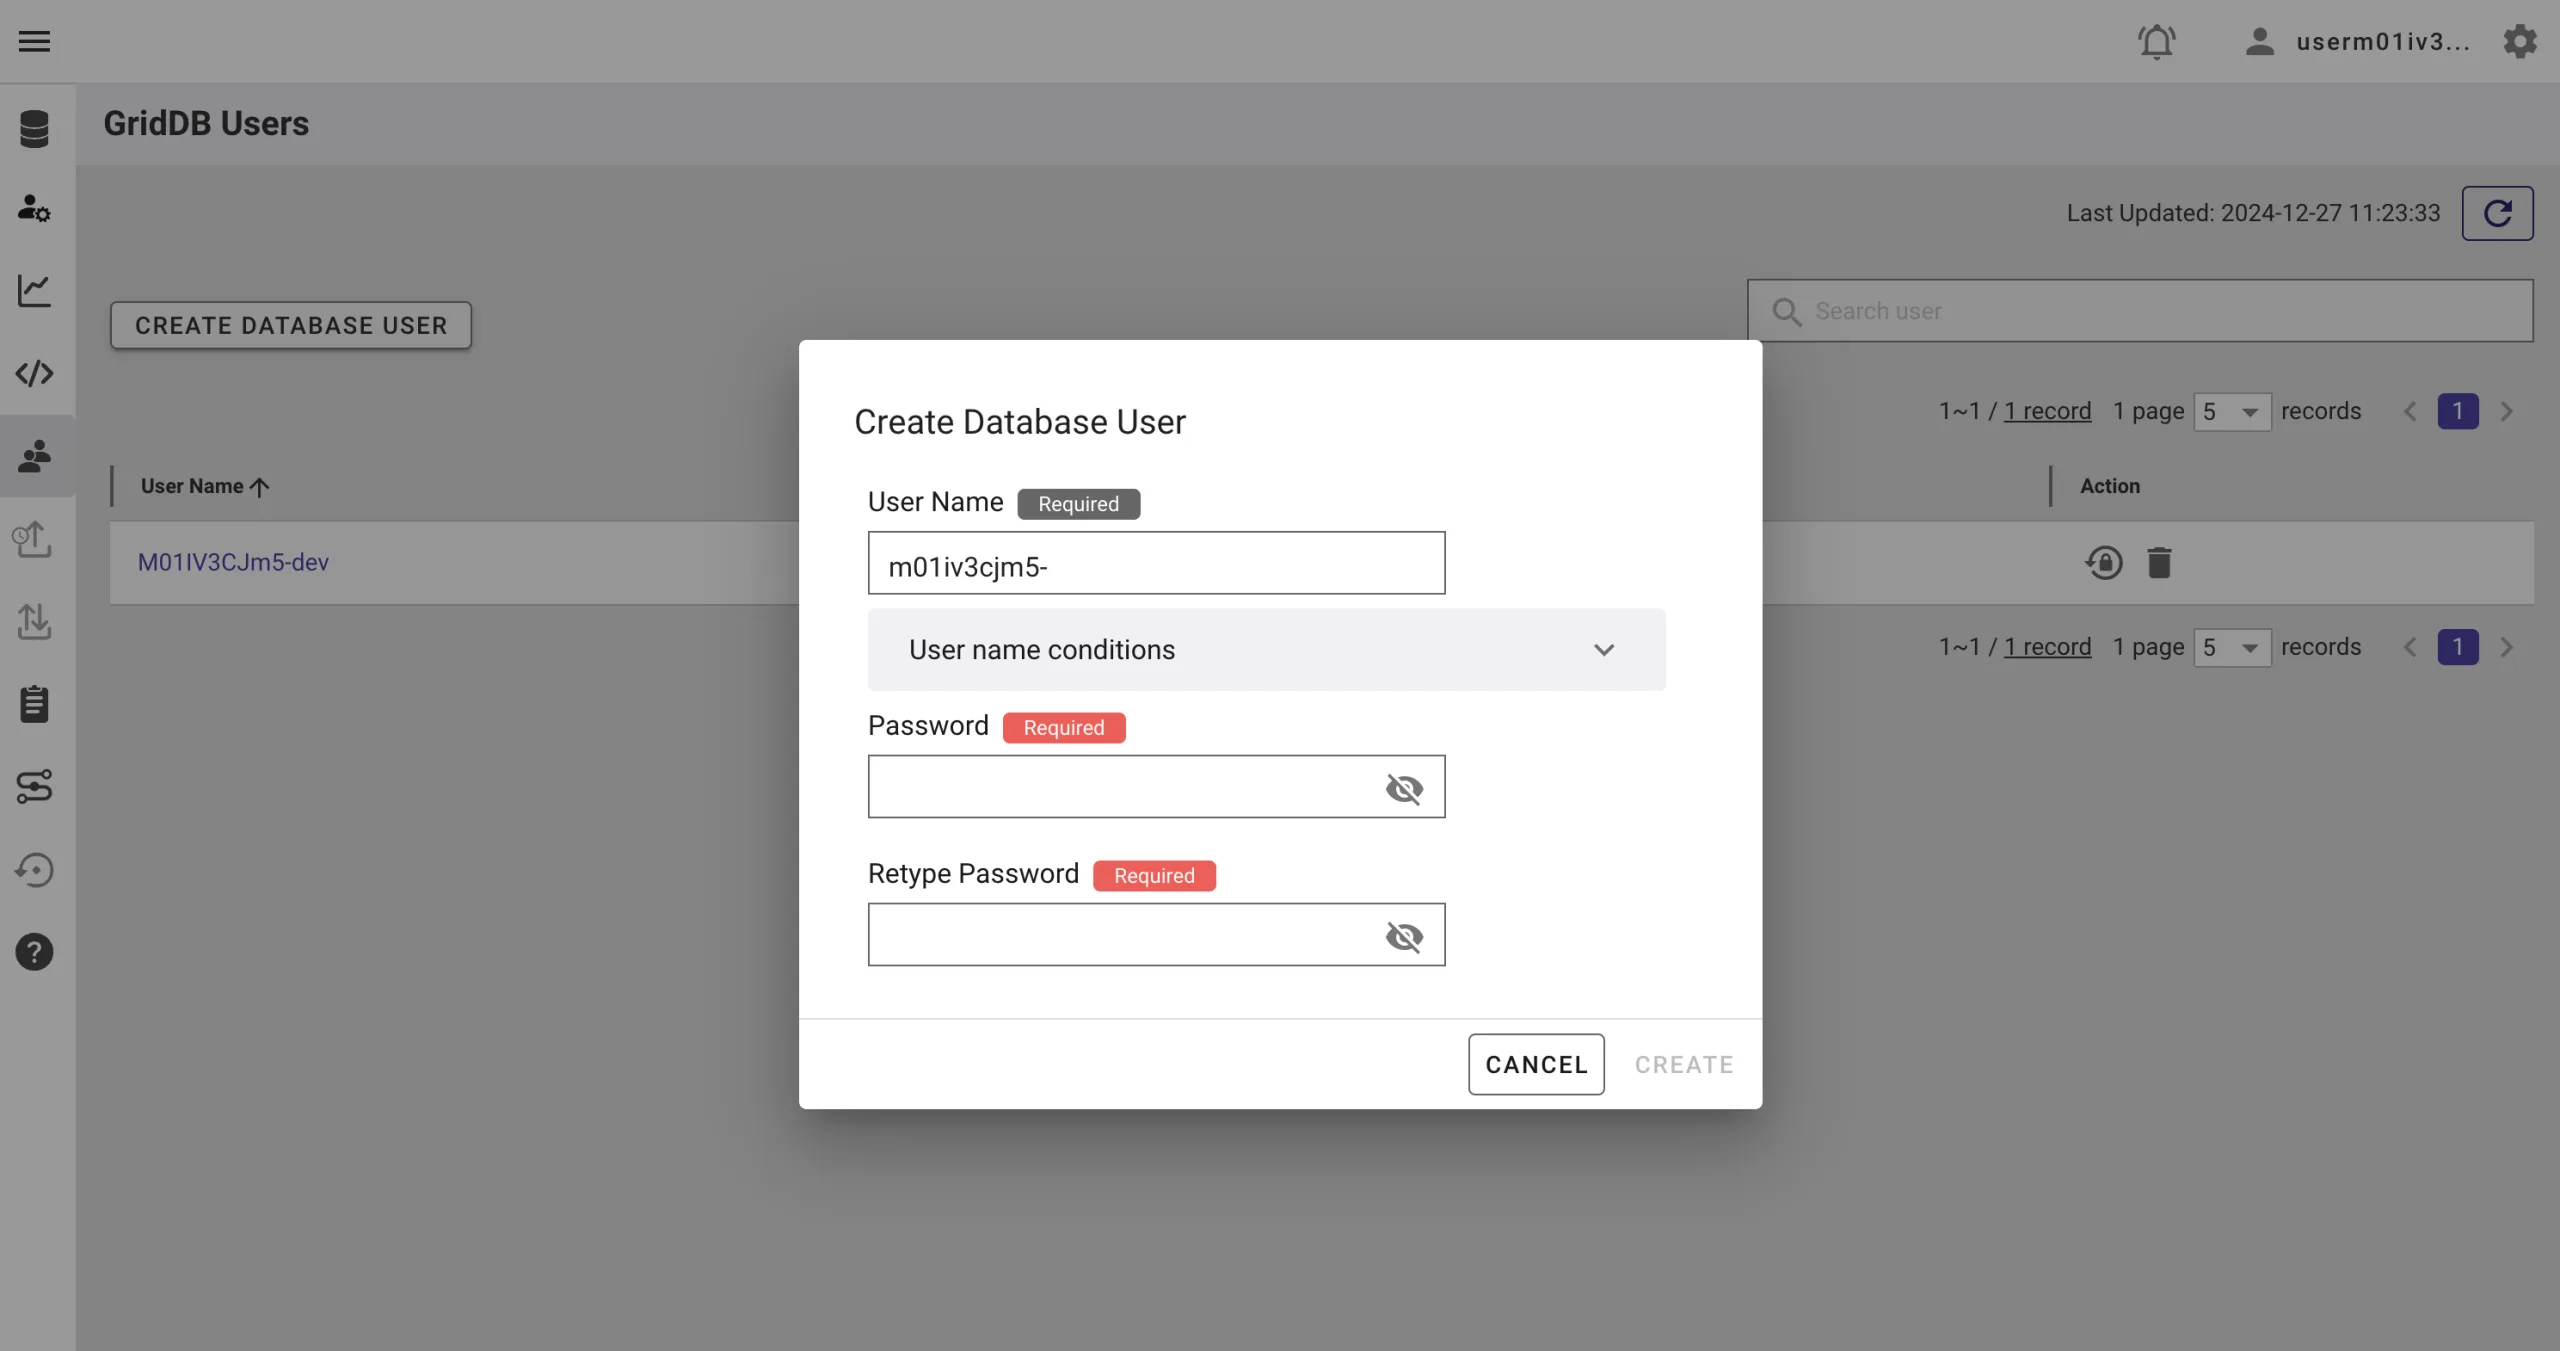
GridDB Username and Password
Go to the GridDB Users section of the GridDB Cloud portal and create or copy the username for GRIDDB_USERNAME. The password is set when the user is created for the first time, use this as the GRIDDB_PASSWORD.
For more details, to get started with GridDB Cloud, please follow this quick start guide.
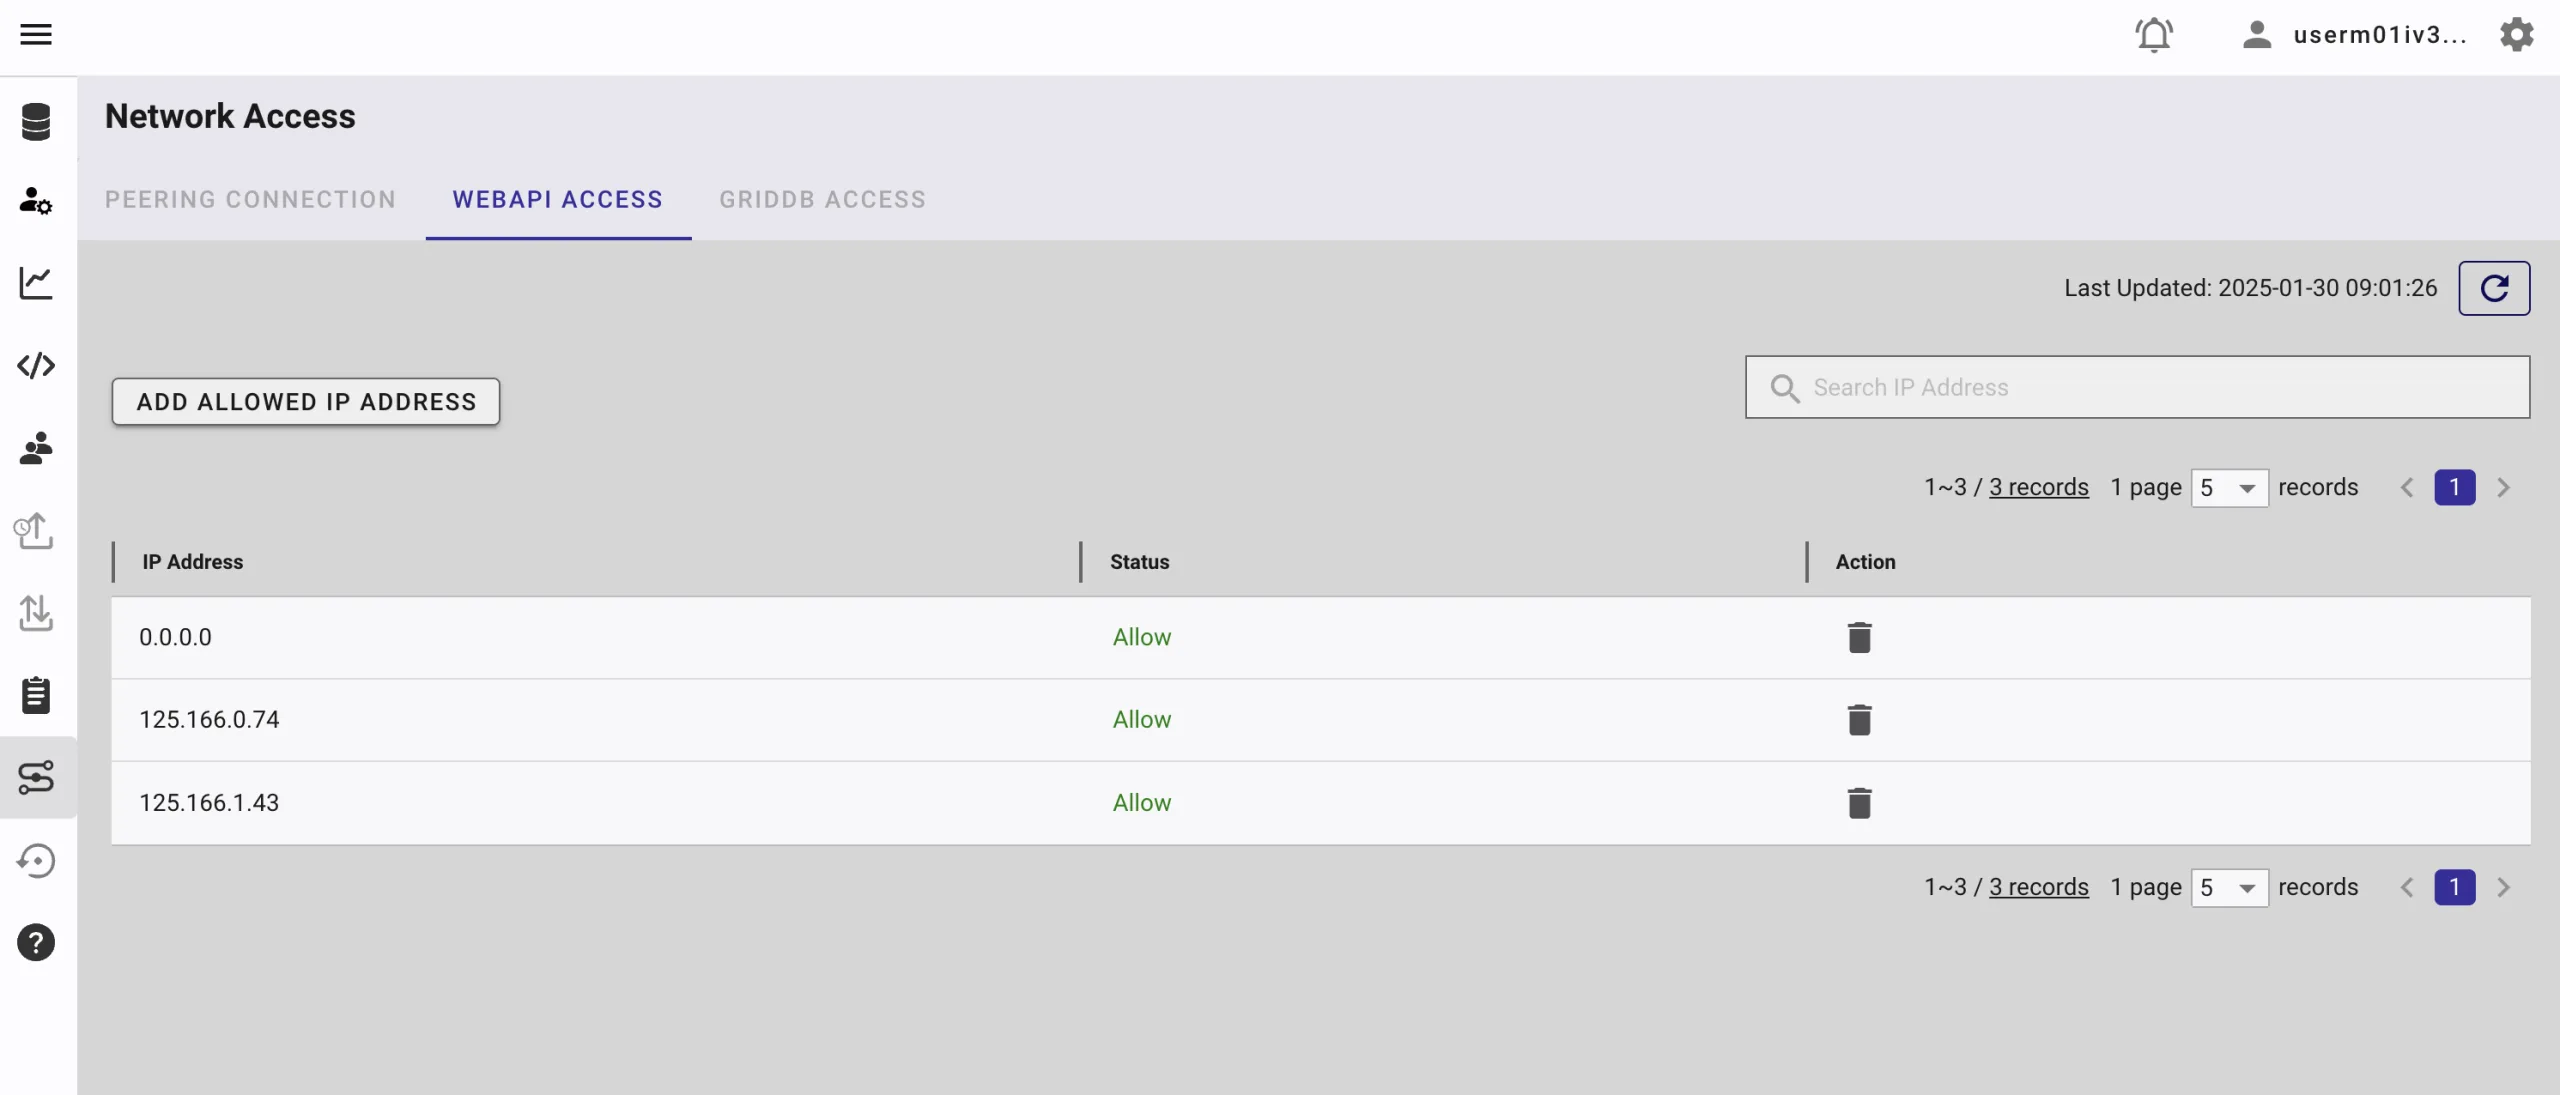
IP Whitelist
When running this project, please ensure that the IP address where the project is running is whitelisted. Failure to do so will result in a 403 status code or forbidden access.
You can use a website like What Is My IP Address to find your public IP address.
To whitelist the IP, go to the GridDB Cloud Admin and navigate to the Network Access menu.
Node.js
We will use Node.js LTS v22.12.0 to build a server that handles the communication between the user interface, AI agents, and OpenAI API and store data in the GridDB Cloud database.
React
We will use React to build the user interface for the resume creation system. Where the user can input their details and generate a resume with a click of a button.
Building the Resume Creation System
Node.js Server
We will use Node.js to build the server that handles the communication between the user interface, AI agents, and OpenAI API. The server will also store the structured information in the GridDB Cloud database.
This table provides an overview of the API routes defined in the server.js code, including HTTP methods, endpoints, descriptions, and any parameters.
| HTTP Method | Endpoint | Description | Parameters |
|---|---|---|---|
| POST | /api/resumes |
Creates a new resume. Calls the generateResume function to generate content, saves to the database, and returns the response. |
Body: { content: string } |
| GET | /api/resumes |
Fetches all resumes stored in the database. | None |
| GET | /api/resumes/:id |
Fetches a specific resume by its ID. | Path: id (Resume ID) |
| DELETE | /api/resumes/:id |
Deletes a specific resume by its ID. | Path: id (Resume ID) |
The main route code for the resume creation is as follows:
app.post('/api/resumes', async (req, res) => {
 try {
  const resumeData = req.body || {};
  const result = await generateResume(resumeData.content || undefined);
  console.log(result);

  const resume = {
   id: generateRandomID(),
   rawContent: resumeData.content,
   formattedContent: result.result,
   status: result.status,
   createdAt: new Date().toISOString(),
   information: JSON.stringify(result.stats),
 }

  // Save resume to database
  const dbResponse = await dbClient.insertData({ data: resume });

  if (result.status === 'success') {
   const all = {
    message: 'Resume created successfully',
    data: result.result,
    stats: result.stats,
    dbStatus: dbResponse
 }
   res.status(201).json(all);
 } else {
   res.status(400).json({
    message: 'Failed to generate resume',
    error: result.error
 });
 }
 } catch (error) {
  res.status(500).json({
   error: 'Server error while creating resume',
   details: error.message
 });
 }
});
When the user submits their data, the server calls the generateResume function to generate the resume content. The result is then saved to the GridDB Cloud database, and the resume content is returned as a response.
Multi-agent AI
We will use KaibanJS to build the multi-agent AI system for the resume creation process. You can find the agent code in the team.kban.js file and this system consists of two main agents:
Profile Analyst (Agent AI 1)
The Profile Analyst agent is responsible for extracting structured information from the user input. It categorizes the input into fields such as Name, Experience, Skills, Education, and Job History. The effectiveness of these fields depends on the quality and diversity of the submitted data.
const profileAnalyst = new Agent({
  name: 'Carla Smith',
  role: 'Profile Analyst',
  goal: 'Extract structured information from conversational user input.',
  background: 'Data Processor',
  tools: []  // Tools are omitted for now
});
This profile agent will use this task code to extract user data:
const processingTask = new Task({
  description: `Extract relevant details such as name,
 experience, skills, and job history from the user's 'aboutMe' input.
 aboutMe: {aboutMe}`,
  expectedOutput: 'Structured data ready to be used for a resume creation.',
  agent: profileAnalyst
});
The expectedOutput is the structured data that will be used by the Resume Writer agent to generate the resume content.
The description and expectedOutput mimic the prompts if were interact with ChatGPT. However, in this case, this is done by the Profile Analyst agent.
Resume Writer (Agent AI 2)
The Resume Writer agent is responsible for crafting the resume content based on the structured information provided by the Profile Analyst agent. It generates well-structured, compelling content that effectively showcases the user’s qualifications and achievements.
const resumeWriter = new Agent({
  name: 'Alex Morra',
  role: 'Resume Writer',
  goal: `Craft compelling, well-structured resumes
 that effectively showcase job seekers qualifications and achievements.`,
  background: `Extensive experience in recruiting,
 copywriting, and human resources, enabling
 effective resume design that stands out to employers.`,
  tools: []
});
This resume agent will use this task code to generate the resume content:
const resumeCreationTask = new Task({
description: `Utilize the structured data to create
a detailed and attractive resume.
Enrich the resume content by inferring additional details from the provided information.
Include sections such as a personal summary, detailed work experience, skills, and educational background.`,
expectedOutput: `A professionally formatted resume in raw markdown format, ready for submission to potential employers`,
agent: resumeWriter
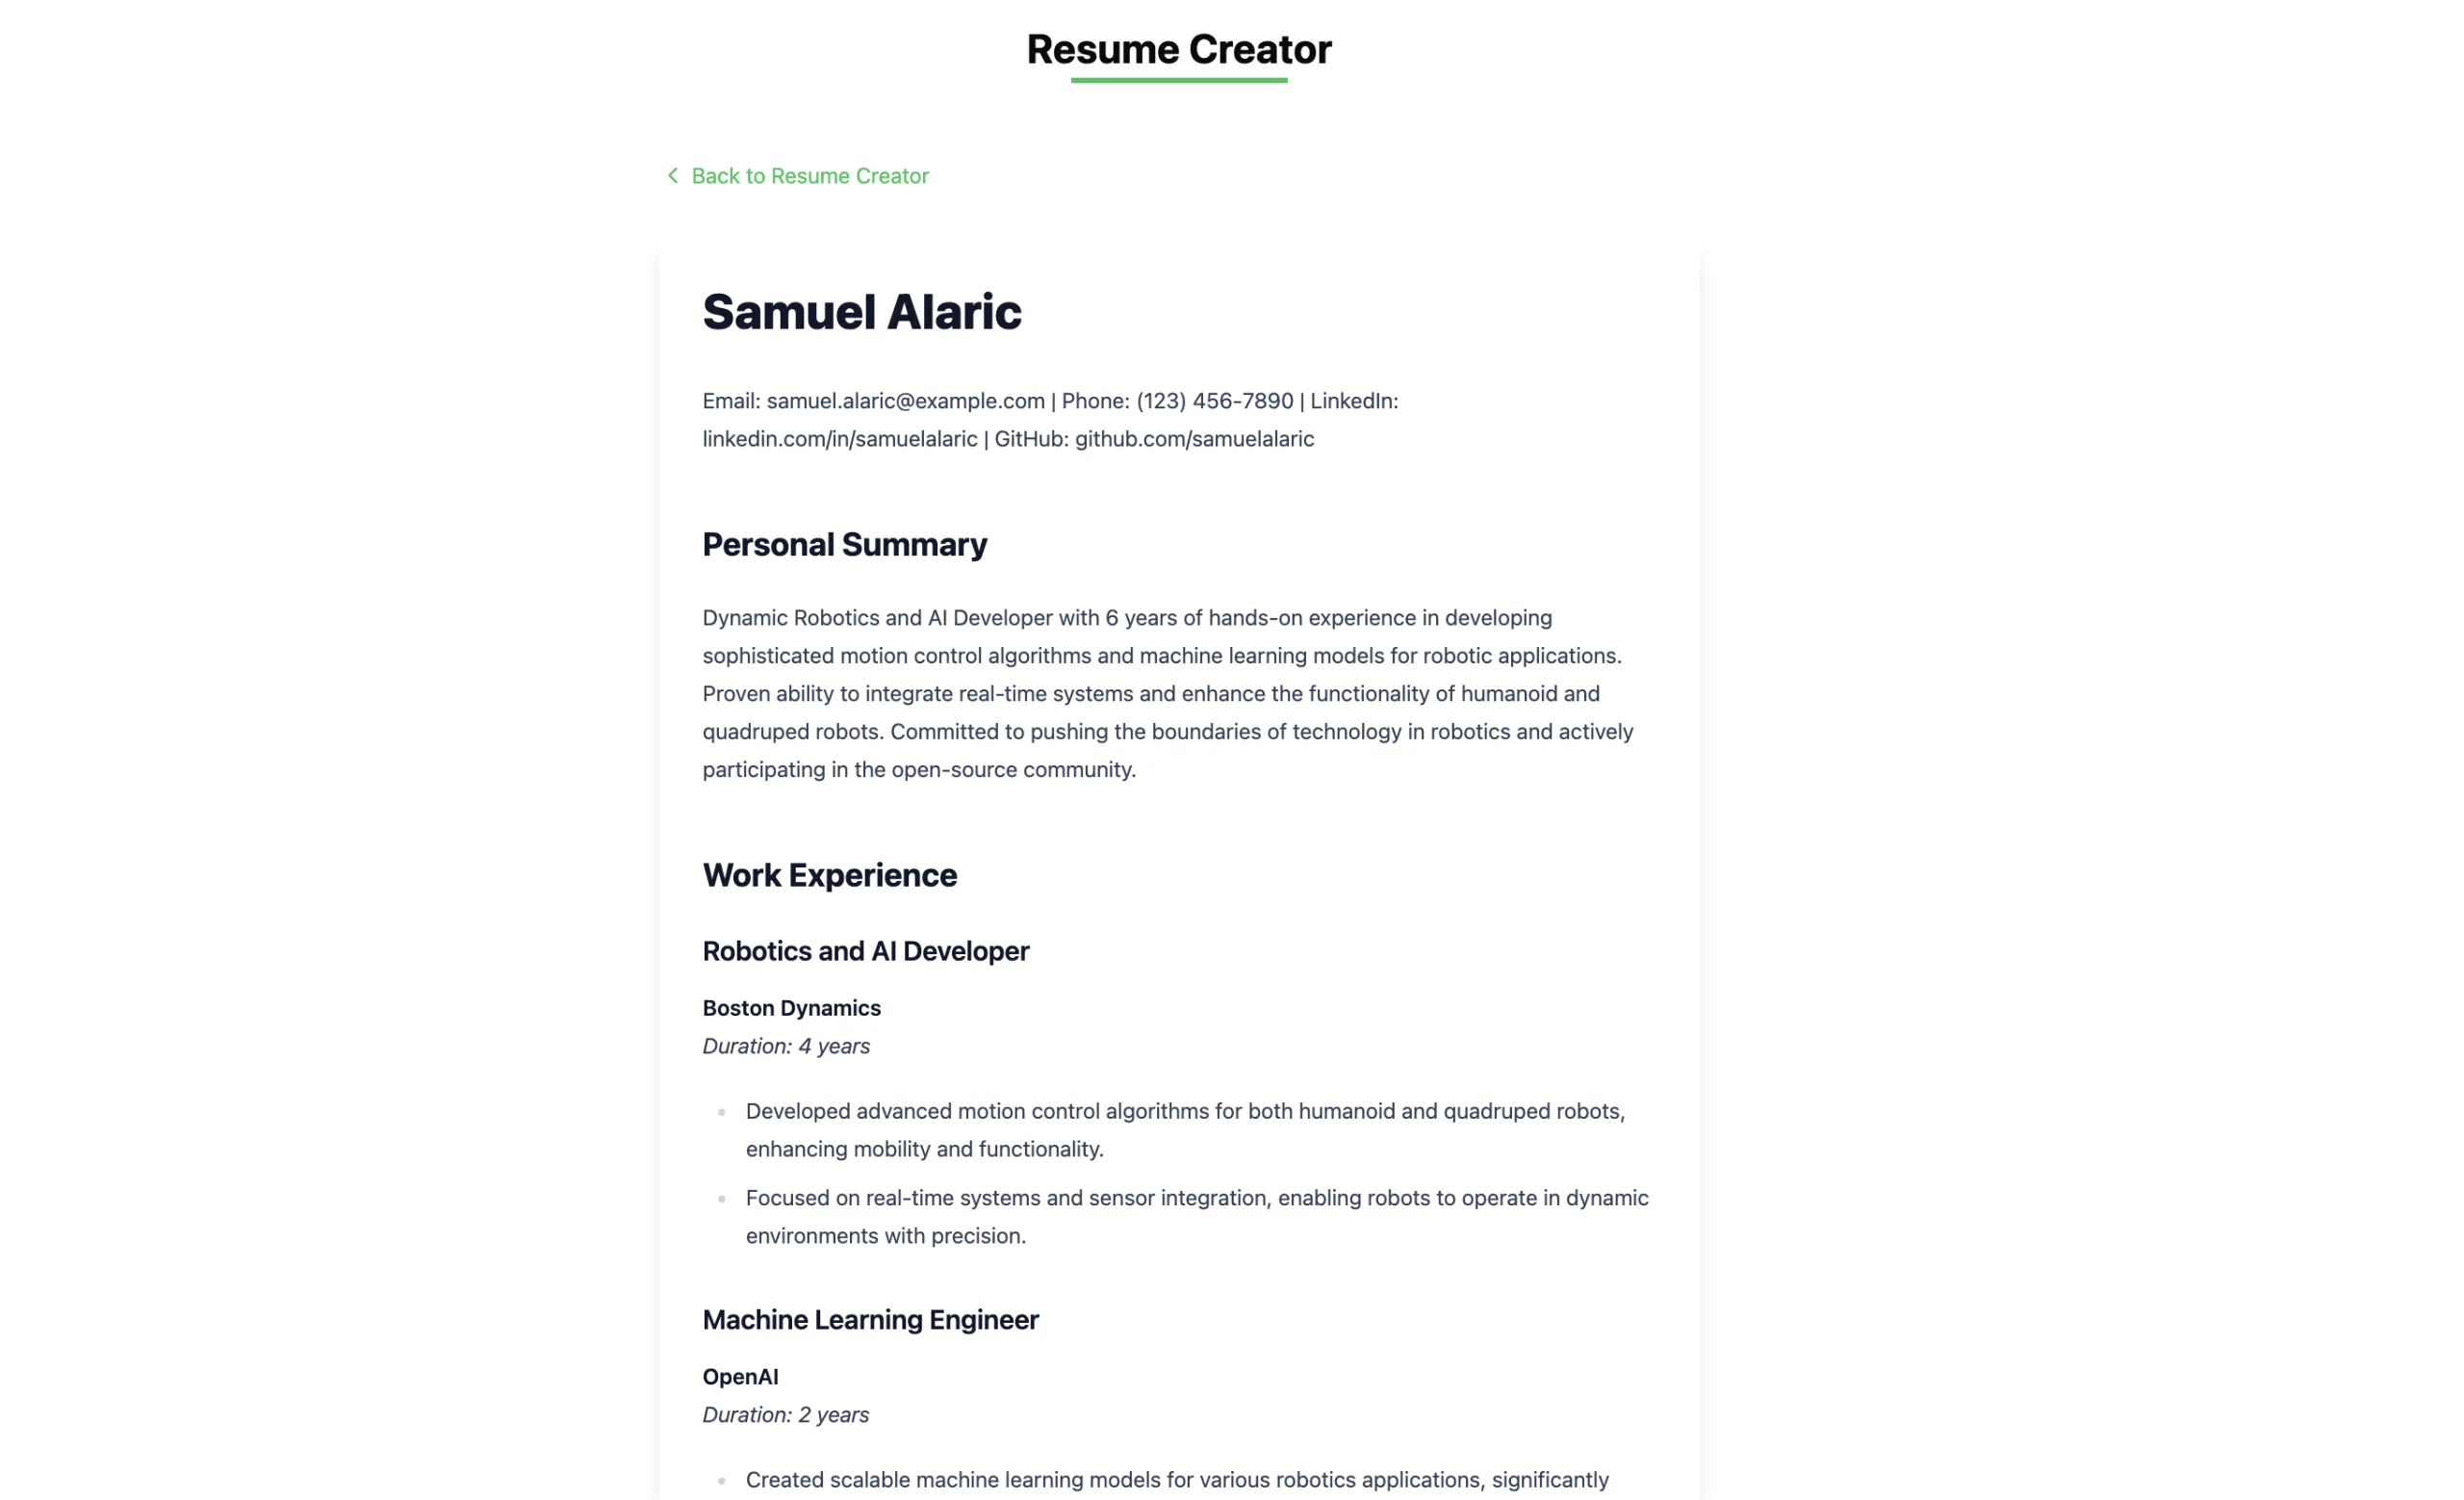
});The result of this task is markdown-formatted resume content that can be easily converted into a PDF or other formats and it’s easy to process by the user interface.
Save Data to GridDB Cloud Database
The GridDB Cloud database stores the structured information extracted by the Profile Analyst agent and the final resume generated by the Resume Writer agent.
This is the schema data used to store the resume information in the GridDB Cloud database:
{
  "id": "string",
  "rawContent": "string",
  "formattedContent": "string",
  "status": "string",
  "createdAt": "string",
  "information": "string"
}| Field | Type | Description |
|---|---|---|
id |
string | A unique identifier for each resume. |
rawContent |
string | The original user input for the resume. |
formattedContent |
string | The final formatted resume content. |
status |
string | Indicates the success or failure of the resume generation process. |
createdAt |
string | The timestamp of when the resume was created. |
information |
string | The OpenAI token information. |
GridDB Cloud provides a RESTful API that allows us to interact with the database. We will use this API to store and retrieve the resume information.
The griddb-client.js file contains the code to interact with the GridDB Cloud database. It includes functions to insert, retrieve, and delete resume data.
To insert new data, you can use the endpoint /containers/${containerName}/rows. This endpoint allows you to add a new row of data to the database:
async function insertData({
        data,
        containerName = 'resumes'
    }) {

        console.log(data);
        try {
            const timestamp = data.createdAt instanceof Date
                ? data.createdAt.toISOString()
                : data.createdAt;

            const row = [
                parseInt(data.id),           // INTEGER
                data.rawContent,             // STRING
                data.formattedContent,       // STRING
                data.status,                 // STRING
                timestamp,                   // TIMESTAMP (ISO format)
                data.information             // STRING
            ];

            const path = `/containers/${containerName}/rows`;

            return await makeRequest(path, [row], 'PUT');
        } catch (error) {
            throw new Error(`Failed to insert data: ${error.message}`);
        }
    }
GridDB also supports SQL-like queries to interact with the database. Here’s an example of an SQL query to retrieve all resumes from the database:
SELECT * FROM resumes;and to retrieve a specific resume by its ID:
SELECT * FROM resumes WHERE id = 'resume-id';Let’s take an example how to insert data into the GridDB Cloud database:
const sql = "insert into resumes (id, rawContent, formattedContent, status, createdAt, information) values(3, 'raw contenct here', ' formatted content here', 'success', TIMESTAMP('2025-01-02'), '{tokens: 300}')";

const response = await fetch(`${process.env.GRIDDB_WEBAPI_URL}'/sql/dml/update'`, {
   method: 'POST',
   headers: {
    'Content-Type': 'application/json',
    'Authorization': `Basic ${authToken}`,
   },
   body: JSON.stringify(payload),
  });

  const responseText = await response.text();
The code above inserts the resume data into the GridDB Cloud database using the /sql/dml/update endpoint and the SQL query.
All these data operations will be handled by the Node.js server and exposed as API endpoints for the user interface to interact with.
User Interface
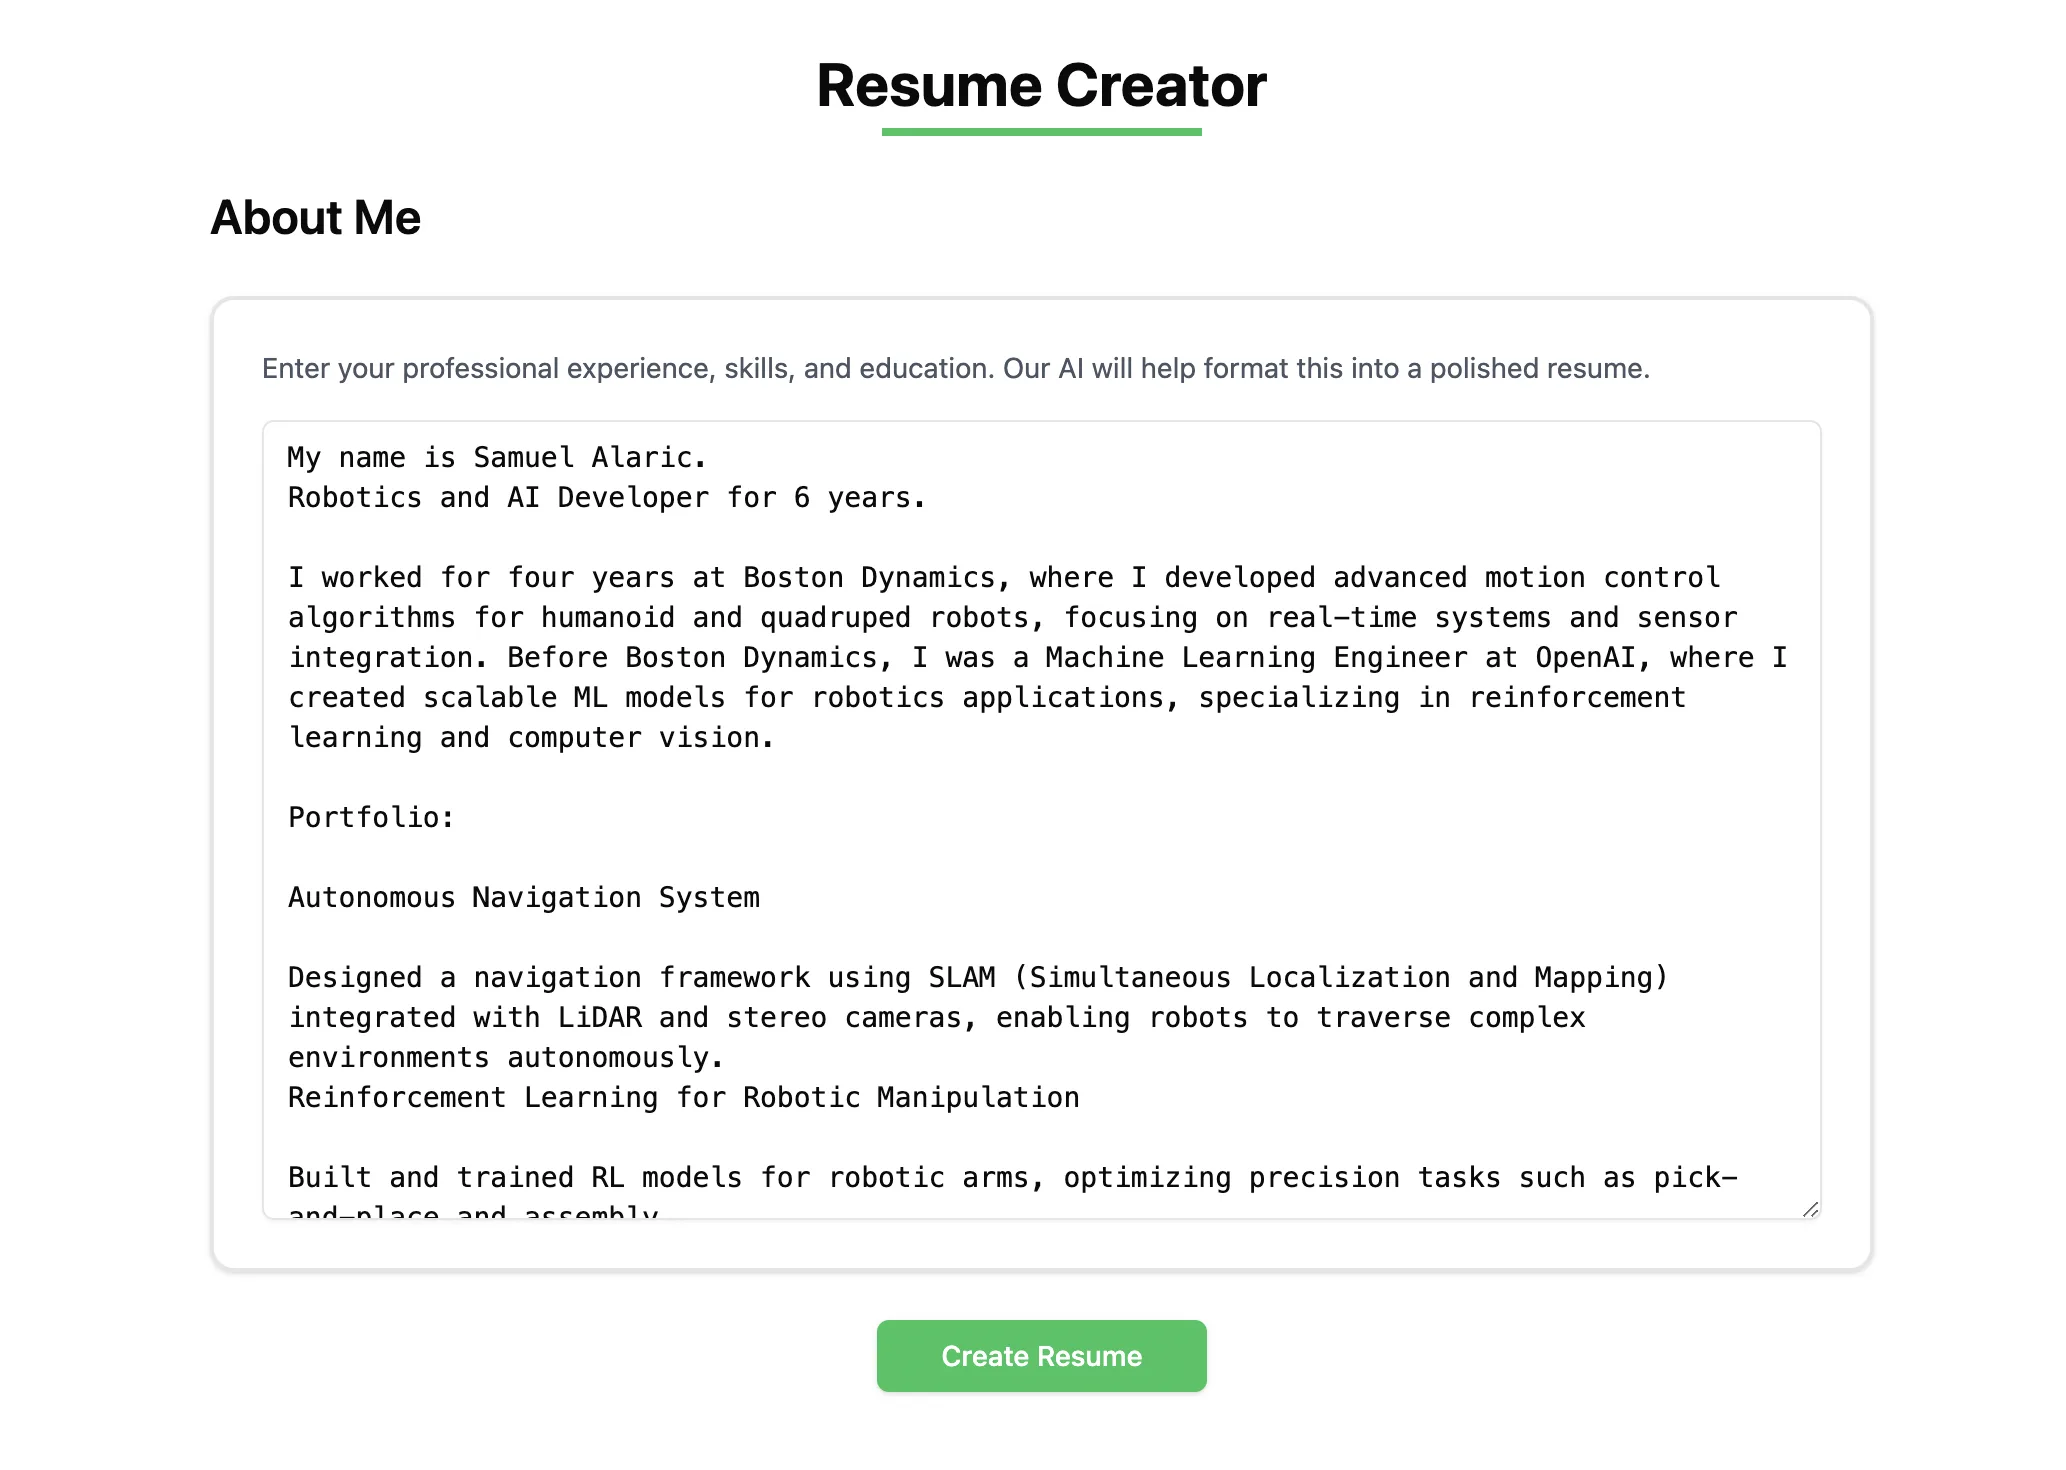
The ResumeCreator component is built using React and allows users to input their details in a text and generate a resume with the click of a button. The user interface is designed to be simple.
import { useState } from 'react';
import { Card, CardContent } from '@/components/ui/card';
import { Button } from '@/components/ui/button';
import { Textarea } from '@/components/ui/textarea';
import { Alert, AlertDescription } from '@/components/ui/alert';
import { ResumeMarkdownRenderer } from './ResumeMarkdownRenderer.tsx';

const ResumeCreator = () => {
 const [isSubmitting, setIsSubmitting] = useState(false);
 const [submitStatus, setSubmitStatus] = useState<'success' | 'error' | null>(null);
 const [resumeText, setResumeText] = useState("default resume text");
 const [markdownContent, setMarkdownContent] = useState(null);

 const BASE_URL = import.meta.env.VITE_APP_BASE_URL + ':' + import.meta.env.VITE_PORT;

 const handleSubmit = async () => {
  setIsSubmitting(true);
  setSubmitStatus(null);

  try {
   const response = await fetch(`${BASE_URL}/api/resumes`, {
    method: 'POST',
    headers: {
     'Content-Type': 'application/json',
 },
    body: JSON.stringify({ content: resumeText }),
 });

   if (!response.ok) {
    throw new Error('Failed to create resume');
 }

   const aiResume = await response.json();
   setMarkdownContent(aiResume.data);
   setSubmitStatus('success');
 } catch (error) {
   console.error('Error creating resume:', error);
   setSubmitStatus('error');
 } finally {
   setIsSubmitting(false);
   setTimeout(() => setSubmitStatus(null), 5000);
 }
 };

 return (
  <div className="max-w-4xl mx-auto p-8 space-y-6">
   <h1 className="text-3xl font-bold text-center">
 Resume Creator
    <div className="w-40 h-1 bg-green-500 mx-auto mt-1"></div>
   </h1>

   {submitStatus && (
    <Alert className={submitStatus === 'success' ? 'bg-green-50' : 'bg-red-50'}>
     <AlertDescription>
      {submitStatus === 'success'
       ? 'Resume created successfully!'
       : 'Failed to create resume. Please try again.'}
     </AlertDescription>
    </Alert>
   )}

   {markdownContent ? (
    <ResumeMarkdownRenderer markdown={markdownContent} />
   ) : (
     <div className="space-y-6">
      <h2 className="text-2xl font-semibold">About Me</h2>

      <Card className="border-2">
       <CardContent className="p-6">
        <p className="text-sm text-gray-600 mb-4">
 Enter your professional experience, skills, and education. Our AI will help format this
 into a polished resume.
        </p>
        <Textarea
         value={resumeText}
         onChange={(e: React.ChangeEvent<HTMLTextAreaElement>) => setResumeText(e.target.value)}
         className="min-h-[400px] font-mono"
         placeholder="Enter your resume content here..."
        />
       </CardContent>
      </Card>

      <div className="flex justify-center">
       <Button
        onClick={handleSubmit}
        disabled={isSubmitting}
        className="bg-green-500 hover:bg-green-600 text-white px-8 py-2 rounded-md"
       >
        {isSubmitting ? 'Creating...' : 'Create Resume'}
       </Button>
      </div>
     </div>
   )}
  </div>
 );
};

export default ResumeCreator;
The core functionality of the ResumeCreator component is to create a user resume using AI and render the result. It uses useState to manage input (resumeText), generated markdown (markdownContent), submission status (submitStatus), and submission progress (isSubmitting). The handleSubmit function sends a POST request to the /api/resumes route at the backend (${BASE_URL}/api/resumes), passing the user’s input, and updates the state based on the API’s response. Read here for the Node.js API routes.
The UI includes a text area for input, a submit button to trigger the API call, and a markdown renderer ResumeMarkdownRenderer component to display the AI-generated resume. Alerts notify the user of the submission status while loading states to ensure a smooth experience.
Further Improvements
- Enhanced Data Extraction: Improve the Profile Analyst agent’s ability to extract and categorize information more accurately and efficiently.
- Advanced Content Generation: Enhance the Resume Writer agent’s content generation capabilities to produce more compelling and personalized resumes.
- User Interface Enhancements: Add more features to the user interface, such as resume templates, customization options, and real-time editing.
Conclusion
In this blog, we have built an AI-powered resume-creation system that automates the tedious and time-consuming tasks involved in manual resume creation. By leveraging multi-agent AI systems, we have streamlined the process of information gathering and content writing to produce resumes with minimal human intervention.
If you have any questions about the blog, please create a Stack Overflow post here https://stackoverflow.com/questions/ask?tags=griddb .
Make sure that you use the “griddb” tag so our engineers can quickly reply to your questions.