GridDB Cloud version 3.1 is now out and there are some new features we would like to showcase, namely the main two: the ability to connect to your Cloud instance via an Azure Virtual Network (vnet) peering connection, and then also for a new way to authenticate your Web API Requests with web tokens (bearer tokens).
In this article, we will first go through setting up a vnet peering connection to your GridDB Cloud Pay as you go plan. Then, we will briefly cover the sample code attached with this article. And then lastly, we will go over the new authentication method for the Web API and an example of implementing it into your app/workflow.
Vnet Peering
What exactly is a vnet peering connection? Here is the strict definition from the Azure docs: “Azure Virtual Network peering enables you to seamlessly connect two or more virtual networks in Azure, making them appear as one for connectivity purposes. This powerful feature allows you to create secure, high-performance connections between virtual networks while keeping all traffic on Microsoft’s private backbone infrastructure, eliminating the need for public internet routing.”
In our case, we want to forge a secure connection between our virtual machine and the GridDB Cloud instance. With this in place, we can connect to GridDB Cloud via a normal java/python source code and use it outside of the context of the Web API.
How to Set Up a Virtual Network Peering Connection
Before you start on the GridDB Cloud side, you will first need to create some resources on the Microsoft Azure side. On Azure, create a Virtual Network (VNet).
Azure Resources to Create Virtual Network Peering Connection
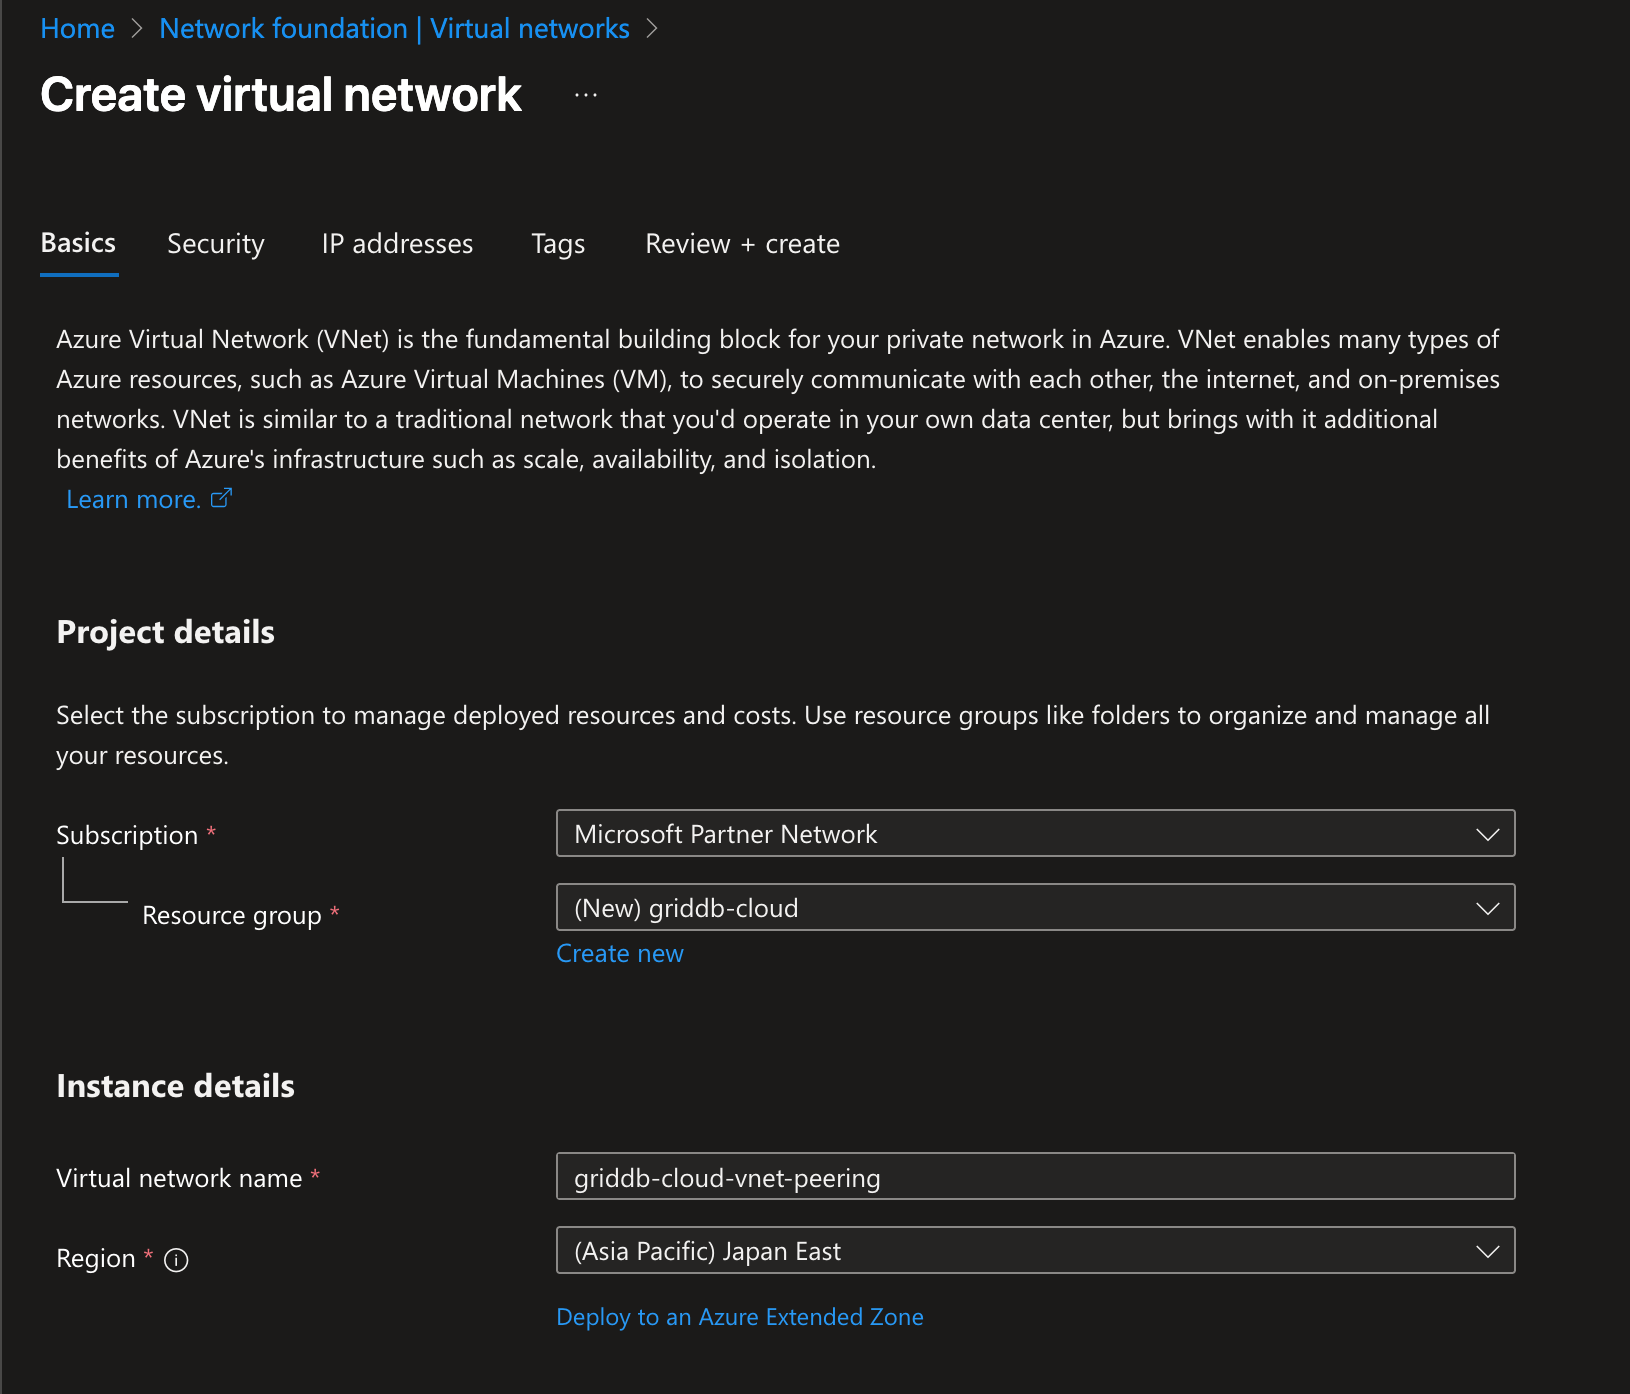
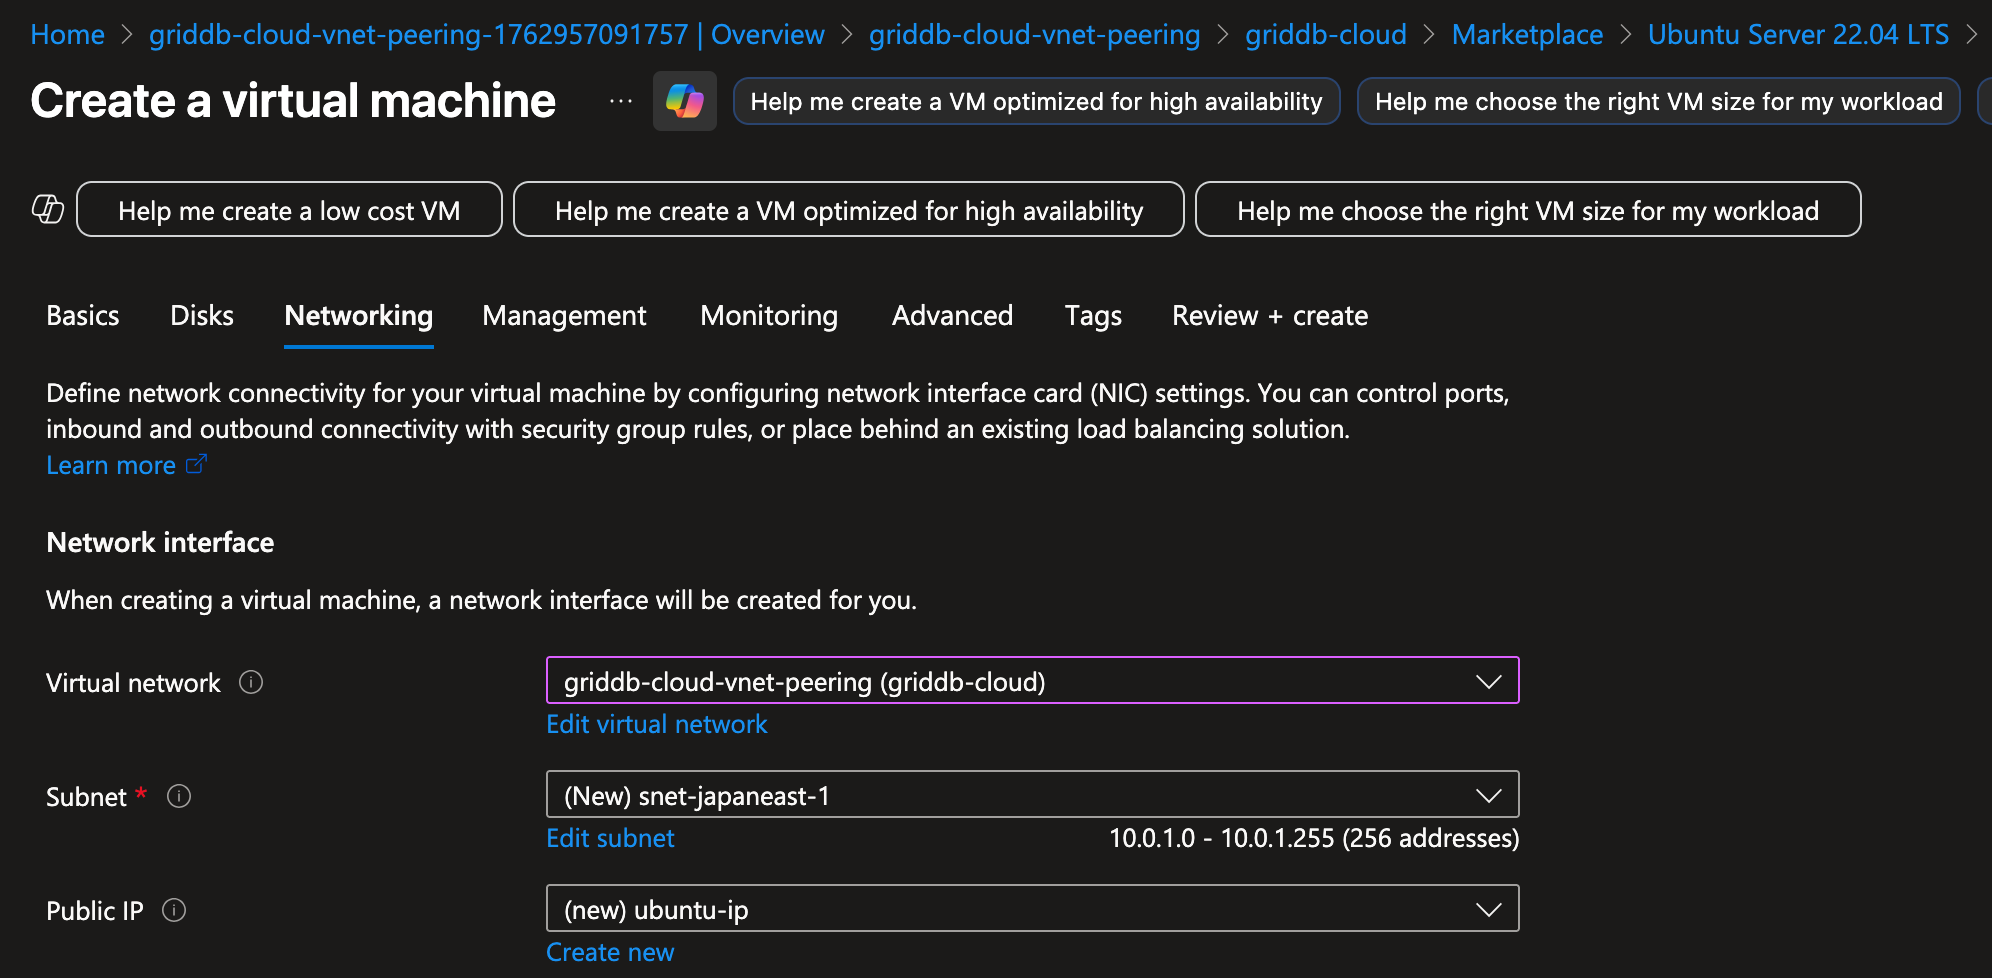
You will also need to eventually set up a virtual machine that is on the same virtual network that you just created (which will be the one you link with GridDB Cloud below). With these two resources created, let’s move on to the GridDB Cloud side.
 >
>
GridDB Cloud — Forging Virtual Network Peering Connection
For this part of the process, you can read step-by-step instructions here in the official docs: https://www.toshiba-sol.co.jp/pro/griddbcloud/docs-en/v3_1/cloud_quickstart_guide_html/GridDB_Cloud_QuickStartGuide.html#connection-settings-for-vnet.
From the network tab, click ‘Create peering connection’ and you’ll see something like this pop up.

Here’s a summary of the steps needed to forge the vnet peering connection:
- From the navigation menu, select Network Access and then click the CREATE PEERING CONNECTION button.
- When the cloud provider selection dialog appears, leave the settings as-is and click NEXT.
- On the VNet Settings screen, enter your VNet information:
- Subscription ID
- Tenant ID
- Resource group name
- VNet name
- Click NEXT
- Run the command provided in the dialog to establish the VNet peering. You can run this in either:
- Azure Cloud Shell (recommended)
- Azure command-line interface (Azure CLI)
- After running the command, go to the VNet peering list screen and verify that the Status of the connection is Connected.
All of these steps are also plainly laid out in the GridDB Cloud UI — it should be a fairly simple process through and through.
Using the Virtual Network Peering Connection
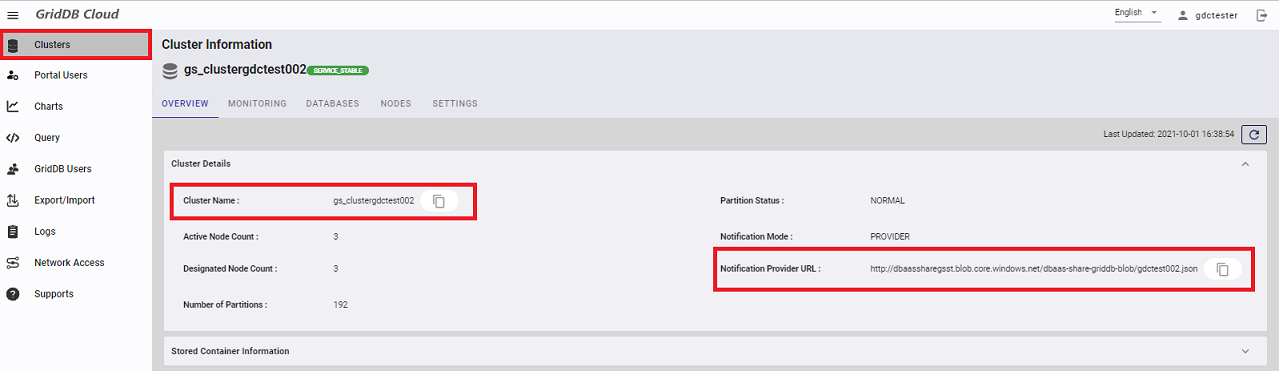
Once your connection is forged, you should be able to connect to the GridDB Cloud instance using the notification provider address provided in your GridDB Cloud UI Dashboard.
If you want to do a very quick check before trying to run sample code, you can download the json file and use a third-party network tool like telnet to see if the machine is reachable. For example, download the json file, find the transaction address and port number, and then run telnet:
$ wget [notifification-provider-url]
$ cat mfcloud2102.json

    {
        "cluster": {"address":"172.26.30.69", "port":10010},
        "sync": {"address":"172.26.30.69", "port":10020},
        "system": {"address":"172.26.30.69", "port":10040},
        "transaction": {"address":"172.26.30.69", "port":10001},
        "sql": {"address":"172.26.30.69", "port":20001}
    },

$ telnet 172.26.30.69 10001
If a connection is made, everything is working properly.
Sample Code
And now you can run the sample code included in this repo. There is Java code for both NoSQL and SQL interfaces as well as Python code. To run the java code, you need to install java and maven. The sample code will create tables and read those tables, but also expects for you to ingest a csv dataset from Kaggle: https://www.kaggle.com/code/chaozhuang/iot-telemetry-sensor-data-analysis. We have included the csv file with this repo.
Ingesting IoT Telemetry Data
To ingest the dataset, first navigate to the griddbCloudDataImport dir inside of this repository. Within this dir, you will find that the GridDB Cloud Import tool is already installed. To use, open up the .sh file and edit lines 34-36 to include your credentials. Next, you must run the python file within this directory to clean up the data, namely changing the timestamp column to better adhere to the Web API’s standard, and also to separate out the csv into 3 distinct csv files, one for each device found in the dataset.
Here is the line of code that will transform the ts col into something the GridDB Web API likes.
df['ts'] = pd.to_datetime(df['ts'], unit='s').dt.strftime('%Y-%m-%dT%H:%M:%S.%f').str[:-3] + 'Z'
You can make out from the format that it needs it to be like this: "2020-07-12T00:01:34.385Z" so that it can be ingested using the tool. The data which is supplied directly in the CSV before transformation looks like this: "1.5945120943859746E9".
Next, you must create the container within your GridDB Cloud. For this part, you can use the GridDB Cloud CLI tool or simply use the GridDB Cloud UI. The schema we want to ingest is found within the schema.json file in the directory.
{
    "container": "device1",
    "containerType": "TIME_SERIES",
    "columnSet": [
        {
            "columnName": "ts",
            "type": "timestamp",
            "notNull": true
        },
        {
            "columnName": "co",
            "type": "double",
            "notNull": false
        },
        {
            "columnName": "humidity",
            "type": "double",
            "notNull": false
        },
        {
            "columnName": "light",
            "type": "bool",
            "notNull": false
        },
        {
            "columnName": "lpg",
            "type": "double",
            "notNull": false
        },
        {
            "columnName": "motion",
            "type": "bool",
            "notNull": false
        },
        {
            "columnName": "smoke",
            "type": "double",
            "notNull": false
        },
        {
            "columnName": "temp",
            "type": "double",
            "notNull": false
        }
    ],
    "rowKeySet": [
        "ts"
    ]
}
To create the table with the tool, simply run: $ griddb-cloud-cli create schema.json. If using the UI, simply follow the UI prompts and follow the schema as shown here. Name the container device1.
Once the container is ready to go, you can run the import tool: $ ./griddbCloudDataImport.sh device1 device1.csv.
You can also use the GridDB Cloud CLI Tool to import: $ griddb-cloud-cli ingest device1.csv.
Running The Sample Code (Java)
Now that we have device1 defined and populated with data, let’s try running our sample code.
$ cd sample-code/java
$ export JAVA_HOME=/Library/Java/JavaVirtualMachines/jdk-23.jdk/Contents/Home
$ mvn clean package
And once the code is compiled, you need to set up your database parameters as your environment variables, and then from there, run the code:
export GRIDDB_NOTIFICATION_PROVIDER="[notification-provider-address]"
export GRIDDB_CLUSTER_NAME="[clustername]"
export GRIDDB_USERNAME="[username]"
export GRIDDB_PASSWORD="[password]"
export GRIDDB_DATABASE="[database name]"
$ java -jar target/java-samples-1.0-SNAPSHOT-jar-with-dependencies.jar Running the sample code will run all of the java code, which includes connections to both JDBC and the NoSQL Interface. Here’s a quick breakdown of the Java Sample files included with this repo:
- The code in
App.javasimply runs the main function and all of the methods within the individual classes. - The code in
Device.javais the class schema for the dataset we ingest - The code in
GridDB.javais the NoSQL interface, connecting, creating tables, and querying from the dataset ingested above. The code also shows multiput, multiget, and various aggregation, time sampling etc examples. GridDBJdb.javashows connecting to GridDB via the JDBC interface and also shows creating a table and querying a table. Also shows a GROUP BY RANGE SQL query.
Running The Sample Code (Python)
For the python code, you will need to first install the Python client. There are good instructions found in the docs page: https://docs.griddb.net/gettingstarted/python.html. The following instructions are for debian-based systems:
sudo apt install default-jdk
export JAVA_HOME=/usr/lib/jvm/java-11-openjdk-amd64
git clone https://github.com/griddb/python_client.git
cd python_client/java
mvn install
cd ..
cd python
python3.12 -m pip install .
cd ..
And once installed, you will need to have the .jar files in your $CLASSPATH. To make it easy, we hve included the jars inside of the lib dir inside the python dir and a script to add the variables to your classpath:
$ source ./set-env.sh
$ echo $CLASSPATH
Once you’ve got everything done, you will need your creds set up in your environment variables, similar to the Java section above. And from there, you can run the code:
$ python3.12 main.pyWeb API (Basic Authentication vs. Bearer Tokens)
The GridDB Web API is one of the methods of orchestrating your CRUD methods for your GridDB Cloud instance. Prior to this release, the method of authenticating your HTTP Requests to your GridDB Cloud was solely using something called Basic Authentication, which is the method of attaching your Username and Password to each web request paired with an IP filtering firewall. Though this method was enough to keep things secure up until now, the GridDB team’s release of utilizing Web Tokens greatly bolsters the safety in authentication strategy for GridDB Cloud.
The Dangers of Basic Authentication
Before I get into how to work the Bearer token into your work flow, I will showcase a simple example of why Basic Authentication can be problematic and lead to issues down the line. Sending your user/pass credentials in every request leaves you extremely vulnerable to man-in-the-middle attacks. Not only that, but there’s issues with sometimes servers keeping logs of all headers incoming into it, meaning your user:pass combo could potentially be stored in plaintext somewhere on some server. If you share passwords at all, your entire online presense could be compromised.
I asked an LLM to put together a quick demo of a server reading your user and password combo. The LLM produced a server and a client; the client sends its user:pass as part of its headers and the server is able to intercept those and decode and store the user:pass in plaintext! After that, we send another request with a bearer token, and though the server can still read and intercept that, bearer tokens will naturally expire and won’t potentially expose your password which may be used in other apps or anything else. Here is the output of the server:
go run server.go
Smarter attacker server listening on http://localhost:8080
--- NEW REQUEST RECEIVED ---
Authorization Header: Basic TXlVc2VybmFtZTpNeVN1cGVyU2VjcmV0UGFzc3dvcmQxMjM=
!!! ð± BASIC AUTH INTERCEPTED !!!
!!! DECODED: MyUsername:MySuperSecretPassword123
--- NEW REQUEST RECEIVED ---
Authorization Header: Bearer eyJ0eXAiOiJKV1QiLCJhbGciOiJIUzI1NiJ9.eyJzdWIiOiJpc3JhZWwiLCJleHAiOjE3NjE3NjA3NjZ9.fake_signature_partI think this example is clear, sending your password in every request can cause major leakage of your secret data. This is bad!
Bearer Tokens
As shown in the example above, a Bearer token is attached to the requests’s header, similar to the Basic Auth method, but it’s labeled as such (Bearer) and the code itself is a string that must be decoded and decrypted by the server. And though, as explaiend above, you do face a similar threat of somebody stealing your bearer token and being able to impersonate you, this damage is mitigated because the bearer token expires within an hour and doesn’t potentially leak information outside of the scope of this database; not to mention, a bearer token can have granular scopes to make limit damage even further. You can read more about them here, as we wrote about saving these into GridDB here:
- Protect your GridDB REST API with JSON Web Tokens
- Protect your GridDB REST API with JSON Web Tokens Part II
How to use with GridDB Cloud
This assumes you are familiar with GridDB Cloud in general and how to use the Web API. If you are not, please read the quickstart: GridDB Cloud Quickstart.
To be issued an auth token from GridDB Cloud, you must use the web api endpoint: https://[cloud-id]griddb.com/griddb/v2/[cluster-name]/authenticate. You make a POST Request to that address with the body being your web api credentials (username, password). If successful, you will receive a JSON response with the access token string (the string you attach with your requests), and an expiry date of that token. From that point on, you can use that bearer token in all of your requests until it expires. Here’s a CURL example:
curl --location 'https://[cloud-id]griddb.com/griddb/v2/[cluster-name]/authenticate.'
--header 'Content-Type: application/json'
--data '{
  "username": "israel",
  "password": "israel"
}'

RESPONSE

{
    "accessToken": "eyJ0eXAiOiJBY2Nlc3MiLCJhbGciOiJIUzI1NiJ9.eyJzdWIiOiJTMDE2anA3WkppLWlzcmFlbCIsImV4cCI6MTc2MTc2MDk4MCwicHciOiJ1ZXNDZlBRaCtFZXdhYjhWeC95SXBnPT0ifQ.1WynKNIwRLM7pOVhAi9itQh35gUnxlzyi85Vhw3xM8E",
    "expiredDate": "2025-10-29 18:03:00.653 +0000"
}
How to use the Bearer Token in an Application
Now that you know how to use a bearer token, let’s take a look at a hands-on example of incorporating it into your application. In this case, we updated the GridDB Cloud CLI Tool to use bearer tokens instead of Basic Authentication. The workflow is as follows: the CLI tool will send each request with the bearer token, but before it does that, it first checks to see if a valid token exists. If it does, no problem, send the request with the proper header attached. If the token doesn’t exist or is expired, it will first use the user credentials (Saved in a config file), grab a new token, save the contents into a json file, and then now will be read and attached with each request until it expires again.
First, we need to create a new type called TokenManager which will handle our tokens, including having methods for saving and loading the access string.
type TokenManager struct {
    AccessToken string        `json:"accessToken"`
    Expiration  ExpireTime    `json:"expiredDate"`
    mux         sync.RWMutex  `json:"-"`
    buffer      time.Duration `json:"-"`
}

// Here create a new instance of our Token Manager
func NewTokenManager() *TokenManager {
    m := &TokenManager{
        buffer: 5 * time.Minute,
    }

    if err := m.loadToken(); err != nil {
        fmt.Println("No cached token found, will fetch a new one.")
    }

    return m
}
This struct will save our access token string into the user’s config dir in their filesystem and then load it before every request:
func (m *TokenManager) saveToken() error {
    configDir, err := os.UserConfigDir()
    if err != nil {
        return err
    }

    cliConfigDir := filepath.Join(configDir, "griddb-cloud-cli")
    tokenPath := filepath.Join(cliConfigDir, "token.json")

    data, err := json.Marshal(m)
    if err != nil {
        return err
    }

    return os.WriteFile(tokenPath, data, 0600)
}

func (m *TokenManager) loadToken() error {
    configDir, err := os.UserConfigDir()
    if err != nil {
        return err
    }

    tokenPath := filepath.Join(configDir, "griddb-cloud-cli", "token.json")

    data, err := os.ReadFile(tokenPath)
    if err != nil {
        return err
    }

    return json.Unmarshal(data, &m)
}
And here is the code for checking to see if the bearer token is expired:
func (m *TokenManager) getAndAddValidToken(req *http.Request) error {
    m.mux.RLock()
    needsRefresh := time.Now().UTC().After(m.Expiration.Add(-m.buffer))
    m.mux.RUnlock()

    if needsRefresh {
        m.mux.Lock()
        if time.Now().UTC().After(m.Expiration.Add(-m.buffer)) {
            if err := m.getBearerToken(); err != nil {
                m.mux.Unlock()
                return err
            }
        }
        m.mux.Unlock()
    }

    m.mux.RLock()
    defer m.mux.RUnlock()

    req.Header.Add("Authorization", "Bearer "+m.AccessToken)
    req.Header.Add("Content-Type", "application/json")
    return nil
}
And finally, here’s the code for actually grabbing a new bearer token and attached it to each HTTP Request sent by the tool:
func (m *TokenManager) getBearerToken() error {
    fmt.Println("--- REFRESHING TOKEN ---")

    if !(viper.IsSet("cloud_url")) {
        log.Fatal("Please provide a `cloud_url` in your config file! You can copy this directly from your Cloud dashboard")
    }

    configCloudURL := viper.GetString("cloud_url")
    parsedURL, err := url.Parse(configCloudURL)
    if err != nil {
        fmt.Println("Error parsing URL:", err)
        return err
    }
    newPath := path.Dir(parsedURL.Path)
    parsedURL.Path = newPath
    authEndpoint, _ := parsedURL.Parse("./authenticate")

    authURL := authEndpoint.String()
    method := "POST"

    user := viper.GetString("cloud_username")
    pass := viper.GetString("cloud_pass")
    payloadStr := fmt.Sprintf(`{"username": "%s", "password": "%s" }`, user, pass)
    payload := strings.NewReader(payloadStr)

    client := &http.Client{}
    req, err := http.NewRequest(method, authURL, payload)
    if err != nil {
        log.Fatal(err)
    }
    defer req.Body.Close()

    req.Header.Add("Content-Type", "application/json")
    resp, err := client.Do(req)
    if err != nil {
        fmt.Println("error with client DO: ", err)
    }
    CheckForErrors(resp)

    body, err := io.ReadAll(resp.Body)
    if err != nil {
        return err
    }

    if err := json.Unmarshal(body, &m); err != nil {
        log.Fatalf("Error unmarshaling access token %s", err)
    }

    if err := m.saveToken(); err != nil {
        fmt.Println("Warning: Could not save token to cache:", err)
    }

    return nil
}

func MakeNewRequest(method, endpoint string, body io.Reader) (req *http.Request, e error) {

    if !(viper.IsSet("cloud_url")) {
        log.Fatal("Please provide a `cloud_url` in your config file! You can copy this directly from your Cloud dashboard")
    }

    url := viper.GetString("cloud_url")
    req, err := http.NewRequest(method, url+endpoint, body)
    if err != nil {
        fmt.Println("error with request:", err)
        return req, err
    }
    tokenManager.getAndAddValidToken(req)
    return req, nil
}
As usual, source code can be found in the GitHub page for the tool itself.
If you have any questions about the blog, please create a Stack Overflow post here https://stackoverflow.com/questions/ask?tags=griddb .
Make sure that you use the “griddb” tag so our engineers can quickly reply to your questions.