Rules involving expiry release help keep your database lean and nimble. In this article, we will be showcasing GridDB’s time expiry functionality, which is closely coupled with GridDB’s partitioning feature. If you keep reading, you will learn how to make a container which has partitioning and expiry rules, complete with a small python script which will create the tables and examine which rows of data pushed into our tables are saved and which are immediately dumped (due to being passed the expiry time period).
Special Announcement
We have released a free Udemy course which shares a focus of expiration and partitioning with GridDB; the course is all about building a full stack Java Application, utilizing GridDB as the persistent storage. The course is completely open to all and is 100% free and be found here: https://www.udemy.com/course/building-a-full-stack-java-application-part-ii.
In the course, you will create an app called GridLog, which allows you to store your computer logs into persistent storage, complete with searchable fields and a log-viewer. Sign up now and learn even more about GridDB and building apps with it.
Prerequisites
In order to follow along, you will need an installation of GridDB, Java, Python, and the GridDB Python Client.
Creating GridDB containers/tables with partitioning rules only works via SQL, so when setting these up yourself, you will need to drop into the GridDB shell/CLI and pre-create the tables OR you can connect via JDBC and create your tables that way. In this article, we will be using a very simple python script which will connect to GridDB via JDBC through a python library called jpype. We have included a requirements.txt file for all python libraries used in this project.
All source code for this project can be found here: https://github.com/griddbnet/Blogs/tree/partitioning_expiry
You can clone the repository like so:
$ git clone https://github.com/griddbnet/Blogs.git --branch partitioning_expiry
GridDB & Partitioning
If you’re wondering why there’s a focus on partitioning in an article about expiry release functionality, it’s because the expiry release relies on the partitioning. Meaning, in order to set the expiry rules, your table must also declare some sort of partitioning rule.
In GridDB, there are three different types of partitioning: Interval Partitioning, Hash Partitioning, and Interval-Hash Partitioning. The type of partitioning which deals with time-based partitions are the ones with Interval in the name — and indeed, these are the types which can have expiry rules set upon them; hash partitioning cannot have expiry rules set on them. This means we will be focusing mostly on Interval Partitioning and Interval Hash Partitioning (to a lesser degree).
Before we showcase how exactly to create a partitioned table, let’s do a quick recap of what these different partitioning methods mean.
Hash Partitioning
This type of partitioning can be used on both Time_Series Containers & Collection containers and can take any type for the column that is being partitioned against. The rows for this type of partitioned table are evenly spread around for the entirety of the table. The benefits of using this partitioning is that it can take any type and doesn’t rely on a time-based column data type.
Interval Partitioning
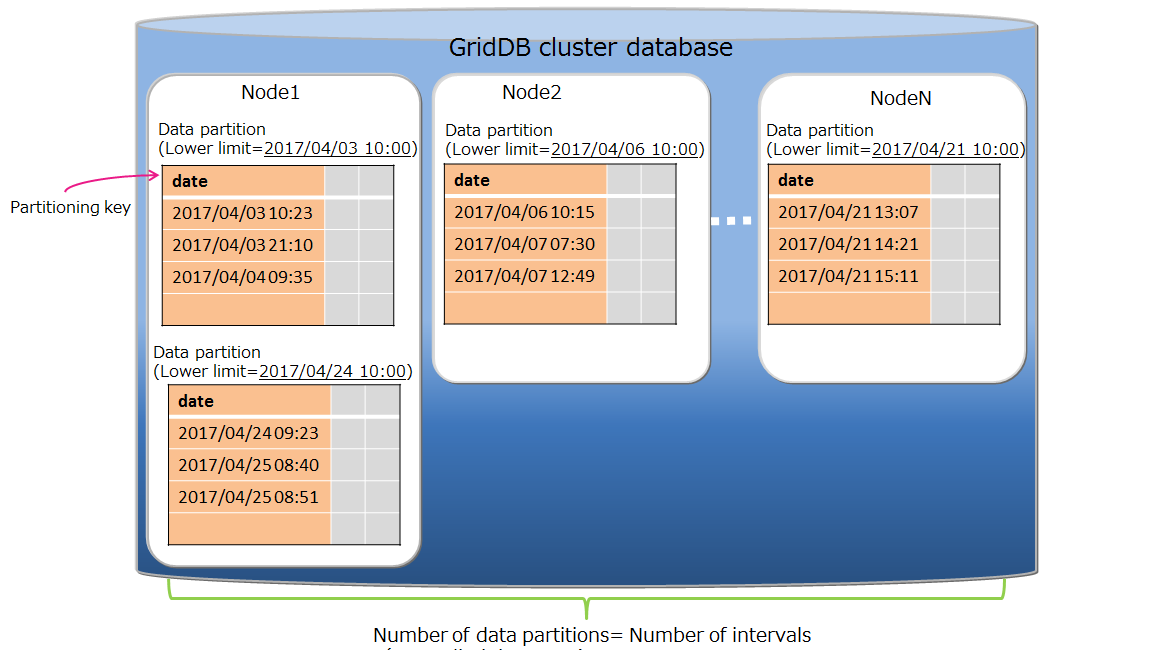
As alluded to before, these tables are partitioned by time-based intervals: “the rows in a table are divided by the specified interval value and are stored in data partitions.” The upper and lower limits for each partition are automatically made for by GridDB based on the rule.
This type of partitioning works with TIME_SERIES containers and their rowkeys (these are always of type TIMESTAMP) but can also work with a Collection container with some added rules. If you want to use a collection container, you need to set the partitioning column as of TIMESTAMP, and you must set that time based column as NOT NULL and as PRIMARY KEY.
Interval Hash Partitioning
As you might have guessed, this partitioning method is a combination of the two above methods — it first partitions based on the interval and then further partitions based on the hash. You can calculate the full amount of partitioning by multiplying the interval division count and the hash division count together.
When to Use Each Partitioning Method
You’re probably asking when to use which partitioning method and I think it’s pretty simple. If your data can be divided evenly across time, you can use Interval partitioning. If your data can be divided evenly across time AND you need extra partitioning, then Interval Hash Partitioning is the way to go. And then of course, if neither use are true for your dataset, just regular Hash partitioning can work well.
Expiry Rules
Now with partitioning out of the way, we can take a look at the expiry rules; as explained above, the expiration rules are based entirely on the interval partitioning. When creating your table, you will add extra information pertaining to the expiry rules and then the partitioning rules. Let’s take a look at our first example, explain it, and then create the table and look at it in the GridDB CLI.
CREATE TABLE IF NOT EXISTS pyIntPart (
  date TIMESTAMP NOT NULL PRIMARY KEY,
  value STRING

WITH
(expiration_type='PARTITION',expiration_time=10,expiration_time_unit='DAY')
PARTITION BY RANGE (date) EVERY (5, DAY);
Couple of things to note about this statement: everything before WITH is standard, but you will notice the timestamp type takes two special attributes: NOT NULL and PRIMARY KEY. These are both necessary to create an interval partitioned collection container. When setting the expiration time and unit, you are explicitly stating how frequently you would like your rows of data to become “cold” (unsearchable) and then finally deleted off disk. Here we set the unit to DAY and the time to 10. So we expect when data is 10 DAYS old, our data will be phased out. And this would be true if these rows were set to be expired individually — but actually the expiration type is set to PARTITION, which means the entire partition must be older than the expiration time before things start getting deleted.
To put it simply, our table pyIntPart has a partitioning range of 5 days. This means that every row from January 1st – January 6th will be in one singular partition — no matter how many rows exist; every single row outside of these dates will appear in their own partitions. The part where the partitioning comes in is how the data being expired is handled.
| date | value |
|---|---|
| 2024-01-01T00:00:00.000Z | 0 |
| 2024-01-02T00:00:00.000Z | 1 |
| 2024-01-03T00:00:00.000Z | 2 |
| 2024-01-04T00:00:00.000Z | 3 |
| 2024-01-05T00:00:00.000Z | 4 |
| 2024-01-06T00:00:00.000Z | 5 |
If we imagine the current data is January 12th, you might imagine that the first two rows would have been deleted already because those rows’ dates are older than 10 days old, but all of this data will persist until January 16th because the data goes by the NEWEST data in the entire partition (5 days). And so all of this data will be valid until January 16th and then the entire partition would be phased out.
Of course, you could set for different rules to play around with how frequently this data gets deleted.
In our Python example, we will start from TODAY and add days before for 20 days. Eventually the data gets so old GridDB immediately moves the data into “cold”. But before that, let’s make a connection to our GridDB server via SQL
import jpype
import jpype.dbapi2
from datetime import datetime, timedelta
import pandas as pd


url = "jdbc:gs://127.0.0.1:20001/myCluster/public"
jpype.startJVM(jpype.getDefaultJVMPath(), "-ea", "-Djava.class.path=./lib/gridstore-jdbc.jar")
conn = jpype.dbapi2.connect(url, driver="com.toshiba.mwcloud.gs.sql.Driver", driver_args={"user": "admin", "password": "admin"})
curs = conn.cursor()
With jpype, you are required to point to your local gridstore-jdbc jar file and to manually start the JVM. (This is why Java is a required prereq for this project)
Now that we’re connected, let’s create our table insert data. And please note, I have a section creating a Interval Hash Partitioned table as well, but I will refrain from explaining it due to it being extremely similar in concept to the Interval Partitioned table.
createIntervalPartition = """CREATE TABLE IF NOT EXISTS pyIntPart (
  date TIMESTAMP NOT NULL PRIMARY KEY,
  value STRING
)
WITH
(expiration_type='PARTITION',expiration_time=10,expiration_time_unit='DAY')
PARTITION BY RANGE (date) EVERY (5, DAY);"""
curs.execute(createIntervalPartition)

now = datetime.utcnow()
for x in range (0, 20):
    pyIntPart = "INSERT INTO pyIntPart values ( TO_TIMESTAMP_MS(" + str(now.timestamp()*1000) +"), 'val" + str(x) + "')"
    pyIntHashPart = "INSERT INTO pyIntHashPart values ( TO_TIMESTAMP_MS(" + str(now.timestamp()*1000) +"), 'val" + str(x) + "')"
    #print(pyIntPart)
    #print(pyIntHashPart)
    curs.execute(pyIntPart)
    curs.execute(pyIntHashPart)
    now = now - timedelta(days=1)

curs.execute("SELECT * FROM pyIntPart")
cols = tuple(zip(*curs.description))[0]
df = pd.DataFrame(curs.fetchall(), columns=cols)
print(df)
The results: (now: 2024-03-12 00:47:03.714053)
                      date  value
0  2024-03-02 00:47:03.714  val10
1  2024-03-01 00:47:03.714  val11
2  2024-02-29 00:47:03.714  val12
3  2024-02-28 00:47:03.714  val13
4  2024-02-27 00:47:03.714  val14
5  2024-03-12 00:47:03.714   val0
6  2024-03-11 00:47:03.714   val1
7  2024-03-10 00:47:03.714   val2
8  2024-03-09 00:47:03.714   val3
9  2024-03-08 00:47:03.714   val4
10 2024-03-07 00:47:03.714   val5
11 2024-03-06 00:47:03.714   val6
12 2024-03-05 00:47:03.714   val7
13 2024-03-04 00:47:03.714   val8
14 2024-03-03 00:47:03.714   val9
As you can see here, we start from 03/12/2024 and we attempt to add data going back twenty days (a simple for loop, subtracting 1 day until the number 20 is reached). Without expiry rules, you’d expect 20 rows of data to be printed when we read the data back into the pandas dataframe, but instead, of course, some of the rows of data are expired and instead are left with 15 rows. The reason for this can be found from our partition rules. If we run a showcontainer in the CLI, we get:
gs[public]> showcontainer pyIntPart
Database    : public
Name        : pyIntPart
Type        : COLLECTION
Partition ID: 15
DataAffinity: -
Partitioned : true
Partition Type           : INTERVAL
Partition Column         : date
Partition Interval Value : 5
Partition Interval Unit  : DAY
Expiration Type      : PARTITION
Expiration Time      : 10
Expiration Time Unit : DAY

Columns:
No  Name                  Type            CSTR  RowKey
------------------------------------------------------------------------------
 0  date                  TIMESTAMP(3)    NN    [RowKey]
 1  value                 STRING

Indexes:
Name        :
Type        : TREE
Columns:
No  Name
--------------------------
 0  date
Our partitions are in 5 day chunks, meaning our dataset which spans from 02/27 – 03/12 spans 3 different partitions.
| date |
|---|
| 2024-03-08 00:47:03.714 |
| 2024-03-09 00:47:03.714 |
| 2024-03-10 00:47:03.714 |
| 2024-03-11 00:47:03.714 |
| 2024-03-12 00:47:03.714 |
and
| date |
|---|
| 2024-03-03 00:47:03.714 |
| 2024-03-04 00:47:03.714 |
| 2024-03-05 00:47:03.714 |
| 2024-03-06 00:47:03.714 |
| 2024-03-07 00:47:03.714 |
and finally
| date |
|---|
| 2024-02-27 00:47:03.714 |
| 2024-02-28 00:47:03.714 |
| 2024-02-29 00:47:03.714 |
| 2024-03-01 00:47:03.714 |
| 2024-03-02 00:47:03.714 |
There is another partition for the days from 02/21 – 02/26 but because ten days ago is 03/01, the entirety of the data from that last partition fall outside of our expiry time, the entire partition is unsearchable and possibly deleted.
Conclusion
Through this article, we have walked through how expiry partitioning works and have a working demo with Python showing exactly how this works in practice. You can try playing around with the expiry rules to see how it works further.
If you have any questions about the blog, please create a Stack Overflow post here https://stackoverflow.com/questions/ask?tags=griddb .
Make sure that you use the “griddb” tag so our engineers can quickly reply to your questions.