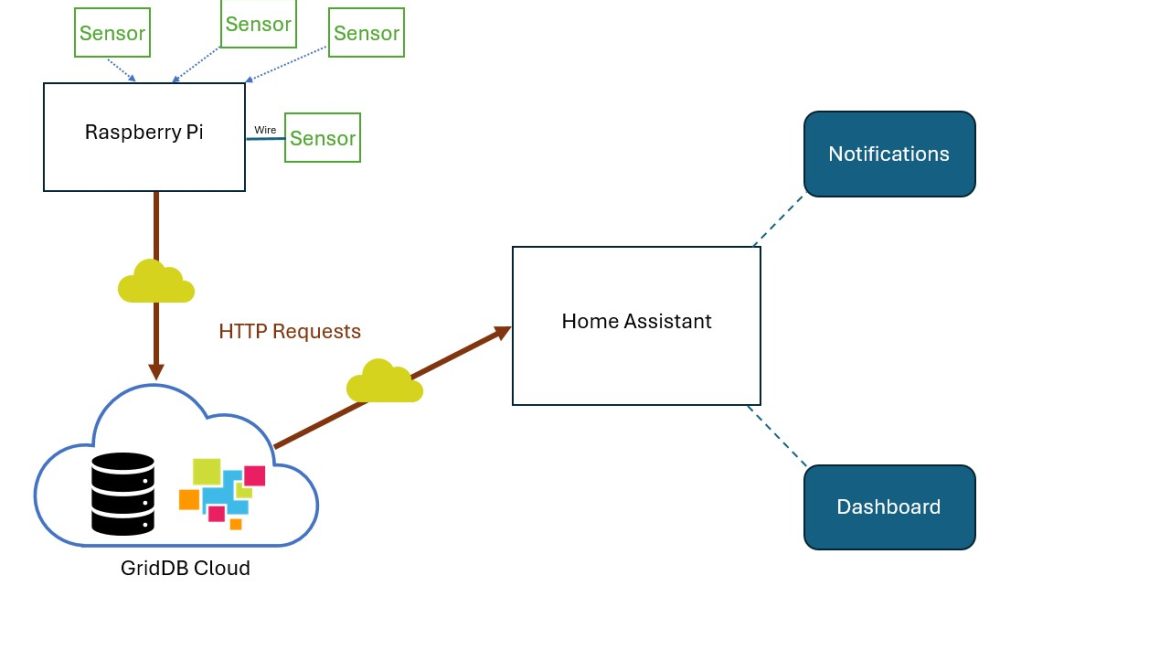
One of GridDB’s main draws are its inherent strengths at managing an IoT system, with its unique key-container data model and memory-first data architecture. With that in mind, we wanted to showcase how you could build out an IoT system completely on the cloud, using Azure’s IoT Hub for the IoT devices and event handling, and GridDB Cloud for the data storage. The easiest way to manage this is to send data from IoT Hub device via HTTP Requests through the use of Azure Functions.
For this article, we want to use the VS Code extensions for the Azure IoT Hub to create all of the resources we will need to create, test, and manage our virtual devices with our IoT Hub. We will also be utilizing the Azure CLI Tools to get a list of possible IP Addresses to be whitelisted in the GridDB Cloud. And then finally, we will create some Azure Functions (with VS Code), deploy them onto your Azure subscription, and then pair it with your Iot Hub. Again, the goal is for the device to emit data, trigger an event, and then send the data payload out to GridDB Cloud, seamlessly.
Implementation
We will now go through how to make this project work.
Prerequisites
To follow along, you will need an account with Microsoft Azure with credits (unfortunately we can’t get this up and running for free) and a free trial to GridDB Cloud. The cheapest available IoT Hub is estimated at $10/month.
Though not required, this article will reference completing many of the actions through VS Code and through the Azure CLI tool.
Creating Azure Resources
Now let’s go through and create our Azure resources. We will need to create the following:
- Azure IoT Hub
- Virtual Device(s)
- Azure Functions
Creating the Azure IoT Hub
This is our main hub; it will be a one-stop shop for our event triggers and our virtual devices. To create a new hub, you can either create it in the Azure Web Portal (straightforward) or through the VS Code extension (potentially easier).
To build with VS Code, first install the proper extension: https://marketplace.visualstudio.com/items?itemName=vsciot-vscode.azure-iot-toolkit.
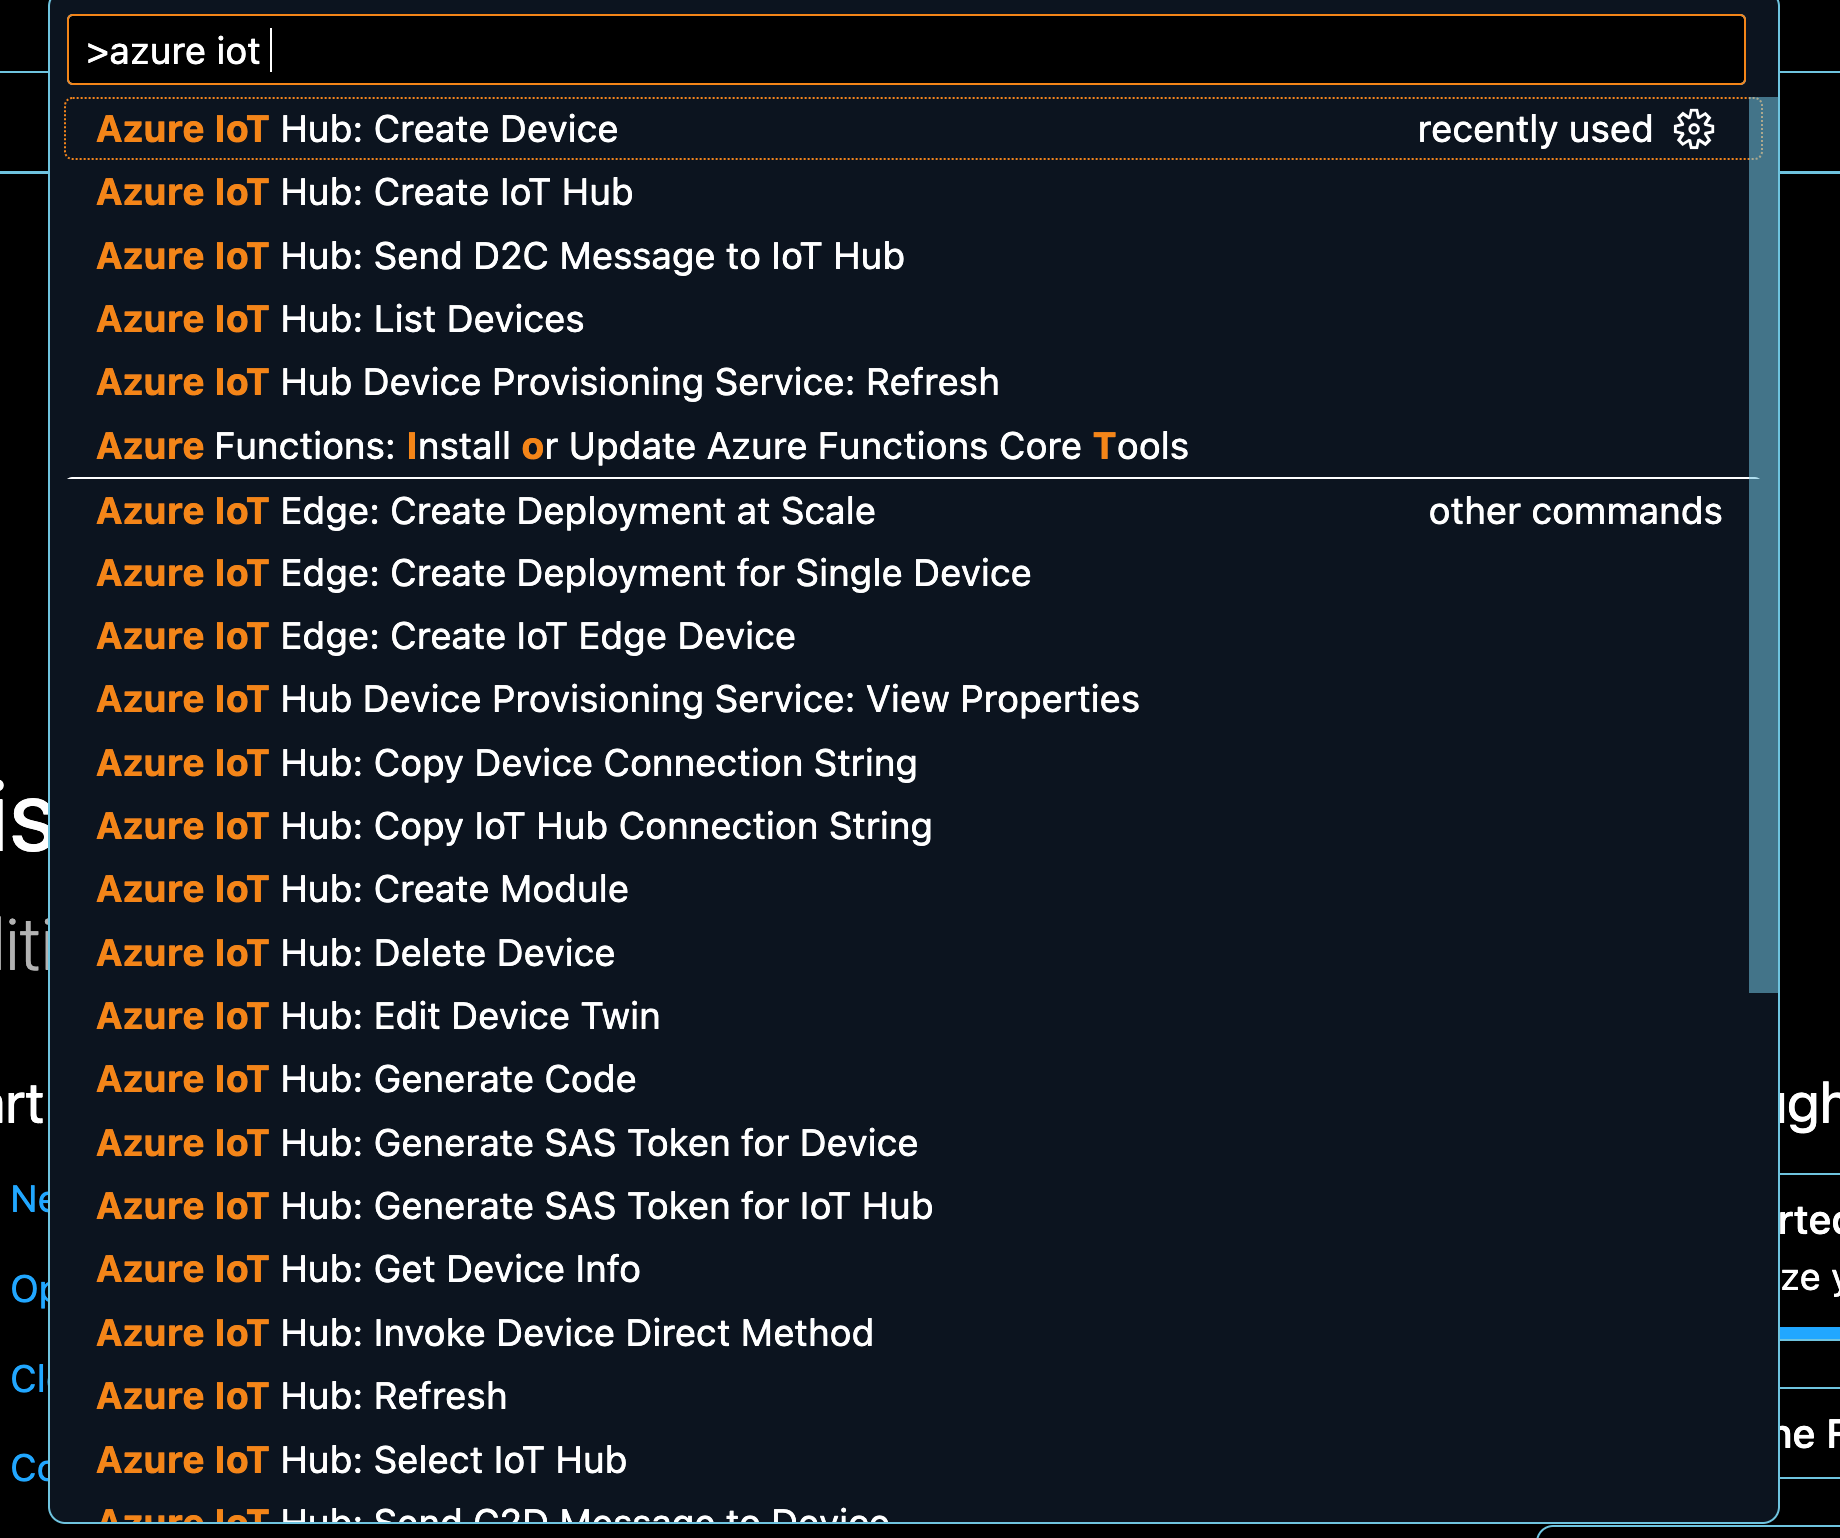
Next, open up the Command Palette (F1 key) and select Azure IoT Hub: Create IoT Hub and fill out all of the necessary information, including region, subscription, and choose a globally unique name (the hub needs to be unique because it gets is own public facing DNS name).
Adding Virtual Devices to the Hub
Now we want to add virtual IoT devices, so once again open up the Command Palette and select Azure IoT Hub: Create Device and give it a device name. You can add as many devices as you’d like, but for now we’ll keep it at one device. We will dicuss how to send data from this device to the Hub later.
Creating Azure Functions for Monitor Events
Lastly we would like to utilize Azure Functions to monitor our device to detect changes; once an event is detected, we want to be able to control what occurs next, in our case, an HTTP Request to be made.
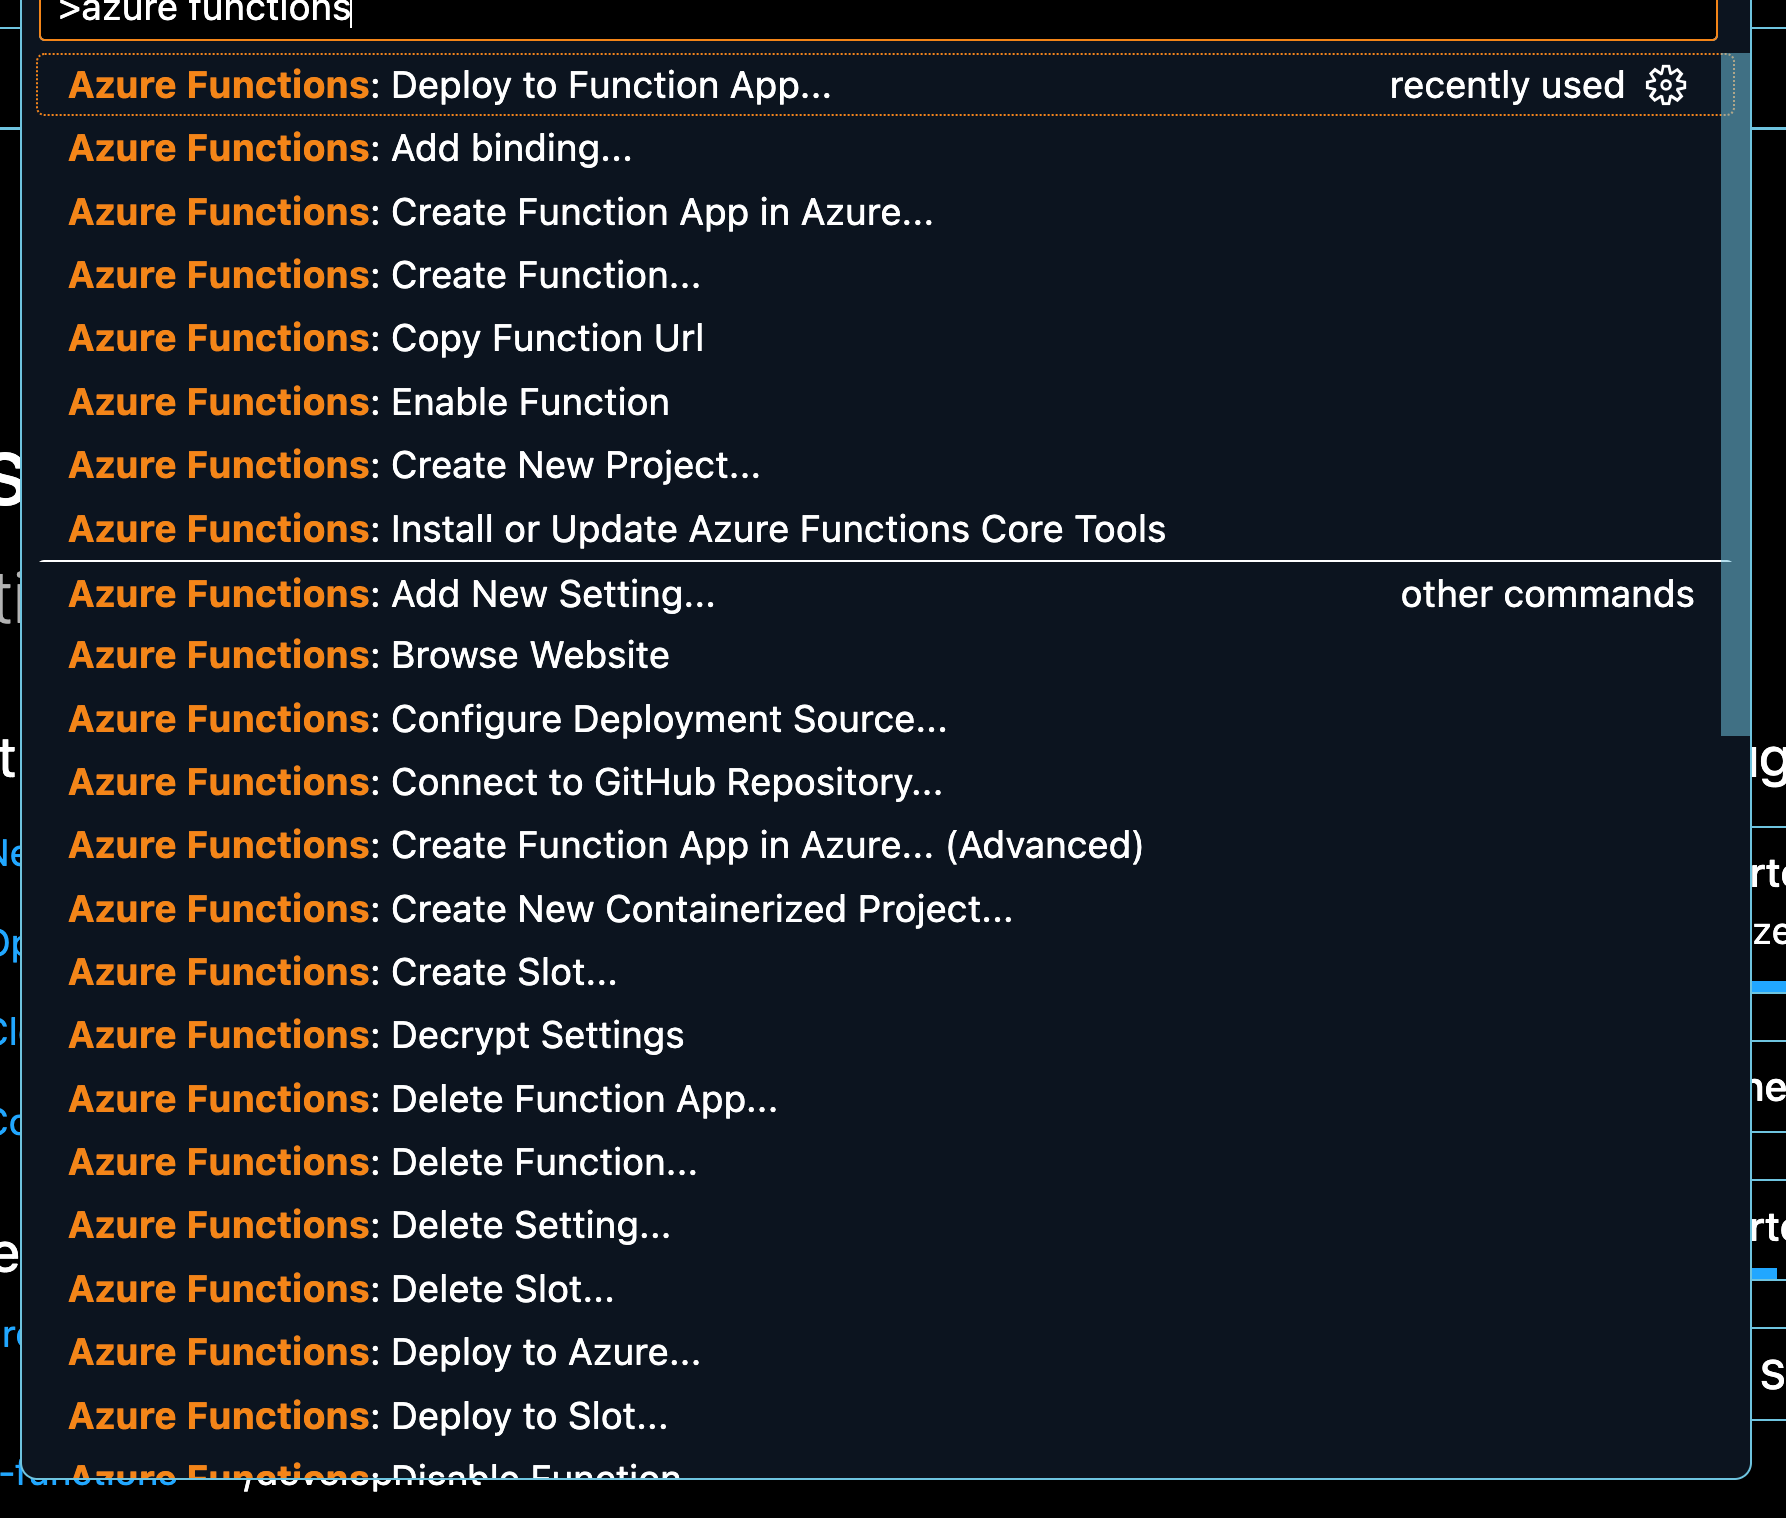
To do so, we will need one more VS Code Extension: Azure Functions
And now, once again, open up your Command Palette and select Azure Functions: Create Function App in Azure... to create a function. At this stage, we are naming it, creating a local instance of it, and choosing a runtime, of which we chose the latest version of node.js available.
For more information on how these event monitoring system works within Azure, here is some of the documentation: https://learn.microsoft.com/en-us/azure/iot-hub/iot-hub-event-grid
Sending our Data Payloads to GridDB Cloud
With our resources in place, the next step is to set up the event monitoring. We want for our hub to make HTTP Requests of our data payloads whenever it detects that one of its devices emits data. To do so, we will use the Azure Function that we created in the previous step and event monitoring.
Azure Function: Source Code for when Event is Triggered
We have already created the source code necessary for this step, so please clone the repo as indicated above. The code is very simple: it takes the sample code built by Azure for eventGridTriggers and simply adds a component to make HTTP Requests whenever the trigger is fired. Here is what the source code looks like:
const { app } = require('@azure/functions');
const axios = require('axios');
require('dotenv').config()

app.eventGrid('eventGridTrigger1', {
    handler: (event, context) => {
        context.log('Event grid function processed event:', event);

        const container = 'azureTest'
        const auth = {
            username: process.env.CLOUD_USERNAME,
            password: process.env.CLOUD_PASSWORD
        }
        const headers = {
            'Content-Type': 'application/json'
        }

        //HTTP Request to create our container called azureTest
        const dataCreation = {
            "container_name": container,
            "container_type": "COLLECTION",
            "rowkey": false,
            "columns": [
                { "name": "test", "type": "STRING" }
            ]
        }
        const configCreation = {
            method: 'POST',
            maxBodyLength: Infinity,
            url: process.env.CLOUD_URL + "/containers",
            headers,
            data: dataCreation,
            auth
        }

        axios.request(configCreation)
            .then((response) => {
                context.log(response.statusText);
                context.log(JSON.stringify(response.data));
            })
            .catch((error) => {
                context.log(error);
                context.error(error)
            });

        //HTTP Request to send data to our container
        const data = JSON.stringify([
            ["GRID EVENT TRIGGERED"]
        ]);

        let config = {
            method: 'PUT',
            maxBodyLength: Infinity,
            url: process.env.CLOUD_URL + "/containers/" + container + "/rows",
            headers,
            data,
            auth
        };

        axios.request(config)
            .then((response) => {
                context.log(response.statusText);
                context.log(JSON.stringify(response.data));
            })
            .catch((error) => {
                context.log(error);
                context.error(error)
            });
    }
});
We are using the GridDB Cloud Web API to build our HTTP Request to send the payload to be saved. With everything in place, we can deploy our function to the Azure Cloud.
You will need to copy the .env-example file and rename it to .env and fill out the values yourself. For the CLOUD URL variable, please just copy the GridDB WebAPI URL from your GridDB Portal as is.
Deploy Azure Function to Azure Cloud
So now, once again, make sure you have the source code provided by this blog in the repo pointed out above and make sure that your VS Code current folder/project is inside of a directory that has the source code.
Next, in the Command Palette, select Azure Functions: Deploy to Function App and select the Function you created above. This will create a zip of your current working directory (meaning all of the source code you downloaded from this article’s repo) and deploy it directly to your Azure Account. And now we want to tie this source code with our IoT Hub and our test virtual device.
Tying Azure Function to IoT Hub
For this last step, we would like for our hub to utilize the Azure Function created in the previous step. For this step, we will use the Azure Web Portal.
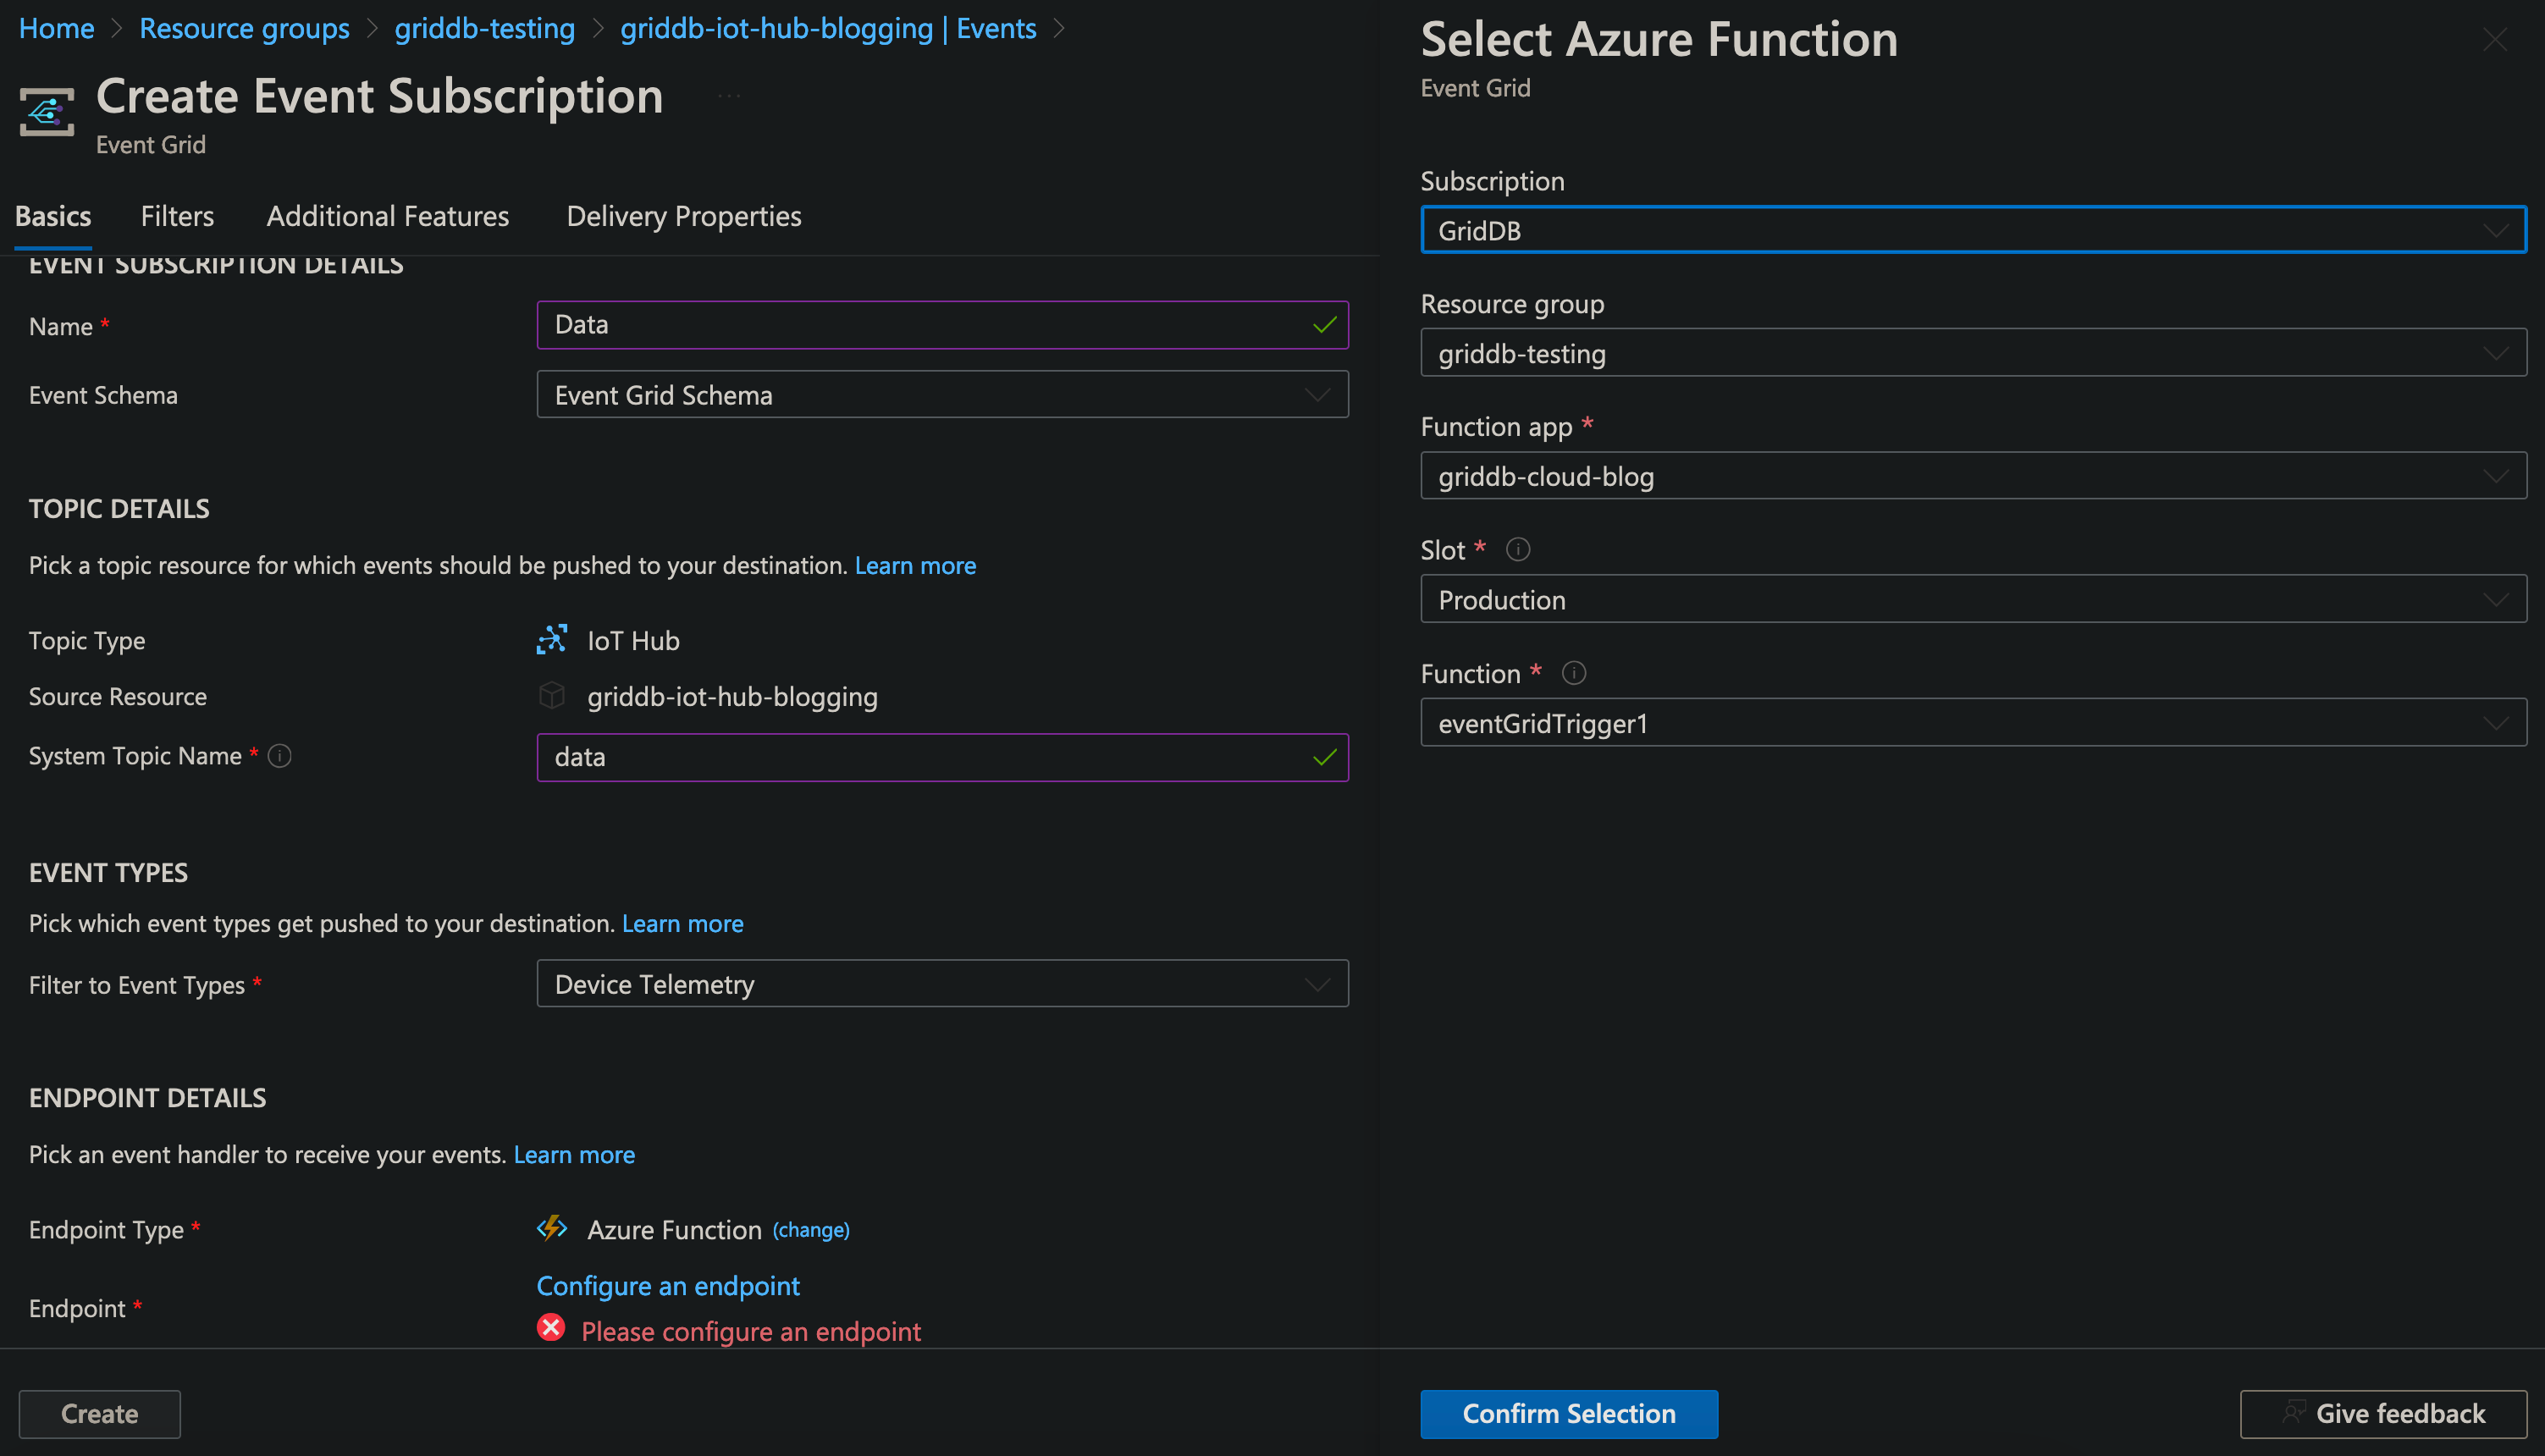
Open up the portal and find your IoT Hub Resource. Within that page navigate to: Events -> Azure Function. We will be creating a new event, so give it a name and system topic. For the “filter for event types” box, keep it selected only to Device Telemetry. And lastly, click Configure an Endpoint.
In the side panel, most likely everything will self-populate, but if not, choose the azure function app and functions we made previous (ie. function is called: eventGridTrigger1). NOTE: For this to work, your account will need the registry Microsoft.EventGrid in the subscription page enabled.
Receiving Data from IoT Hub
Lastly, even if we were to trigger an event of some payload to our hub from our device, the HTTP Request would fail because the GridDB Cloud requires all incoming IP Addresses to be whitelisted.
The issue now arises that we are using a lightweight Azure Function to handle our events, not a full blown server/VM with one static IP Address. Luckily, there is a way to retrieve all possible IP Addresses used by our Azure Function as shown in these docs: https://learn.microsoft.com/en-us/azure/azure-functions/ip-addresses.
You will need to install the Azure CLI and login to your proper account/subscription. Once there, you can run the following command:
$ az functionapp show --resource-group <INSERT RESOURCE NAME> --name <INSERT AZURE FUNCTION NAME> --query possibleOutboundIpAddresses --output tsv > outbound.txt
This will output a list of about 40 possible IP Addresses and save it into a text file called outbound.txt. As long as we add all of these to the GridDB Cloud Whitelist, we will be able to successfully save all of our events as they occur.
Whitelist IP Addresses
Obviously, while hand-writing each of these IP addresses is technically feasible, it’d be tedious and horrifying. To add each of these with a simple do while loop in bash, we first need to grab the endpoint with all authorization headers.
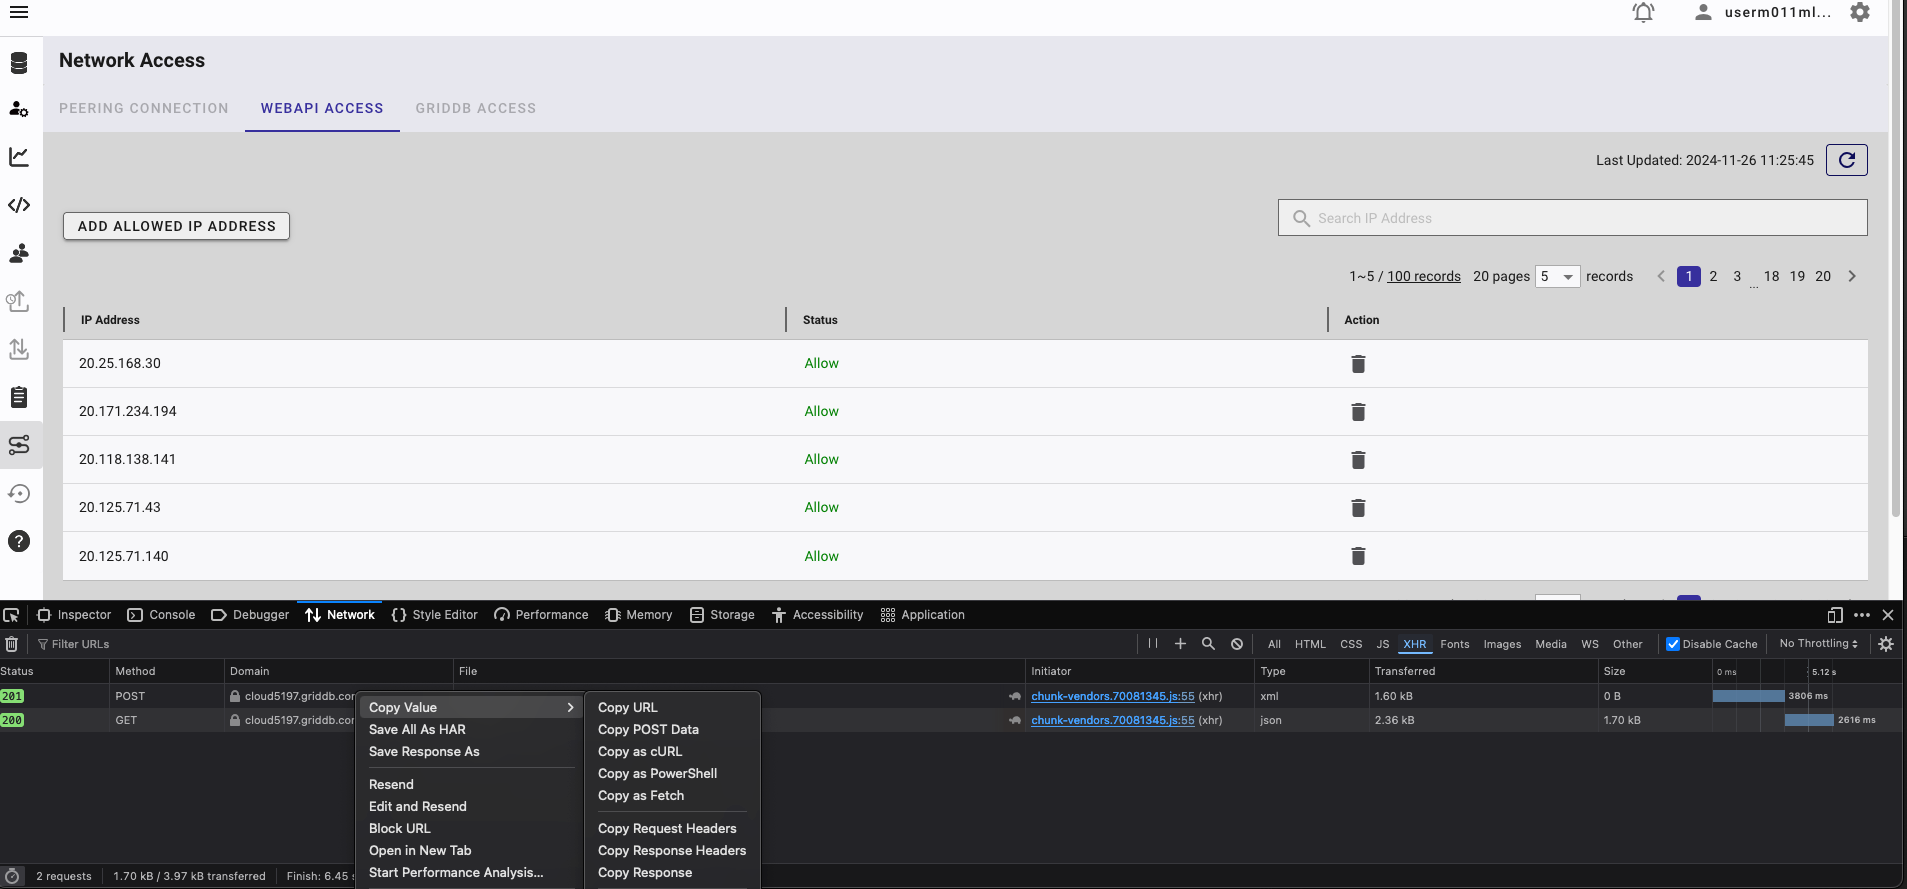
To do so, open up your GridDB Cloud Web Portal, open up the dev console, navigate to the network tab, filter for XHR requests, clear everything out, and add one of the 40 IP addresses on your list.
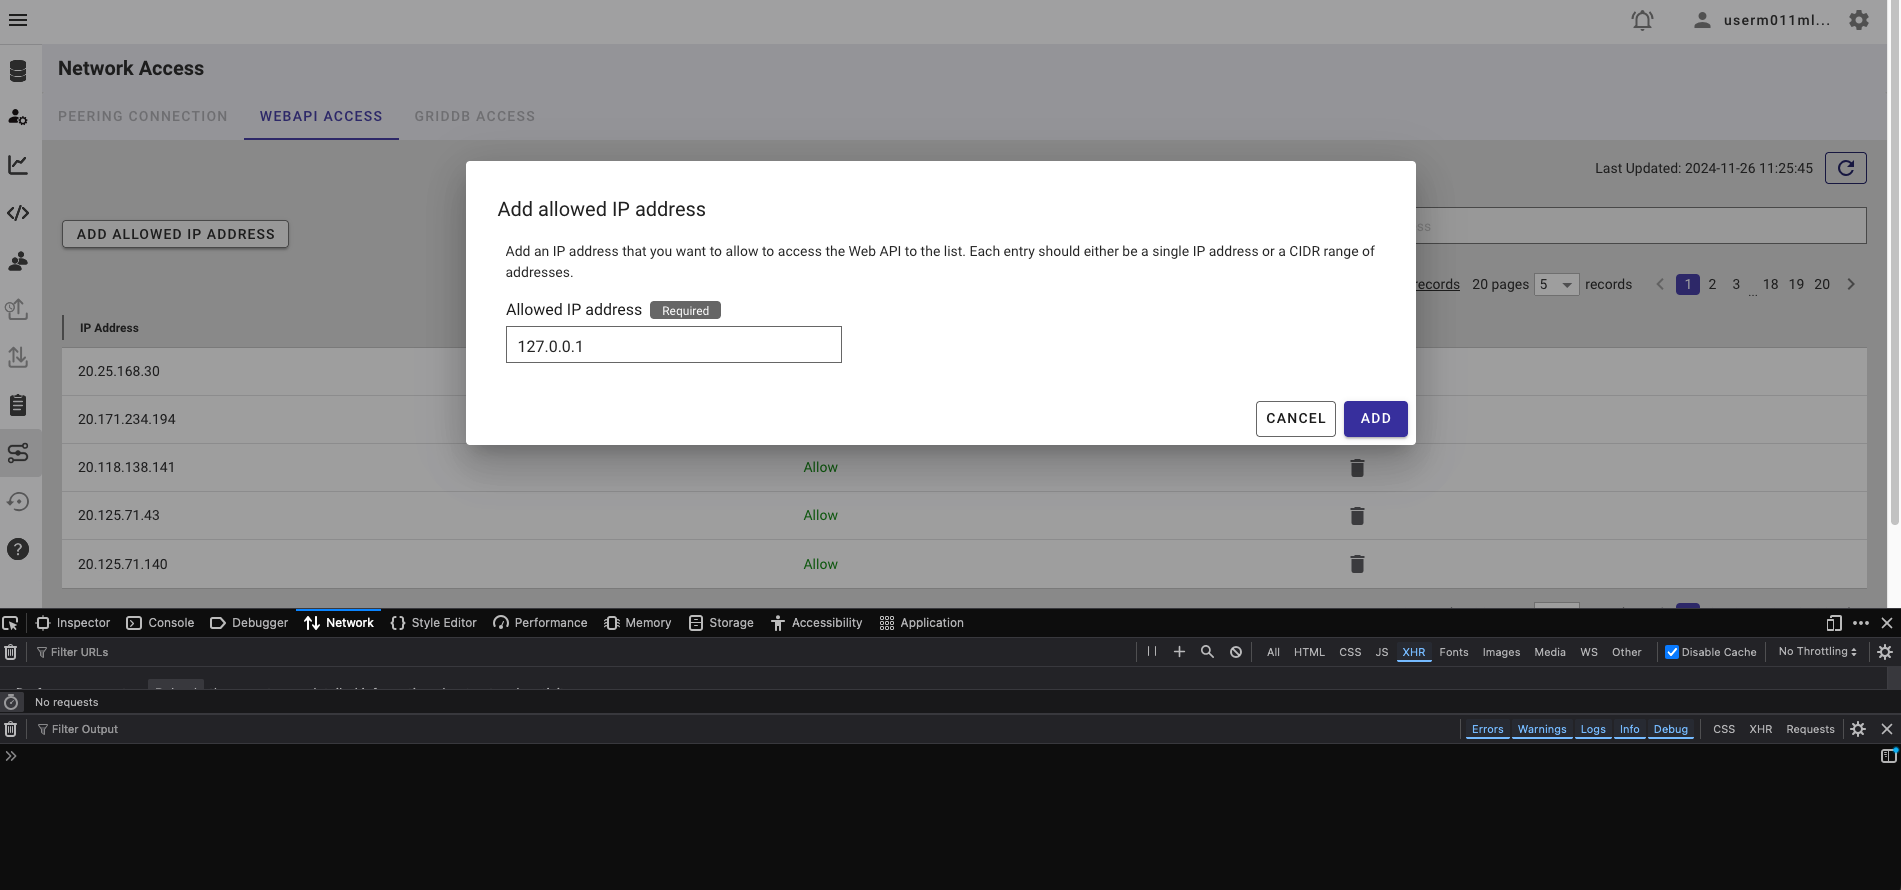 When you hit submit, you will see a 201 POST Request, now do the following: right click -> Copy Value -> Copy as cURL. You will now have the cURL Command saved in your clipboard.
Open up the whitelistIp.sh script and enter in the endpoint unique to you inside of the runCurl script sans the IP Address at the end. Here is what the entire script looks like:
#!/bin/bash

file=$1

#EXAMPLE
#runCurl() {
# curl 'https://cloud57.griddb.com/mfcloud57/dbaas/web-api/contracts/m01wc1a/access-list' -X POST -H 'User-Agent: Mozilla/5.0 (Macintosh; Intel Mac OS X 10.15; rv:133.0) Gecko/20100101 Firefox/133.0' -H 'Accept: application/json, text/plain, */*' -H 'Accept-Language: en-US,en;q=0.5' -H 'Accept-Encoding: gzip, deflate, br, zstd' -H 'Content-Type: application/json;charset=utf-8' -H 'Access-Control-Allow-Origin: *' -H 'Authorization: Bearer eyJ0eXAiOiJBY2Nlc3MiLCJIUzI1NiJ9.eyJzdWIiOiJkMTg4NjlhZC1mYjUxLTQwMWMtOWQ0Yy03YzI3MGNkZTBmZDkiLCJleHAiOjE3MzEwMTEyMTMsInJvbGUiOiJBZG1pbiIsInN5c3RlbVR5cGUiOjF9.B1MsV9-Nu8m8mJbsp6dKABjJDBjQDdc9aRLffTlTcVM' -H 'Origin: https://cloud5197.griddb.com' -H 'Connection: keep-alive' -H 'Referer: https://cloud5197.griddb.com/mfcloud5197/portal/' -H 'Sec-Fetch-Dest: empty' -H 'Sec-Fetch-Mode: cors' -H 'Sec-Fetch-Site: same-origin' -H 'Priority: u=0' -H 'Pragma: no-cache' -H 'Cache-Control: no-cache' --data-raw $1
#}

runCurl() {
    <paste VALUE HERE> $1
}

while IFS= read -r line; do
    for ip in ${line//,/ }; do
        echo "Whitelisting IP Address: $ip"
        runCurl $ip
    done
done < "$file"</paste>
The script will take the outputs from the Azure CLI command to make a string of IP Addresses, seperate out the value by the comma, and then run the cURL command for each individual address. This script expects the file name as a CLI argument when running ie: $ ./whitelistIp.sh outbound.txt.
Sending Data from Device to Cloud
Now that we’ve got everything set up, the last thing we will do is send data from our virtual device to the cloud. We then expect to see our test string being published into our GridDB Cloud instance. In the source code, we are simply saving a string which contains the characters “GRID EVENT TRIGGERED” to a new container called azureTest as a test to make sure our infrastructure works as expected.
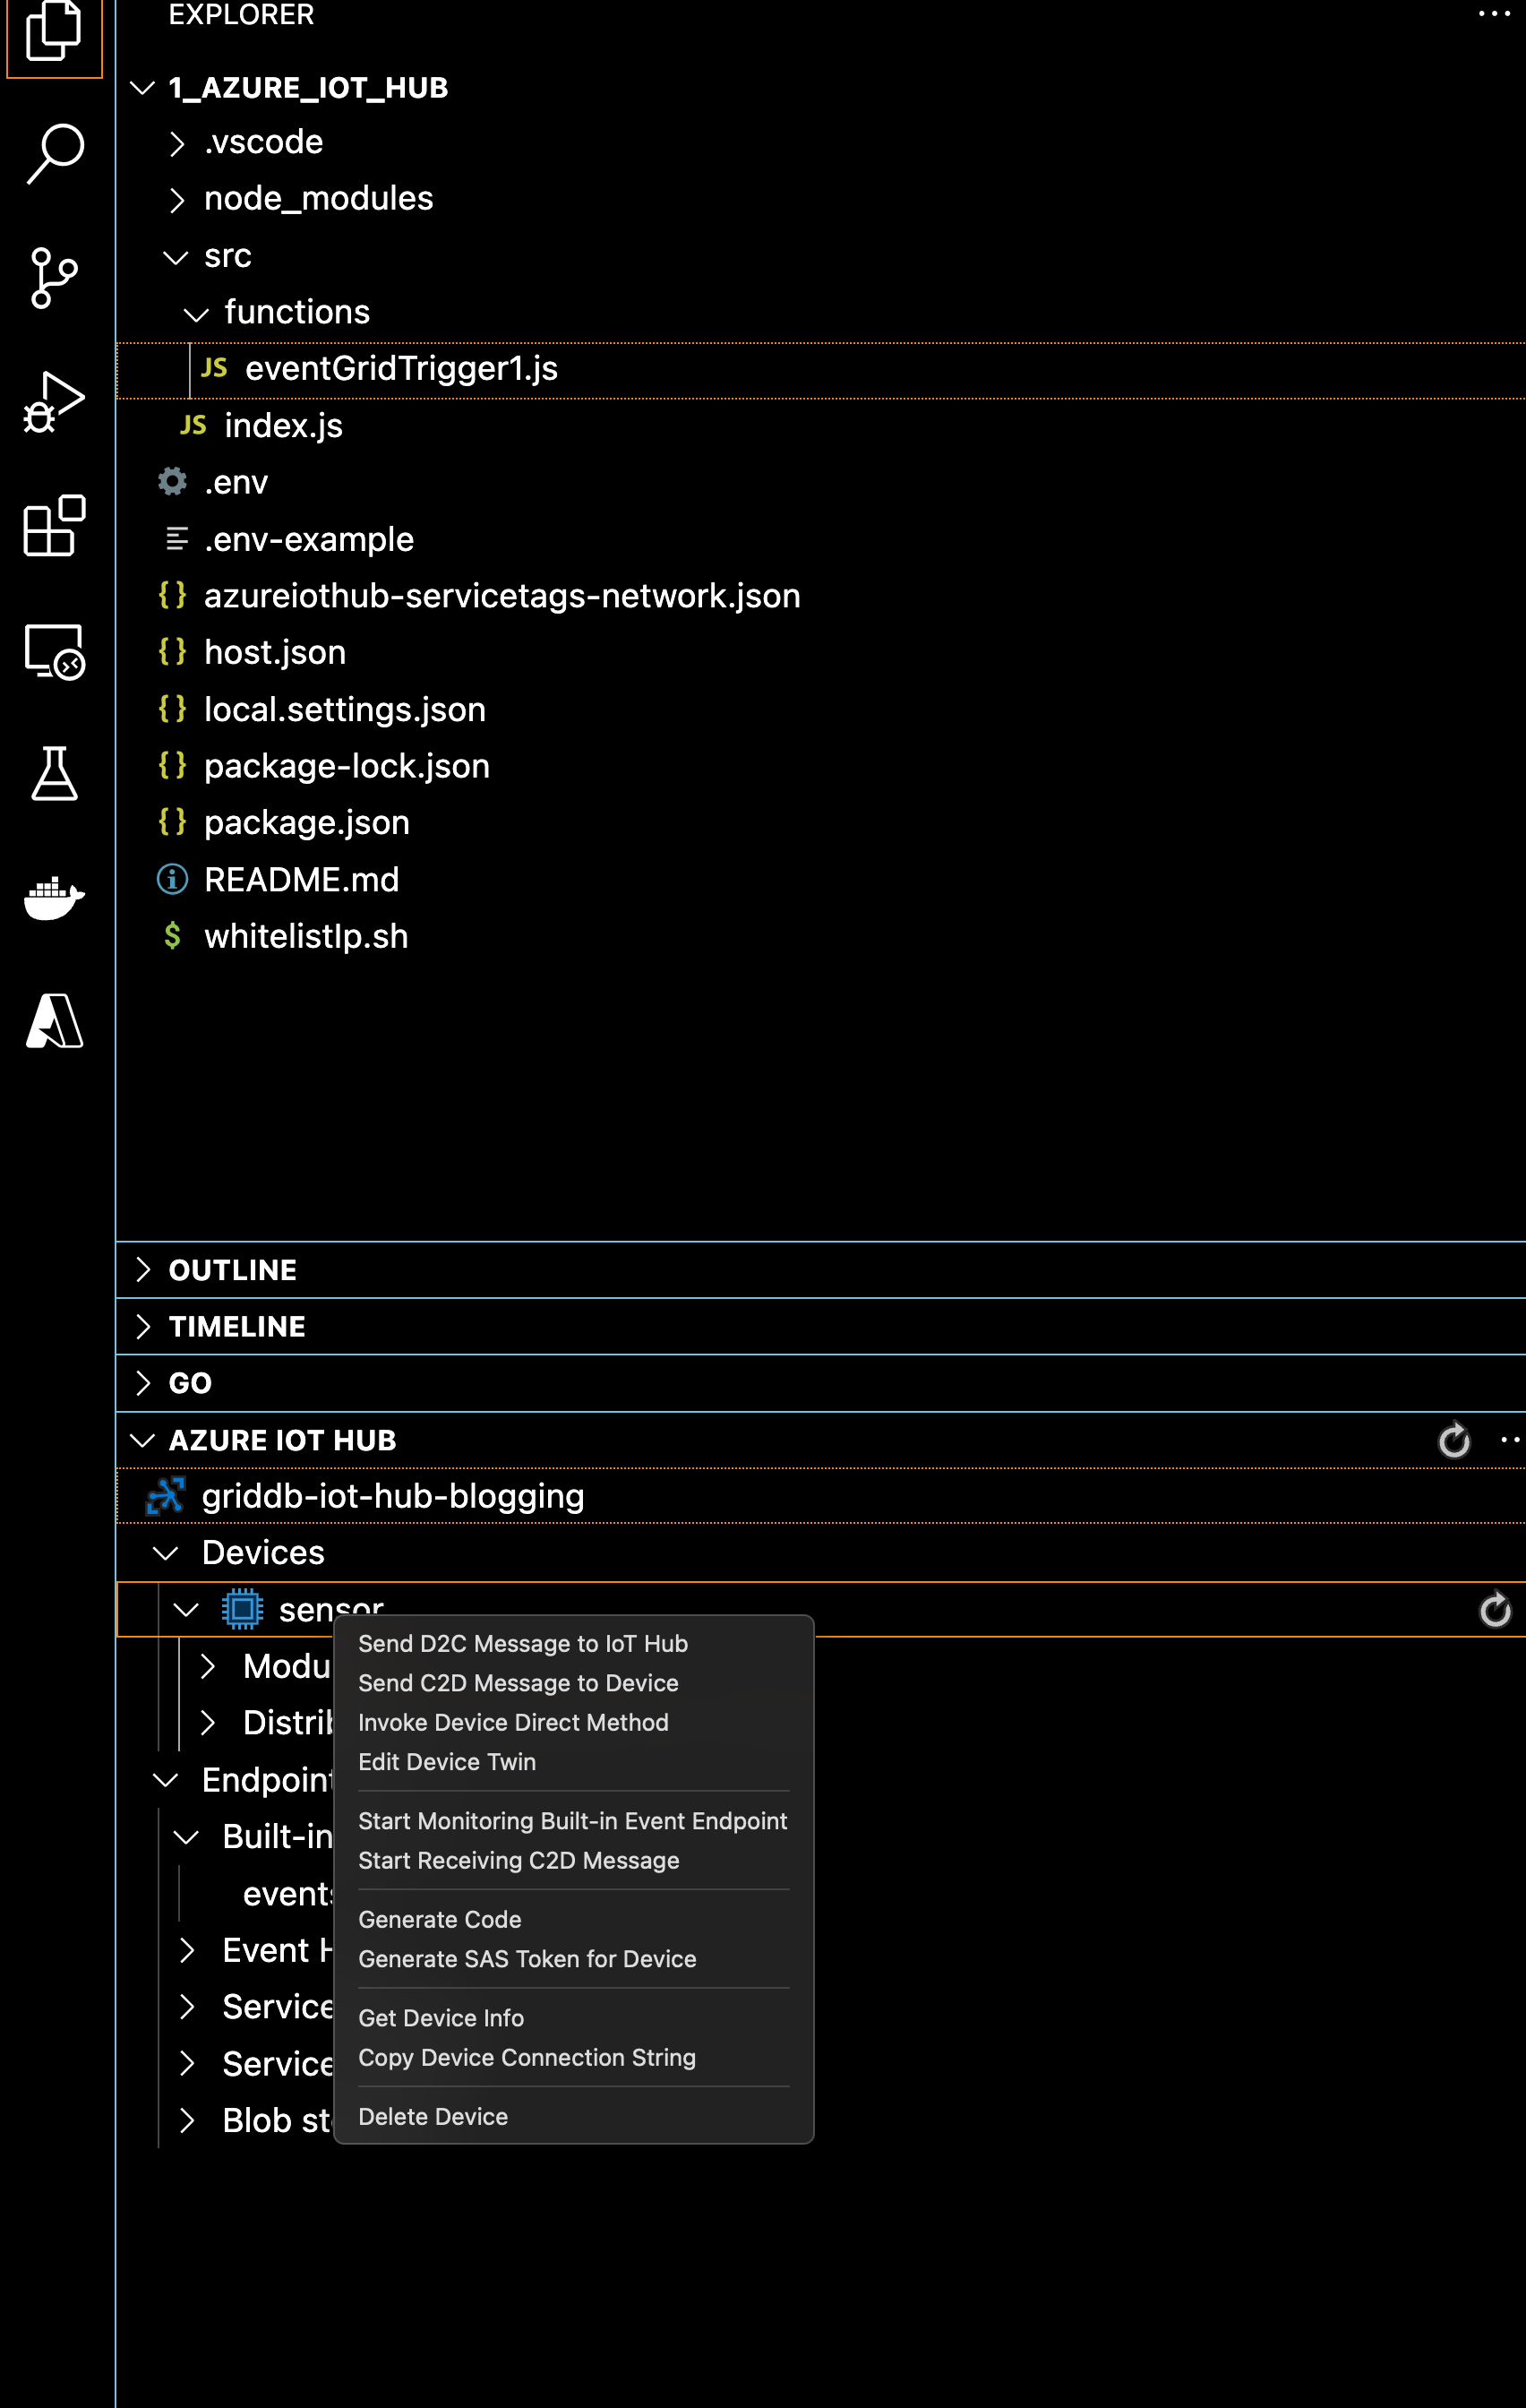
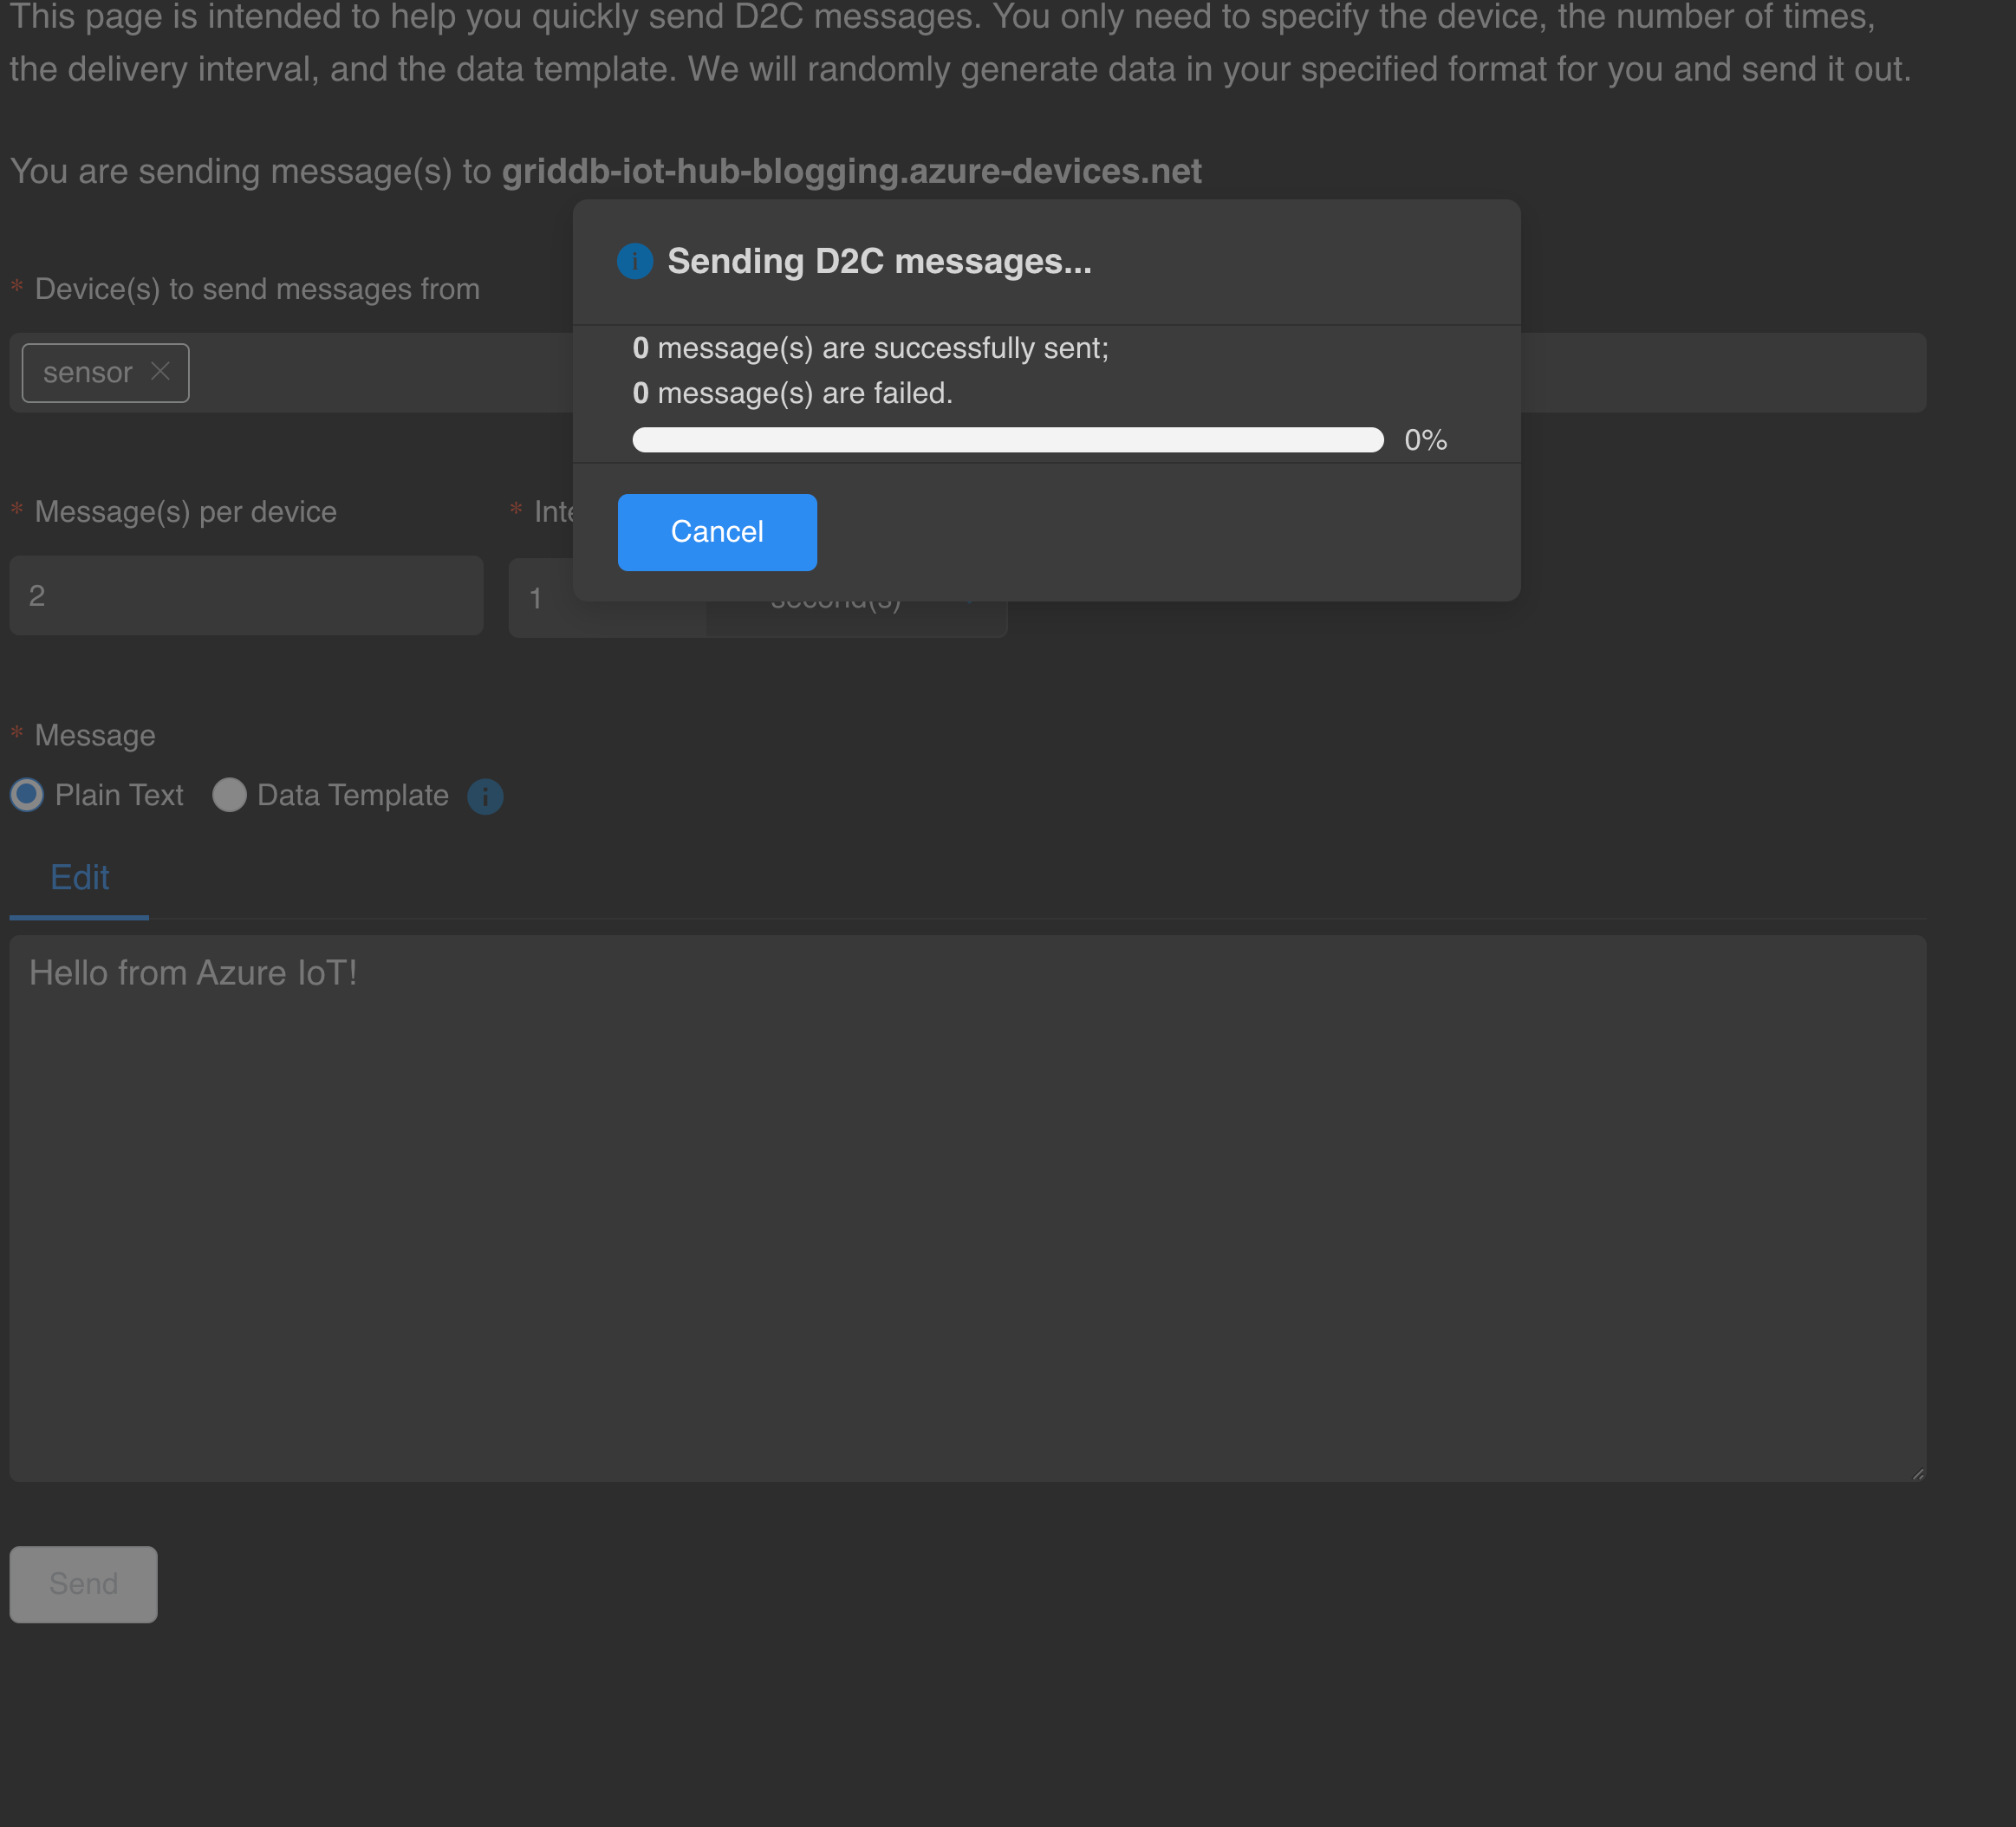
From your VS Code window, in the explorer tab, find the Azure IoT Hub Resource panel and find your IoT Hub Manager and its devices. Right click the device you want to use and select Send D2C Messages to IoT Hub (D2C = Device to Cloud).
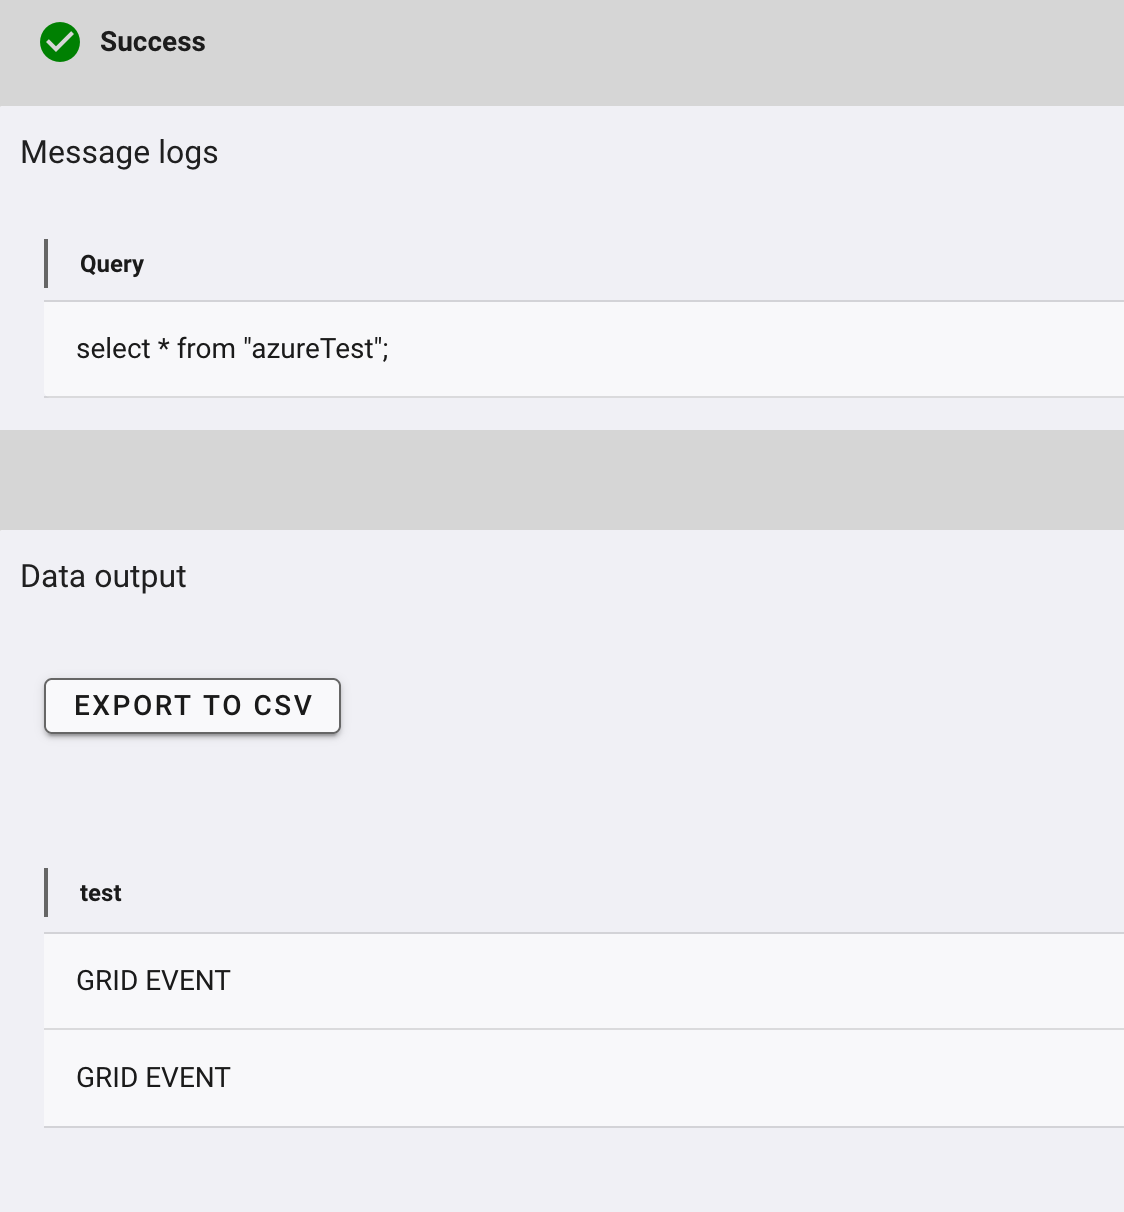
Once your message is sent, you should have a new container in your GridDB Cloud instance called ‘azureTest’ and it should have one row of data inside of it with a value of ‘GRID EVENT TRIGGERED’ — cool!
Conclusion
And that does it! You can now expand your Cloud IoT Infrastructure as much as you’d like. Make new data containers with real schemas tied to real devices and sync them up and save all data into GridDB Cloud for a purely server-less experience!
If you have any questions about the blog, please create a Stack Overflow post here https://stackoverflow.com/questions/ask?tags=griddb .
Make sure that you use the “griddb” tag so our engineers can quickly reply to your questions.
