
Intrusions refer to unauthorized activities that exploit vulnerabilities in IoT devices, which can compromise sensitive data or disrupt essential services. Detecting these intrusions is crucial to maintaining the security and integrity of IoT networks.
This article demonstrates how to develop a robust intrusion detection system for IoT environments using a machine learning and deep learning approach with the GridDB database . We will begin by retrieving IoT intrusion detection data from Kaggle, store it in a GridDB container, and use this data to train machine learning and deep learning models to identify different types of intrusions.
GridDB, a high-performance NoSQL database, is particularly suited for handling the large-scale, real-time data generated by IoT systems due to its efficient in-memory processing and time series capabilities.
Using GridDBâs powerful IoT data management features along with advanced machine learning and deep learning, we will build a predictive model that identifies potential threats to IoT devices.
Note: You can find codes for the tutorial in my GridDB Blogs GitHub repository.
Prerequisites
You need to install the following libraries to run codes in this article.
- GridDB C Client
- GridDB Python client
To install these libraries, follow the installation instructions on GridDB Python Package Index (Pypi).
Since the code is executed in Google Colab, you do not need to install any other libraries.
Run the following script to import required libraries into your Python application.
import pandas as pd
import seaborn as sns
import matplotlib.pyplot as plt
from sklearn.model_selection import train_test_split
from sklearn.preprocessing import StandardScaler
from sklearn.ensemble import RandomForestClassifier
from sklearn.metrics import accuracy_score,  classification_report
from sklearn.preprocessing import LabelEncoder

import tensorflow as tf
from tensorflow.keras.models import Sequential
from tensorflow.keras.layers import Dense, Dropout, BatchNormalization
from tensorflow.keras.callbacks import EarlyStopping, ModelCheckpoint
from tensorflow.keras.optimizers import Adam
from tensorflow.keras.models import load_model

import griddb_python as griddb
Inserting IoT Data into GridDB
In this section, you will see how to download IoT data from kaggle, import it into your Python application and store it in the GridDB database. Along the way you, you will learn to connect your Python application to GridDB, create a GridDB container and insert data into the GridDB container you created.
Downloading and Importing the IoT Dataset From Kaggle
We will insert the IoT Intrusion Detection dataset from Kaggle into the GridDB.
The dataset consists of different types of IoT intrusions. the following script imports the dataset into a Pandas dataframe.
# Dataset download link
#https://www.kaggle.com/datasets/subhajournal/iotintrusion/data

dataset = pd.read_csv("IoT_Intrusion.csv")
print(f"The dataset consists of {dataset.shape[0]} rows and {dataset.shape[1]} columns")
dataset.head()
Output:
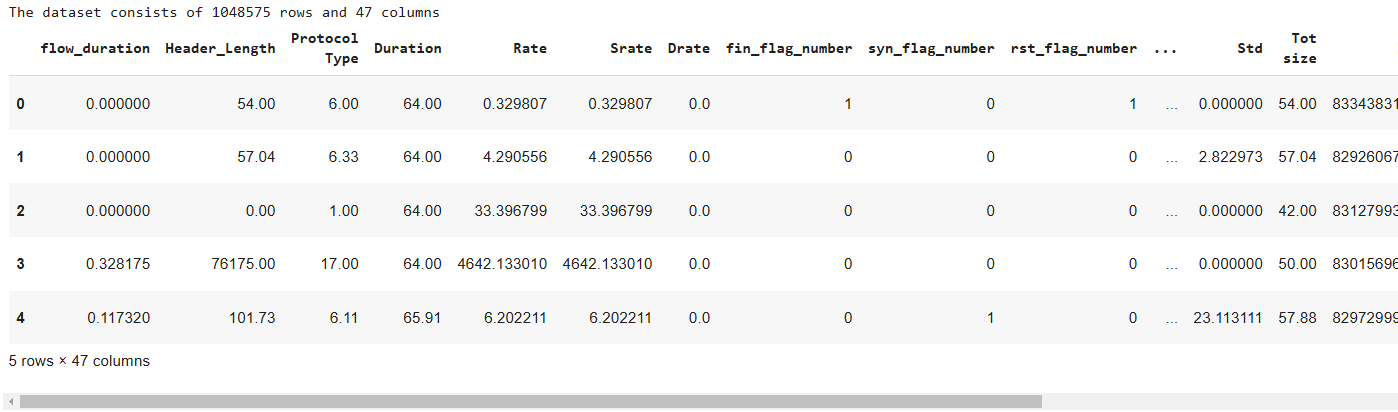
The above output shows that the dataset consists of 1048575 rows and 47 columns.
For the sake of simplicity, we will train our machine learning models on 200k records. The following script randomly selects 200k records from the original dataset.
The label column contains the intrusion types. We will also plot the count for each intrusion type.
dataset = dataset.sample(n=200000, random_state=42)
print(f"The dataset consists of {dataset.shape[0]} rows and {dataset.shape[1]} columns")
print(f"The total number of output labels are {dataset['label'].nunique()}")
dataset['label'].value_counts()
Output:
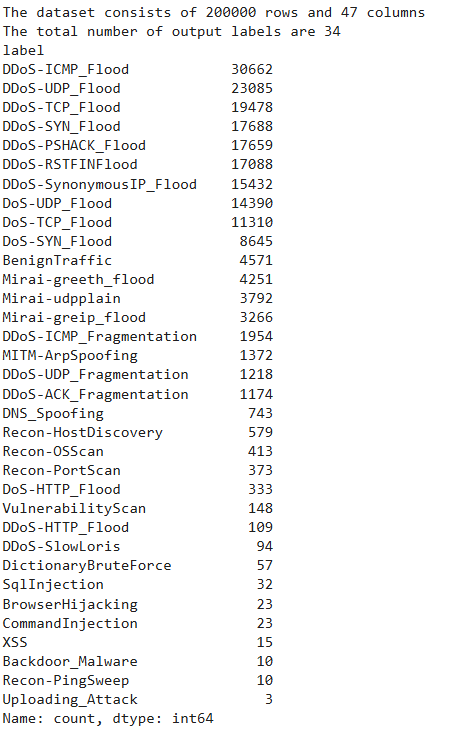
The above output shows all the 34 intrusion types in our dataset with DDoS-ICMP_FLOOD being the most frequently occurring intrusion while Uploading_Attack is the least frequently occurring intrusion type.
For simplification’s sake we will group the 34 categories into 9 major categories using the following script.
category_map = {
    'DDoS': [
        'DDoS-ICMP_Flood', 'DDoS-UDP_Flood', 'DDoS-TCP_Flood', 'DDoS-PSHACK_Flood',
        'DDoS-SYN_Flood', 'DDoS-RSTFINFlood', 'DDoS-SynonymousIP_Flood', 'DDoS-ICMP_Fragmentation',
        'DDoS-ACK_Fragmentation', 'DDoS-UDP_Fragmentation', 'DDoS-HTTP_Flood', 'DDoS-SlowLoris'
    ],
    'DoS': [
        'DoS-UDP_Flood', 'DoS-TCP_Flood', 'DoS-SYN_Flood', 'DoS-HTTP_Flood'
    ],
    'Brute Force': [
        'DictionaryBruteForce'
    ],
    'Spoofing': [
        'MITM-ArpSpoofing', 'DNS_Spoofing'
    ],
    'Recon': [
        'Recon-HostDiscovery', 'Recon-OSScan', 'Recon-PortScan', 'Recon-PingSweep'
    ],
    'Web-based': [
        'SqlInjection', 'CommandInjection', 'XSS', 'BrowserHijacking', 'Uploading_Attack'
    ],
    'Mirai': [
        'Mirai-greeth_flood', 'Mirai-udpplain', 'Mirai-greip_flood'
    ],
    'Other': [
        'VulnerabilityScan', 'Backdoor_Malware'
    ],
    'Benign-trafic': [
        'BenignTraffic'
    ]
}

# Reverse the mapping to allow lookup by subcategory
subcategory_to_parent = {subcat: parent for parent, subcats in category_map.items() for subcat in subcats}

# Add the 'class' column using the mapping
dataset['class'] = dataset['label'].map(subcategory_to_parent)

dataset['class'].value_counts()
Output:
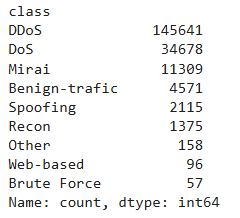
You can now see that DDoS intrusion is the most frequently occuring intrusion followed by DoS and Mirai.
Let’s plot a bar plot for the class distribution.
class_counts = dataset['class'].value_counts()

sns.set(style="darkgrid")

plt.figure(figsize=(10, 6))
sns.barplot(x=class_counts.index, y=class_counts.values)
plt.title("Class Distribution")
plt.xlabel("Class")
plt.ylabel("Count")
plt.xticks(rotation=45)
plt.show()
Output:
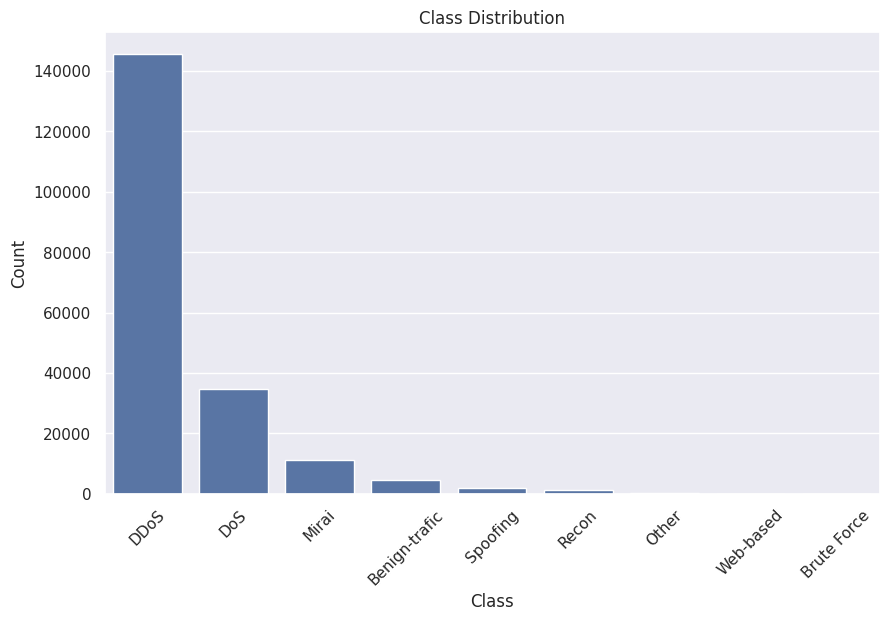
The above output shows that our dataset is highly imbalanced.
In the next section, we will insert this data into GridDB.
Connect to GridDB
You need to perform the following steps to connect your Python application to a GridDB instance.
-
Create an instance of the
griddb.StoreFactoryobject using theget_instance()method. -
Create a GridDB store factory object by calling the
get_store()method on theStoreFactoryobject. You need to pass the GridDB host and cluster name, and the user and password that you use to connect to the GridDB instance. This should establish a connection to your GridDB instance. -
To test the connection create a container by calling the
get_container()method and pass to it a dummy container name. This step is optional and only tests the connection.
The following script shows how to connect to GridDB.
# GridDB connection details
DB_HOST = "127.0.0.1:10001"
DB_CLUSTER = "myCluster"
DB_USER = "admin"
DB_PASS = "admin"

# creating a connection

factory = griddb.StoreFactory.get_instance()

try:
    gridstore = factory.get_store(
        notification_member = DB_HOST,
        cluster_name = DB_CLUSTER,
        username = DB_USER,
        password = DB_PASS
    )

    container1 = gridstore.get_container("container1")
    if container1 == None:
        print("Container does not exist")
    print("Successfully connected to GridDB")

except griddb.GSException as e:
    for i in range(e.get_error_stack_size()):
        print("[", i, "]")
        print(e.get_error_code(i))
        print(e.get_location(i))
        print(e.get_message(i))
Output:
Container does not exist
Successfully connected to GridDB
If you see the above output, you have successfully connected to GridB.
Create Container for IoT Data in GridDB
GridDB stores data in containers. Therefore, you need to create a container to store your IoT data.
You will need to perform the following steps to create a GridDb container capable of storing your IoT data.
-
First, check if a container with the name you want to use already exists. If it does, either delete the existing container or choose a different name for your new container.
-
Convert your dataset into a format that the GridDB expects. For example, GridDB expects the dataset to have a unique ID, therefore you need to add unique add if it doesn’t already exist. Similarly GriDB doesn’t accept spaces in column names. You will need to preprocess the column names too.
-
GridDB data types are different than the Pandas dataframe types. You need to Define mapping from Pandas dataframe column types to GridDB data types.
-
You need to create a column info list that contains column names and their corresponding mapped data type.
-
Finally, you need to call the
put_container()method on the store factory object and pass it the container name, thecolumn_infolist and the container type (griddb.ContainerType.COLLECTIONin this case). Therow_keyis set to true since each row has unique ID. -
To test if the container is successfully created, call the
get_container()method to retrieve the container you created.
The following script creates the IoT_Data container in our GridB instance.
# drop container if already exists
gridstore.drop_container("IoT_Data")

# Add an primary key column
dataset.insert(0, 'ID', range(1, len(dataset) + 1))

# Clean column names to remove spaces or forbidden characters in the GridDB container
dataset.columns = [col.strip().replace(" ", "_") for col in dataset.columns]

# Mapping from pandas data types to GridDB data types
type_mapping = {
   'float64': griddb.Type.DOUBLE,
   'int64': griddb.Type.INTEGER,
   'object': griddb.Type.STRING
}


# Generate column_info dynamically, adding ID as the first entry
column_info = [["ID", griddb.Type.INTEGER]] + [
   [col, type_mapping[str(dtype)]] for col, dtype in dataset.dtypes.items() if col != "ID"
]

# Define the container info with ID as the primary key and as a collection container
container_name = "IoT_Data"
container_info = griddb.ContainerInfo(
   container_name, column_info, griddb.ContainerType.COLLECTION, row_key=True
)

# Connecting to GridDB and creating the container
try:
   gridstore.put_container(container_info)
   container = gridstore.get_container(container_name)
   if container is None:
       print(f"Failed to create container: {container_name}")
   else:
       print(f"Successfully created container: {container_name}")

except griddb.GSException as e:
   print(f"Error creating container {container_name}:")
   for i in range(e.get_error_stack_size()):
       print(f"[{i}] Error code: {e.get_error_code(i)}, Message: {e.get_message(i)}")
Insert IoT Data into GridDB
We are now ready to insert the dataframe into the GridDB container we just created.
To do so, we iterate through all the rows in our dataset, fetch the column data and column type for each row and insert the data using the container.put() method.
The following script inserts our IoT data from the Pandas dataframe into the GriDB IoT_Data container.
try:
    for _, row in dataset.iterrows():
        # Prepare each row's data in the exact order as defined in `column_info`
        row_data = [
            int(row[col]) if dtype == griddb.Type.INTEGER else
            float(row[col]) if dtype == griddb.Type.DOUBLE else
            str(row[col])
            for col, dtype in column_info
        ]
        # Insert the row data into the container
        container.put(row_data)

    print(f"Successfully inserted {len(dataset)} rows of data into {container_name}")

except griddb.GSException as e:
    print(f"Error inserting data into container {container_name}:")
    for i in range(e.get_error_stack_size()):
        print(f"[{i}] Error code: {e.get_error_code(i)}, Message: {e.get_message(i)}")
Output:
Successfully inserted 200000 rows of data into IoT_DataIn the next sections we will retrieve the IoT data from GridDB and will train machine learning and deep learning models for predicting intrusion type.
Forecasting IoT Intrusion Using Machine Learning and Deep Learning
We will try both machine learning and deep learning approaches for predicting intrusion type. But first we will see how to retrieve data from GridDB.
Retrieving Data From GridDB
To retrieve GridDB data you have to retrieve the container, call query() method and pass the SELECT * query to the method. This will retrieve all the records from the container. Next, call the fetch() method to retrieve the data from the container. Finally, call the fetch_rows() method to store data in a Pandas dataframe.
The following script defines the retrieve_data_from_griddb() method that retrieves data from a GridDB container into a Pandas dataframe.
def retrieve_data_from_griddb(container_name):

    try:
        data_container = gridstore.get_container(container_name)

        # Query all data from the container
        query = data_container.query("select *")
        rs = query.fetch()

        data = rs.fetch_rows()
        data .set_index("ID", inplace=True)
        return data

    except griddb.GSException as e:
        print(f"Error retrieving data from GridDB: {e.get_message()}")
        return None


iot_data = retrieve_data_from_griddb("IoT_Data")
iot_data.head()
Output:

IoT Data Classification Using Machine Learning
We will first use the Random Forest Classification algorithm, a classification machine learning algorithm and predict the intrusion type.
To do so, we will divide our dataset into features and labels set and then train and test sets. We will also standardize our dataset.
# Separate the features (X) and the output class (y)

X = iot_data.drop(columns=['label', 'class'])  # Dropping both `label` and `class` columns as `class` is the target
y = iot_data['class']  # Output target

X_train, X_test, y_train, y_test = train_test_split(X, y, test_size=0.2, random_state=42)

scaler = StandardScaler()
X_train = scaler.fit_transform(X_train)
X_test = scaler.transform(X_test)
Next, we will use the RandomForestClassifier() class from the sklearn module and call its fit() method to train the algorithm on the training data.
rf_model = RandomForestClassifier(random_state=42)
rf_model.fit(X_train, y_train)
Finally, we can make predictions using the predict() method and compare the predictions with the actual labels in the test set to calculate the model accuracy.
rf_predictions = rf_model.predict(X_test)
rf_accuracy = accuracy_score(y_test, rf_predictions)

classification_rep = classification_report(y_test, rf_predictions, zero_division=1)
print("Classification Report:n", classification_rep)
Output:
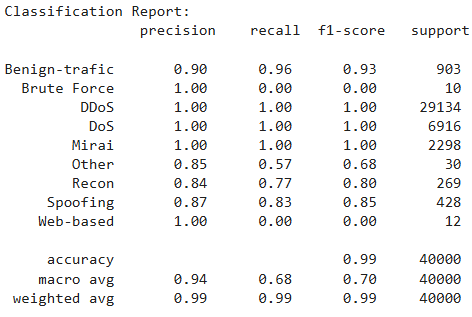
The above output shows that our model achieves an accuracy of 99% on the test set. It is important to note that since Brute Force had only 47 instances in the training set, the model is not able to learn much about this category.
IoT Data Classification Using Deep Learning
Let’s now predict intrusion detection using a deep neural network implemented in TensorFlow Keras library. We will convert the output labels to numeric integers since deep learning algorithms work with numbers only. Next we will standardize the training and test sets as we did before.
label_encoder = LabelEncoder()
y = label_encoder.fit_transform(iot_data['class'])  # Integer encoding

X_train, X_test, y_train, y_test = train_test_split(X, y, test_size=0.2, random_state=42)

X_train = scaler.fit_transform(X_train)
X_test = scaler.transform(X_test)
The following script defines our model with four hidden layers followed by an output layer. Since we have a multiclass classification problem we use the softmax function in the final activation layer.
We also use an adaptive learning rate to avoid overfitting.
# Define the model
model = Sequential([
    Dense(256, input_dim=X_train.shape[1], activation='relu'),
    BatchNormalization(),
    Dropout(0.4),
    Dense(128, activation='relu'),
    BatchNormalization(),
    Dropout(0.4),
    Dense(64, activation='relu'),
    BatchNormalization(),
    Dropout(0.3),
    Dense(32, activation='relu'),
    BatchNormalization(),
    Dropout(0.3),
    Dense(len(pd.unique(y)), activation='softmax')  # Softmax for multiclass classification
])

# Adaptive learning rate scheduler with exponential decay
initial_learning_rate = 0.001
lr_schedule = tf.keras.optimizers.schedules.ExponentialDecay(
    initial_learning_rate=initial_learning_rate,
    decay_steps=10000,
    decay_rate=0.9
)

# Compile the model with Adam optimizer with decayed learning rate
model.compile(optimizer=Adam(learning_rate=lr_schedule),
              loss='sparse_categorical_crossentropy',
              metrics=['accuracy'])
The script trains our deep learning model on the training set. We save the best model after each epoch.
# Define callbacks without ReduceLROnPlateau
early_stopping = EarlyStopping(monitor='val_loss', patience=15, restore_best_weights=True)
model_checkpoint = ModelCheckpoint('best_model.keras', monitor='val_accuracy', save_best_only=True)

# Train the model with the callbacks
history = model.fit(
    X_train, y_train,
    epochs=100,
    batch_size=32,
    validation_data=(X_test, y_test),
    callbacks=[early_stopping, model_checkpoint],
    verbose=1
)
Output:

Once the training is complete we load the best model and make predictions on the test. We compare predictions with the actual target label to calculate model performance.
# Load the best model
best_model = load_model('best_model.keras')

y_pred = best_model.predict(X_test).argmax(axis=-1)

print("Classification Report:n", classification_report(y_test, y_pred, zero_division = 0))
Output:
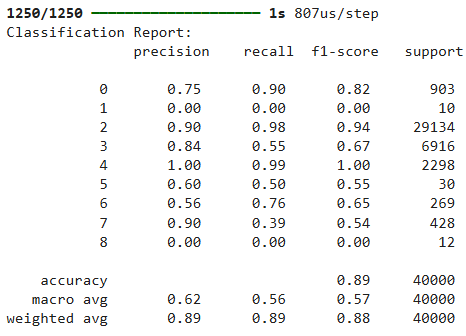
The above output shows that we achieve an accuracy of 89% on the test which is much less than what was achieved using the Random Forest algorithm. The reason can be that tree algorithms such as Random Forest are known to perform better on the tabular dataset. Furthermore, the performance of deep learning models is significantly impacted by data imbalance.
Conclusion
This article demonstrated a complete workflow for building an IoT intrusion detection system using GridDB for data management and machine learning and deep learning models for classification. We covered how to connect to GridDB, store IoT intrusion data, and use Random Forest and deep neural network models to predict intrusion types. The Random Forest model achieved high accuracy, showing its suitability for tabular datasets, while deep learning models highlighted the challenges of data imbalance.
If you have any questions or need help with GridDB, feel free to reach out on Stack Overflow with the griddb tag, and our engineers will be glad to assist.
If you have any questions about the blog, please create a Stack Overflow post here https://stackoverflow.com/questions/ask?tags=griddb .
Make sure that you use the “griddb” tag so our engineers can quickly reply to your questions.