Introduction
This blog focuses on leveraging AI to generate narrative voices and titles for documentary videos. Weâll explore implementing this using a tech stack that includes Node.js for backend operations, GridDB for managing video metadata, OpenAI for AI-driven text and voice generation, and React for building an interactive frontend.
Run The Application
Clone the repository from this link or run the following commands:
git clone https://github.com/junwatu/ai-narrative-and-voices.git
cd ai-narrative-and-voices
cd app
npm install
Copy the .env.example file to .env and set the VITE_APP_URL environment variable or leave it by default and set the OPENAI_API_KEY environment variable (please look at this section for more details on how to get the OpenAI API key).
To run the application, execute the following command:
npm run start:buildOpen the browser and navigate to http://localhost:3000/.
You can customize the app address and port by setting the
VITE_SITE_URLenvironment variable in the.envfile.
Solving the Problem
Creating compelling narratives and attention-grabbing titles for documentary videos presents significant challenges due to:
- Time-Consuming Process: Manually crafting narratives and titles is lengthy and often leads to delays, particularly under tight production schedules.
- Creative Blocks: Writers frequently face creative blocks, hindering the consistent generation of fresh, engaging content.
- Scalability Issues: Maintaining consistent quality across multiple projects becomes increasingly difficult as content volume grows.
Tech Stack Overview
OpenAI Key
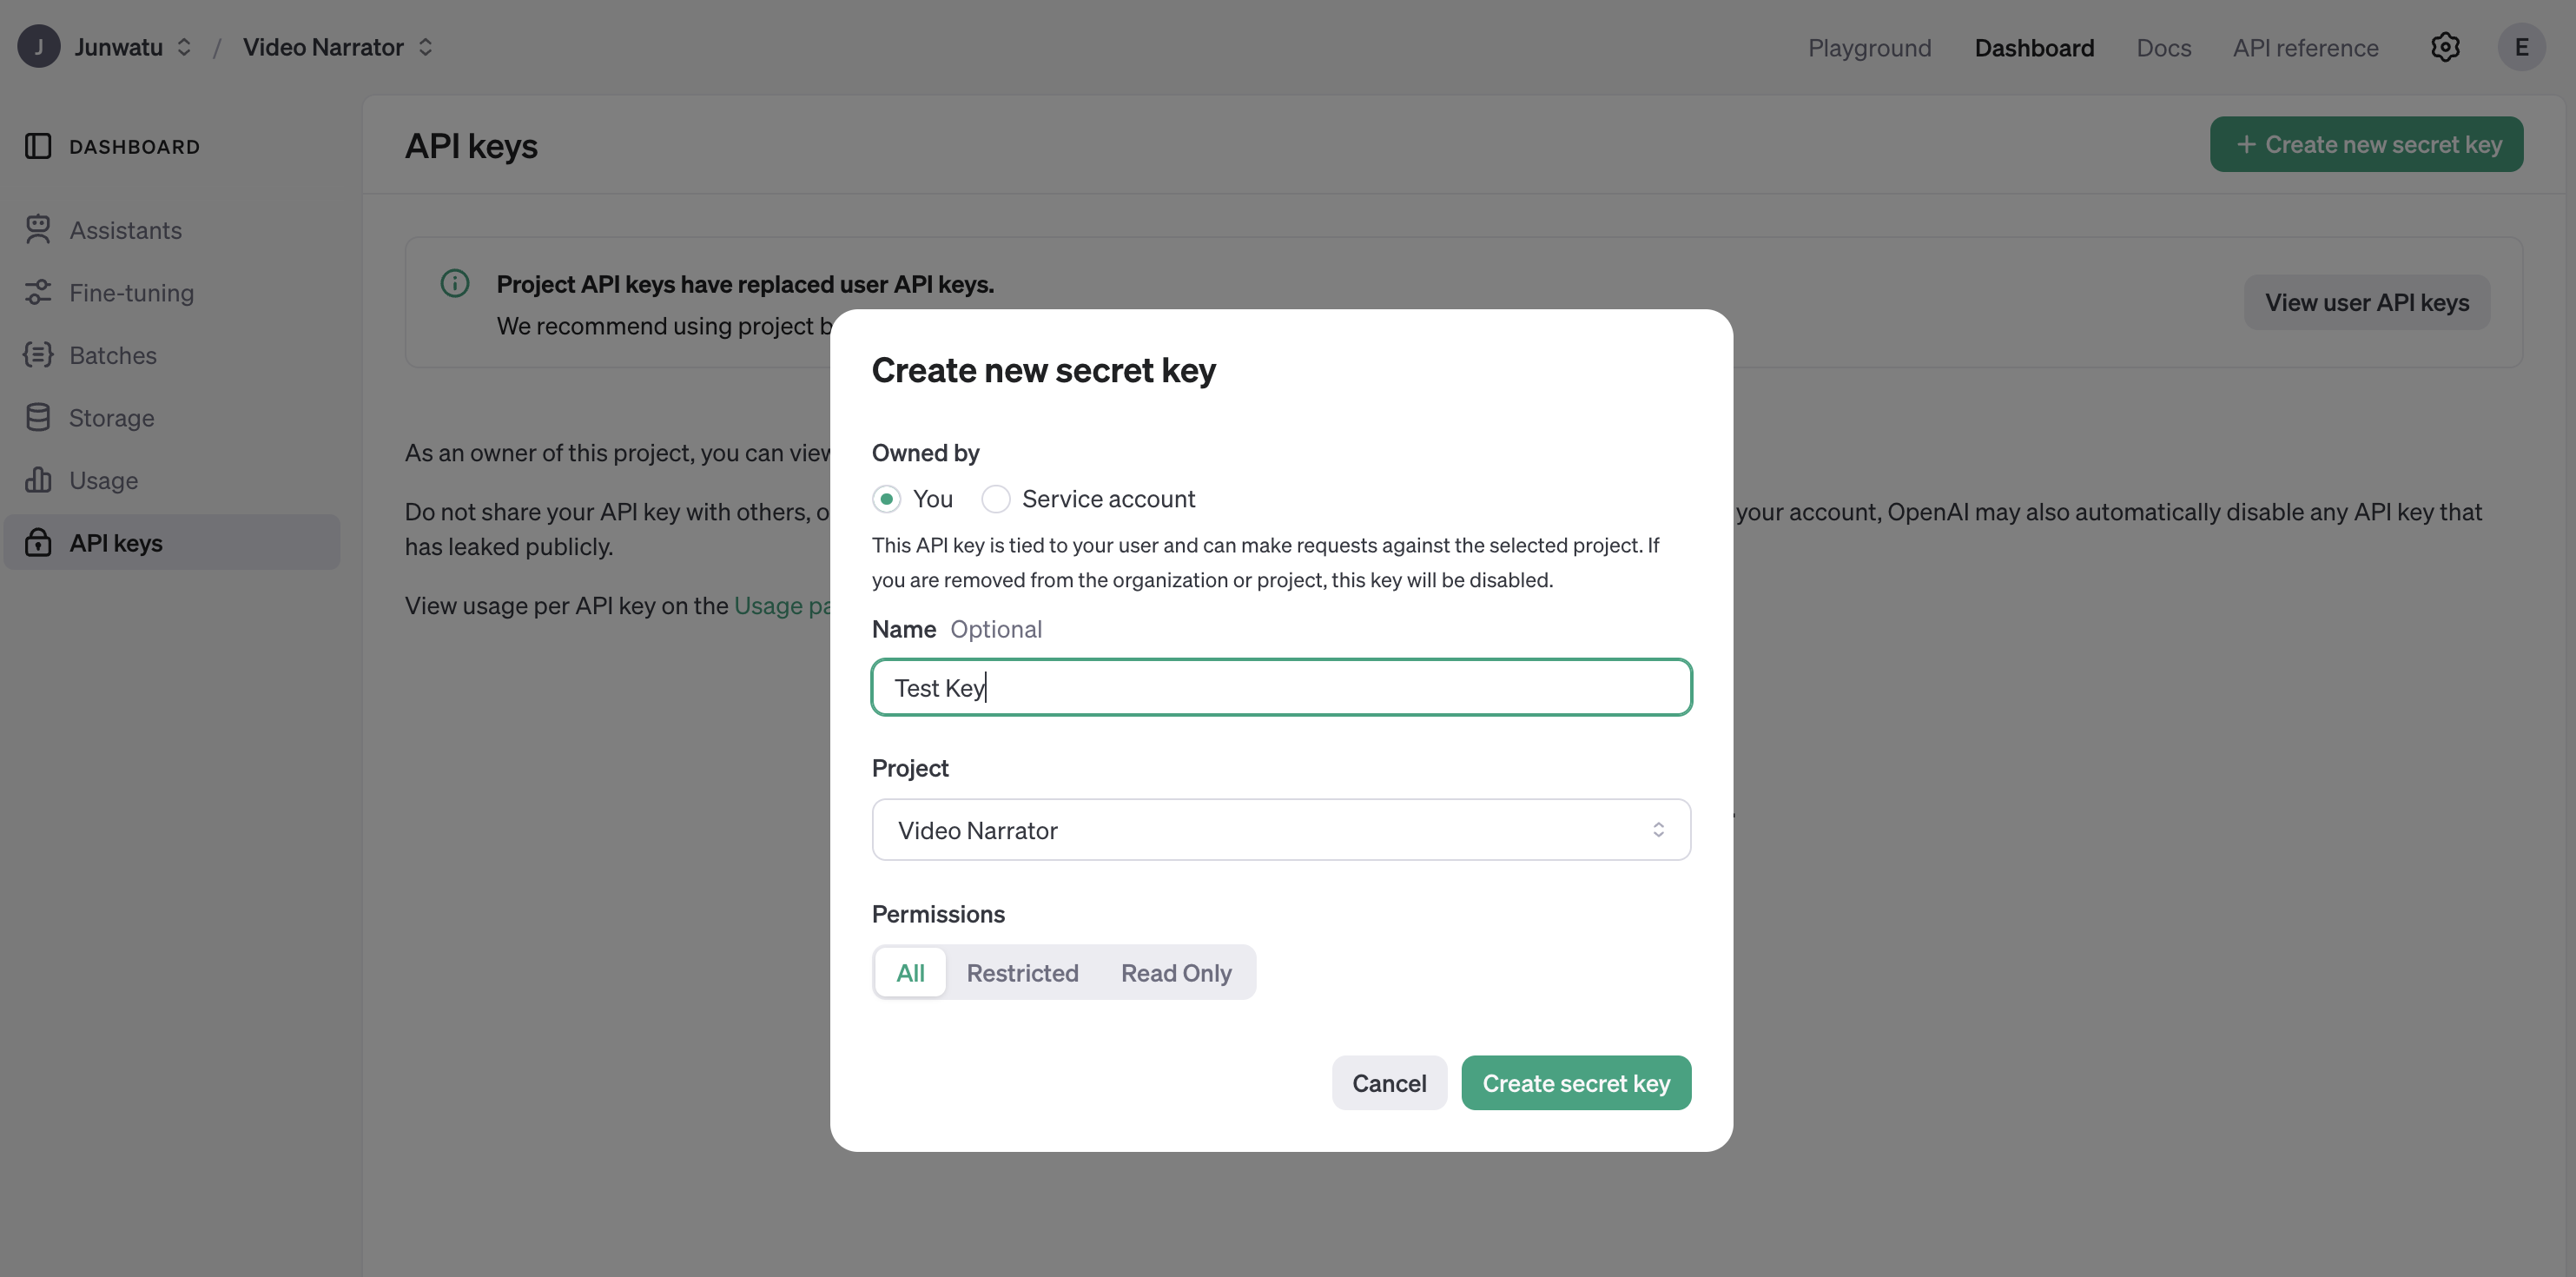
To access any OpenAI services, we need a valid key. Go to this link and create a new OpenAI key.
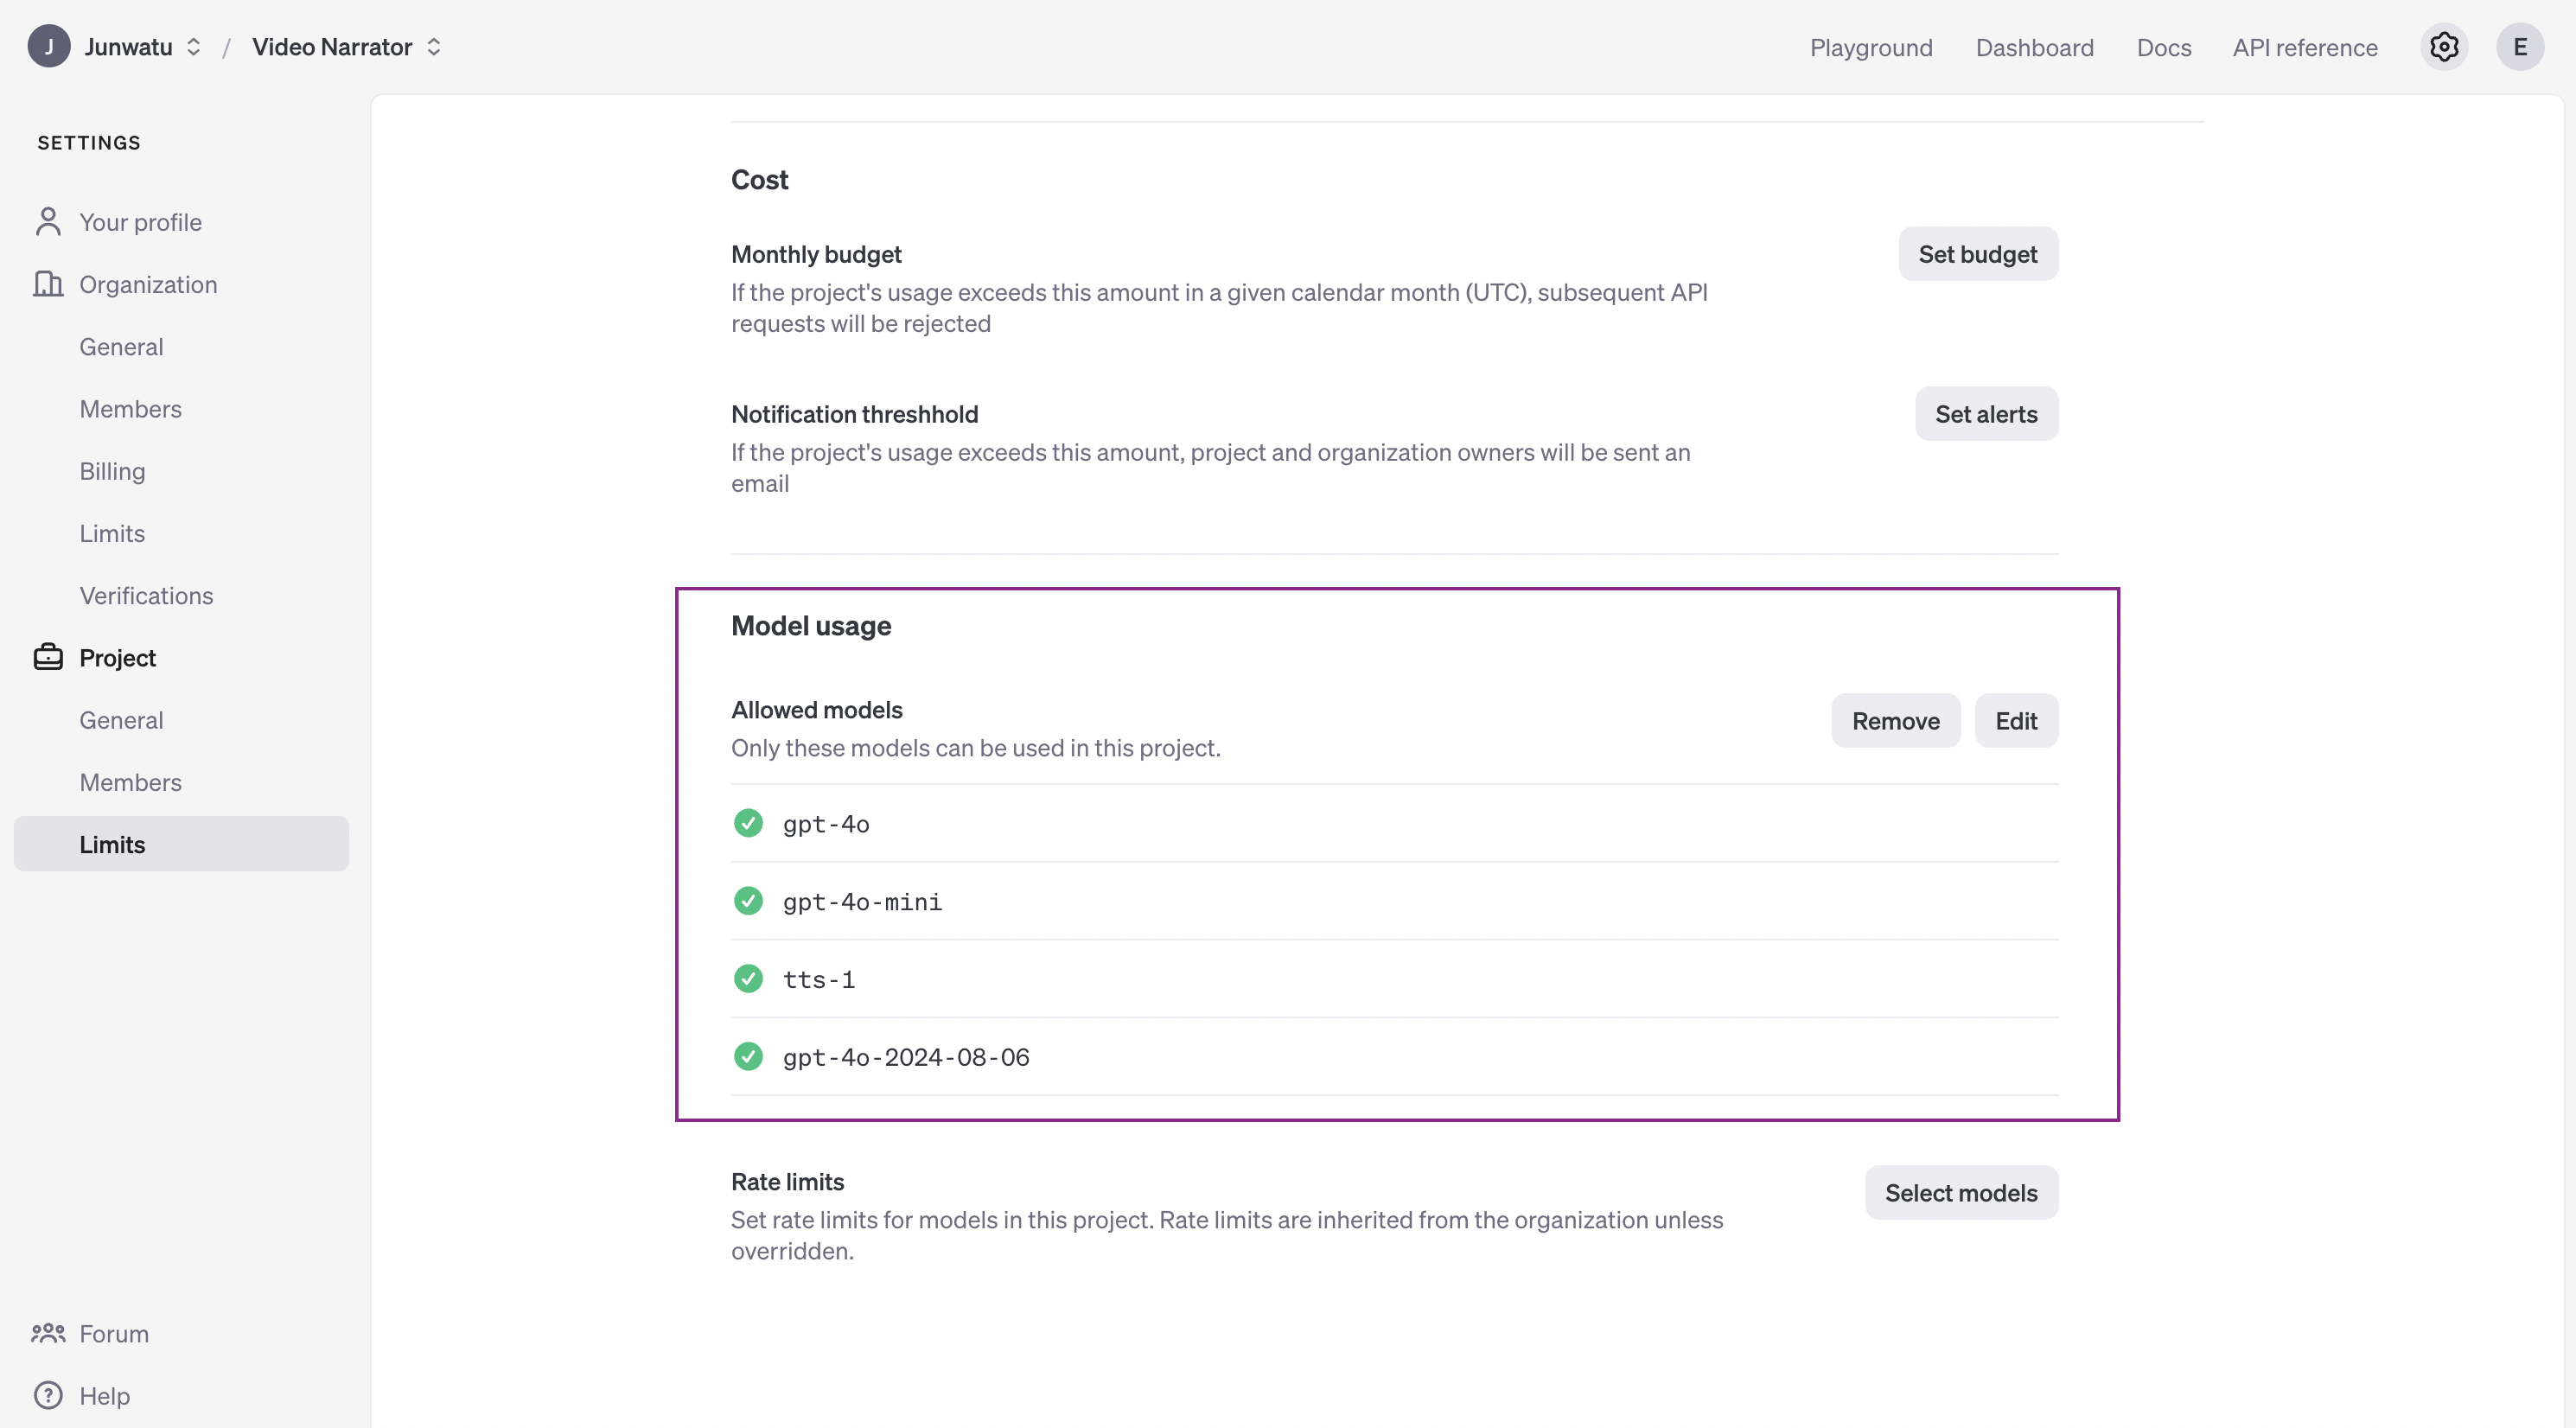
The OpenAI key is on a project basis, so we need to create a project first in the OpenAI platform and you need also to enable any models that you use on a project. For this project, we will need gpt-4o or gpt-4o-2024-08-06, gpt-4o-mini and tts-1 models.
The OpenAI key will be saved on the .env file and make sure not to include it in version control by adding it to the .gitignore.
Node.js
This project will run on the Node.js platform. You need to install it from here. For this project, we will use the nvm package manager and Node.js v16.20.2
LTS version.
# installs nvm (Node Version Manager)
curl -o- https://raw.githubusercontent.com/nvm-sh/nvm/v0.39.7/install.sh | bash

# download and install Node.js
nvm install 16

# verifies the right Node.js version is in the environment
node -v # should print `v16.20.2`

# verifies the right NPM version is in the environment
npm -v # should print `8.19.4``
To connect Node.js and GridDB database, you need the gridb-node-api npm package which is a Node.js binding developed using GridDB C Client and Node addon API.
FFmpeg
This project utilizes the fluent-ffmpeg npm package, which requires FFmpeg to be installed on the system. For Ubuntu, you can use the following command to install it:
sudo apt update
sudo apt install ffmpeg
For more installation information, please go to the FFmpeg official website.
GridDB
To save the video summary and video data, we will use the GridDB database. Please look at the guide for detailed installation. We will use Ubuntu 20.04 LTS here.
Run GridDB and check if the service is running. Use this command:
sudo systemctl status gridstoreIf not running try to run the database with this command:
sudo systemctl start gridstoreReact
We will use React to build the front end of the application. React lets you build user interfaces out of individual pieces called components. So if you want to expand or modify the application, you can easily do so by adding or modifying components.
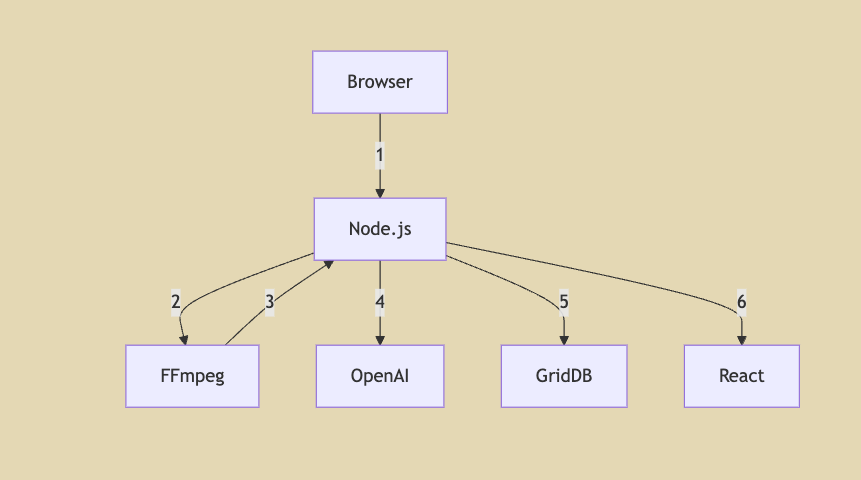
System Architecture
- Video Upload: The browser uploads the video to the Node.js backend for processing.
- Video Processing: Node.js sends the video to FFmpeg for processing tasks like encoding, decoding, or frame extraction.
- Processed Video Retrieval: FFmpeg processes the video and returns the processed data to Node.js.
- AI Content Generation: Node.js sends the processed video data to OpenAI for generating narrative voices and titles.
- Metadata Storage: Node.js stores the video metadata and AI-generated content in GridDB.
- Frontend Interaction: Node.js sends the necessary data to the React frontend for user interaction and display.
Node.js Server
Node.js server is the core of the application. It is responsible for the following tasks:
- Handle the video upload
- Frame extraction
- AI content generation
- Audio Voice Generation
- Storing Data To GridDB
- Routes
The server code is:
import express from 'express'
import path from 'path'
import bodyParser from 'body-parser'
import metadataRoutes from './routes/metadataRoutes.js'
import uploadRoutes from './routes/uploadRoutes.js'
import { __dirname } from './dirname.js'

const app = express()

if (!process.env.VITE_APP_URL) {
    throw new Error('VITE_APP_URL environment variable is not set')
}
const apiURL = new URL(process.env.VITE_APP_URL)
const HOSTNAME = apiURL.hostname || 'localhost'
const PORT = apiURL.port || 3000

app.use(bodyParser.json({ limit: '10mb' }))
app.use(express.static(path.join(__dirname, 'dist')))
app.use(express.static(path.join(__dirname, 'public')))
app.use(express.static(path.join(__dirname, 'audio')))
app.use(express.static(path.join(__dirname, 'uploads')))

app.get('/', (req, res) => {
    res.sendFile(path.join(__dirname, 'dist', 'index.html'))
})

app.use('/api', uploadRoutes)
app.use('/api/metadata', metadataRoutes)

app.listen(PORT, HOSTNAME, () => {
    console.log(`Server is running on http://${HOSTNAME}:${PORT}`)
})
The node.js server provides routes and exposes dist, public, audio, and uploads directories to the client. The audio and upload directories are needed so later the client will be able to download the generated audio and original video files.
Video Upload
The api/upload route handles the video upload and saves the video in the uploads folder.
app.use('/api', uploadRoutes)The uploadRoutes is defined in the routes/uploadRoutes.js file.
router.post('/upload', upload.single('file'), async (req, res) => {
    if (!req.file) {
        return res.status(400).send('No file uploaded or invalid file type.')
    }

    try {
        // relative path
        const videoPath = path.join('uploads', req.file.filename)
        const { base64Frames, duration } = await processVideo(videoPath)
        // send frames to OpenAI
        const { narrative, title, voice } = await generateNarrative(base64Frames, duration)

        await saveDocumentaryMetadata({
            video: videoPath, audio: voice, narrative, title
        })

        res.json({
            filename: req.file.filename,
            narrative,
            title,
            voice
        })
    } catch (error) {
        console.error('Error processing video:', error)
        res.status(500).send('Error processing video')
    }
})
This route is used to process the video and extract the frames and will return the base64 frames of the video and later will be sent to OpenAI for generating the narrative voices and titles. This route returns JSON data for client-side display.
Frame Extraction
The processVideo function is defined in the libs/videoprocessor.js file. This function uses the ffmpeg package to extract the frames from the video.
export function extractFrames(videoPath, secondsPerFrame, outputFolder, scaleFactor = 0.5) {
    return new Promise((resolve, reject) => {
        const frameRate = 1 / secondsPerFrame
        const framePattern = path.join(outputFolder, 'frame-%03d.png')
        const resizeOptions = `fps=${frameRate},scale=iw*${scaleFactor}:ih*${scaleFactor}`

        ffmpeg(videoPath)
            .outputOptions([`-vf ${resizeOptions}`])
            .output(framePattern)
            .on('end', () => {
                fs.readdir(outputFolder, (err, files) => {
                    if (err) {
                        reject(err)
                    } else {
                        const framePaths = files.map(file => path.join(outputFolder, file))
                        resolve(framePaths)
                    }
                })
            })
            .on('error', reject)
            .run()
    })
}
The default seconds per frame is 4 seconds. You can override this by passing the secondsPerFrame parameter to the extractFrames function. The frames will be saved in the frames folder.
AI Content Generation
The generateNarrative is the function responsible for AI-generated titles, narratives, and audio files.
Generate Narrative
The generateNarrative function takes the base64 frames of the video as input and returns the narrative, title, and generated audio voice.
async function generateNarrative(frames) {
    const videoDuration = 2

    const frameObjects = frames.map(x => ({
        type: 'image_url',
        image_url: {
            url: `data:image/png;base64,${x}`,
            detail: "low"
        }
    }));

    const videoContent = {
        role: "user",
        content: [{
                type: 'text',
                text: `The original video, in which frames are generated  is ${videoDuration} seconds. Create a story based on these frames that fit for exactly ${videoDuration} seconds. BE CREATIVE. DIRECT ANSWER ONLY.`
            },
            ...frameObjects
        ],
    }

    const response = await openai.chat.completions.create({
        model: "gpt-4o",
        messages: [{
                role: "system",
                content: "You are a professional storyteller."
            },
            videoContent
        ],
        temperature: 1,
        max_tokens: 4095,
        top_p: 1,
        frequency_penalty: 0,
        presence_penalty: 0,
        response_format: {
            "type": "text"
        },
    });

    if (response.choices[0].finish_reason === 'stop') {
        const narrative = response.choices[0].message.content
        const title = await generateTitle(narrative)

        const fileName = title.split(' ').join('-').toLowerCase()
        const voice = await generateSpeechToFile(narrative, 'audio', fileName)

        return {
            narrative,
            title,
            voice
        }
    } else {
        throw new Error('Failed to generate narrative')
    }
}
To generate the narrative text, we use prompt engineering to guide the AI model. The prompt is a text that includes the video frames and the video duration:
The original video, in which frames are generated is ${videoDuration} seconds. Create a story based on these frames that fit for exactly ${videoDuration} seconds. BE CREATIVE. DIRECT ANSWER ONLY.This function also uses the generateTitle function to generate the title and the generateSpeechToFile function to generate audio voice.
Generate Title
The generateTitle function takes the narrative text as input and returns the title.
async function generateTitle(narrative) {
    const titleResponse = await openai.chat.completions.create({
        model: 'gpt-4o-mini',
        messages: [{
                role: 'system',
                content: 'You are a professional storyteller.'
            },
            {
                role: 'user',
                content: `Direct answer only. Generate a title for the following narrative text: n${narrative}`
            }
        ],
        temperature: 1,
        max_tokens: 1000,
        top_p: 1,
        frequency_penalty: 0,
        presence_penalty: 0,
        response_format: {
            type: 'text'
        }
    })

    const title = titleResponse.choices[0].message.content
    return title
}
The model used here is gpt-4o-mini which is a smaller version of the gpt-4o model and it’s very good to generate a unique title.
Audio Voice Generation
The generateSpeechToFile function will generate an audio voice based on the given text input. We use the tts-1 AI model, which is a powerful text-to-speech model from OpenAI. The generated audio style can be selected from a few produced sound styles. In this project, we will use a shimmer voice style.
async function generateSpeechToFile(text, folderPath, fileName, model = 'tts-1', voice = 'shimmer') {
    try {
        if (!fs.existsSync(folderPath)) {
            await fs.promises.mkdir(folderPath, { recursive: true });
        }

        const mp3Filename = `${fileName}.mp3`
        const outputFilePath = path.join(folderPath, mp3Filename);
        const mp3 = await openai.audio.speech.create({
            model,
            voice,
            input: text,
        });

        const buffer = Buffer.from(await mp3.arrayBuffer());
        await fs.promises.writeFile(outputFilePath, buffer);
        console.log(`File saved at: ${outputFilePath}`);
        return mp3Filename;
    } catch (error) {
        console.error('Error generating speech:', error);
        throw error;
    }
}
The generated audio will be saved as an MP3 file in the specified folder. This audio file can be combined with the original video footage to create a compelling documentary-style video.
Connect To GridDB
The griddb.cjs file is responsible to connect to the GridDB database and the gridDBService.js is a wrapper for easy code. These are the methods we use in this project.
| Function Name | Description |
|---|---|
saveDocumentaryMetadata |
Saves documentary metadata (video, audio, narrative, title) to the database. |
getDocumentaryMetadata |
Retrieves documentary metadata by its ID. |
getAllDocumentaryMetadata |
Retrieves all documentary metadata stored in the database. |
Storing Video Metadata in GridDB
The GridDB database will store the video file path, audio voice filename, generated narrative, and title. This ensures efficient retrieval and management of all essential documentary metadata.
After uploading and processing the video by OpenAI. The metadata will be saved into the database using the saveDocumentaryMetadata function.
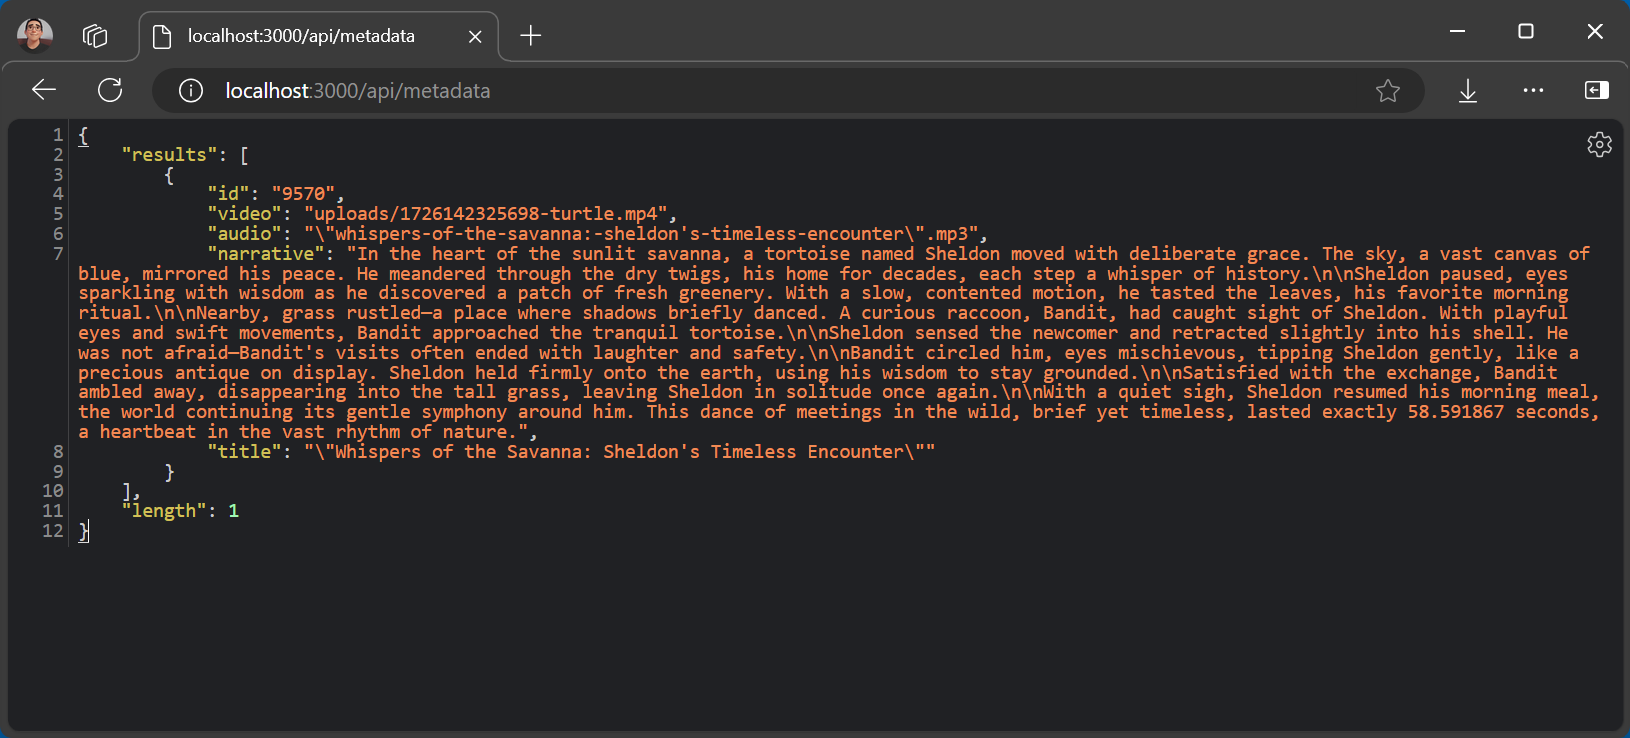
await saveDocumentaryMetadata({ video: videoPath, audio: voice, narrative, title })This function is also accessible directly in the /api/metadata route using the POST HTTP method. Other metadata routes are accessible directly using the /api/metadata route. Please look at the routes section for route details.
Get Videos Metadata
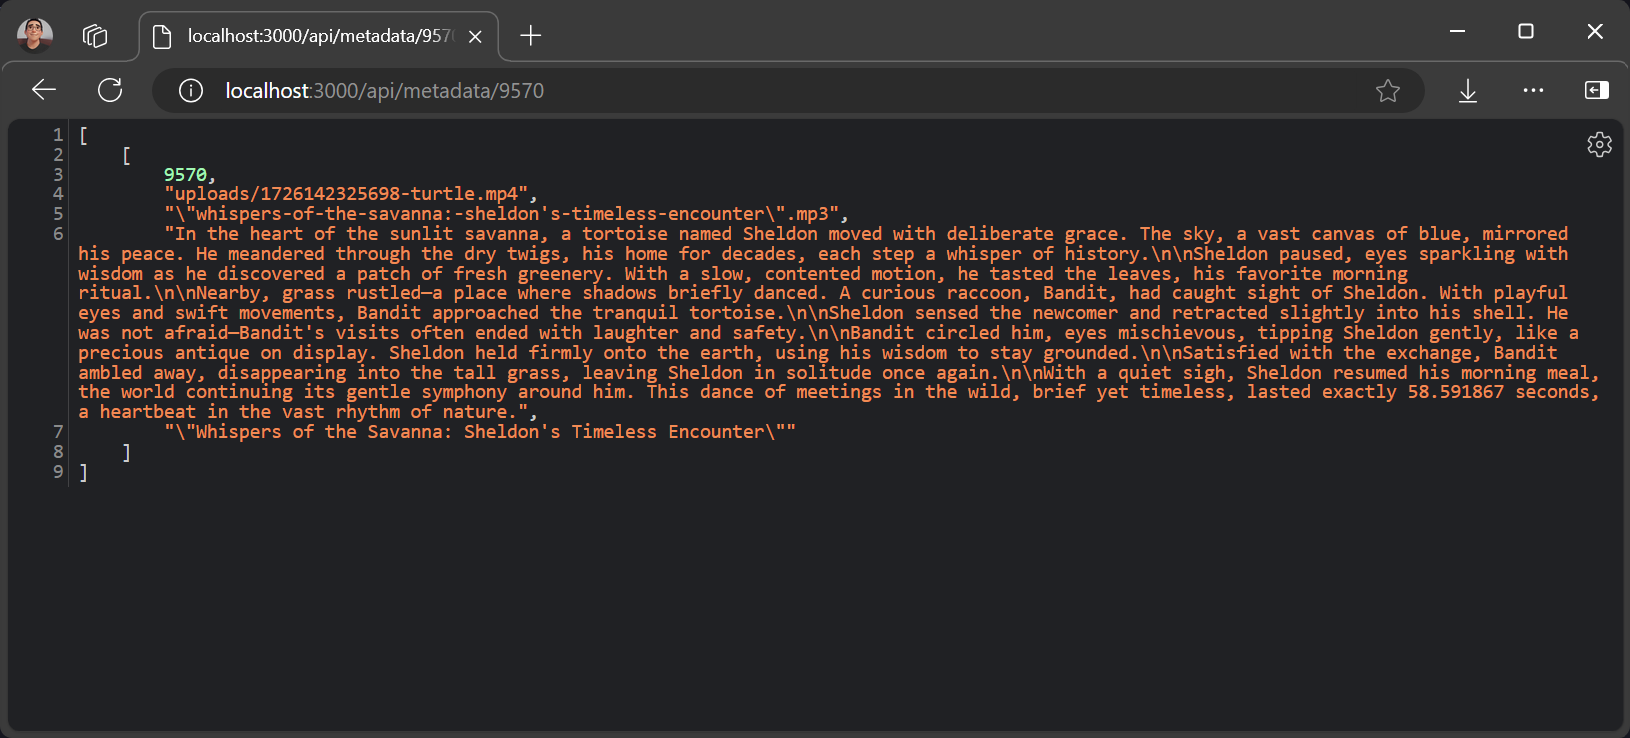
To get the video metadata, you can use the GET method in the /api/metadata to retrieve all saved data and use the /api/metadata/:docId to get the specific video metadata.
Get Video By ID
To get video metadata based on the ID, you can use the GET method in the /api/metadata/:id route with id as the data identifier as the query parameter.
Routes
Here are the routes list for the Node.js server in this project:
| HTTP Method | Route | Description | File |
|---|---|---|---|
| GET | /api/metadata |
Fetch all documentary metadata | metadataRoutes.js |
| GET | /api/metadata/:docId |
Fetch metadata for a specific documentary | metadataRoutes.js |
| POST | /api/metadata |
Save or update documentary metadata | metadataRoutes.js |
| POST | /api/upload |
Upload and process a video file (MP4 format only) | uploadRoutes.js |
User Interface
The user interface is built with React.js, providing a modern, component-based architecture. This choice of technology stack enables developers to easily customize and expand the user interface to meet evolving project requirements or incorporate new features in the future.
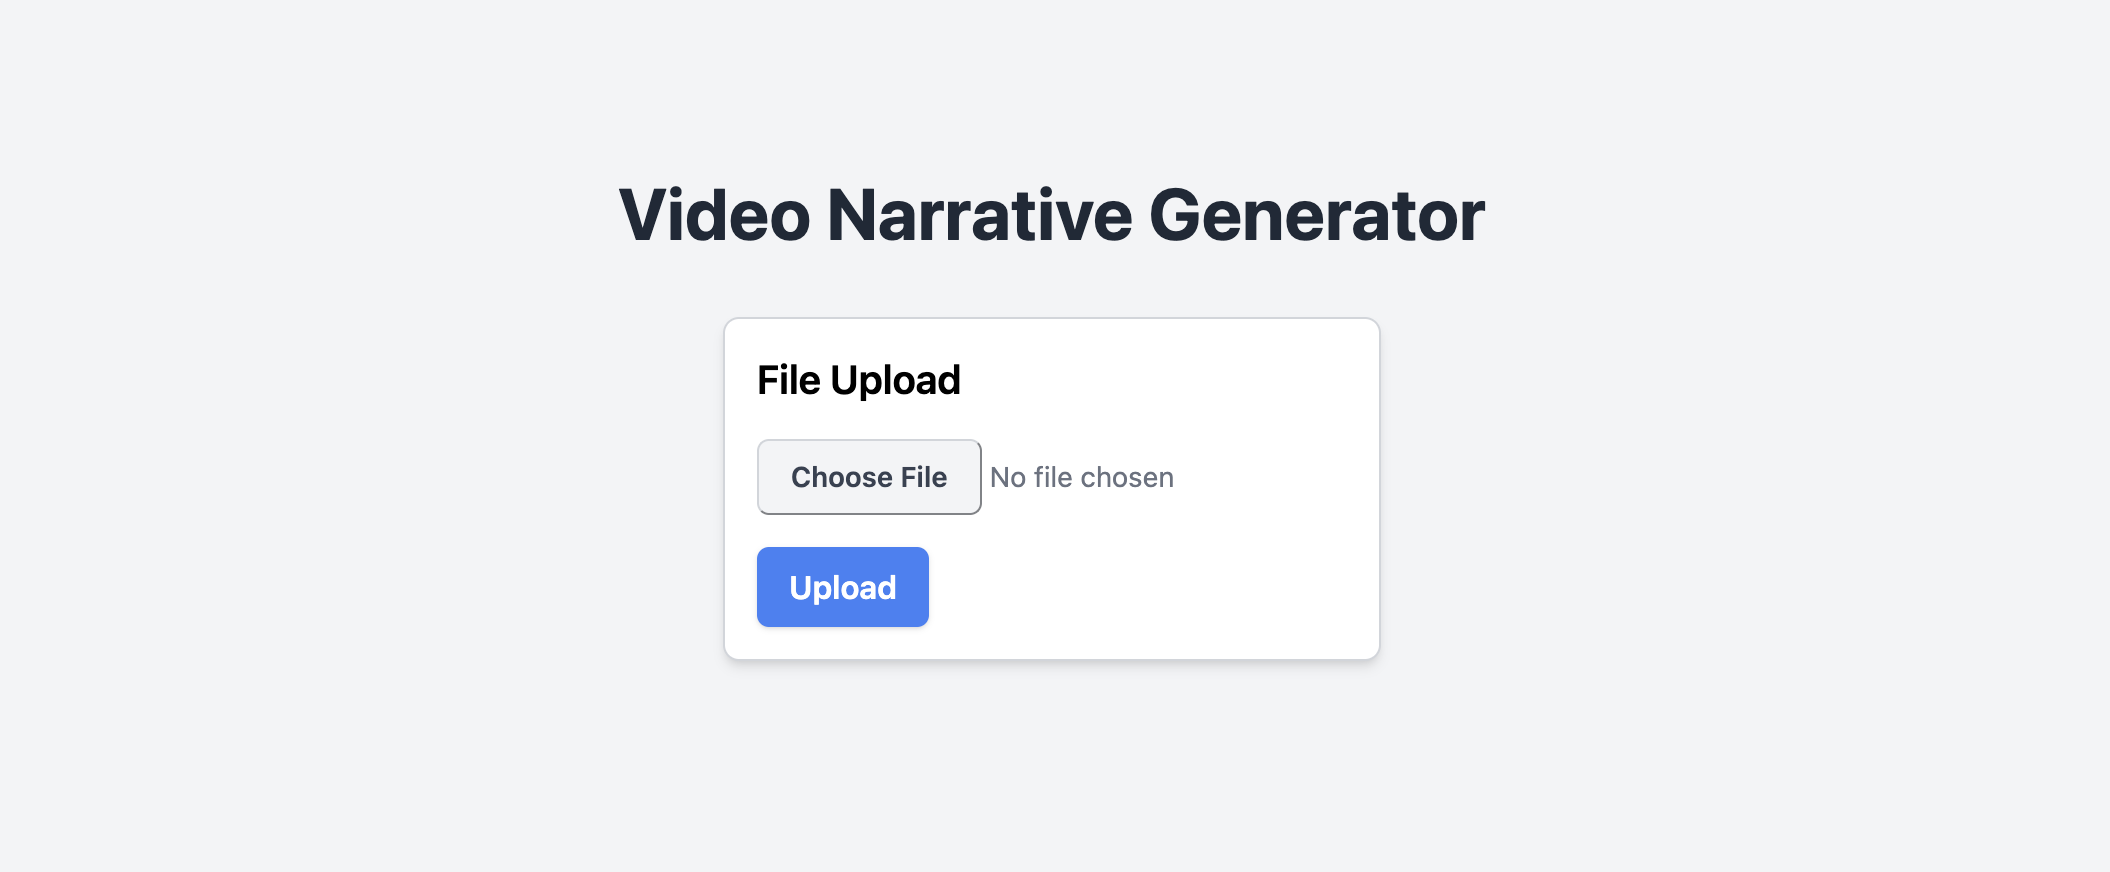
The main UI is a simple file uploader react component. The component source code is in the components/FileUpload.jsx file.
The handleUpload function will upload the file to the /api/upload route and will handle the data response for further processing.
jsx
const handleUpload = async () => {
    if (!file) {
        setUploadStatus('Please select a file first.')
        return
    }

    const formData = new FormData()
    formData.append('file', file)

    try {
        setUploadStatus('Uploading...')
        const response = await fetch('/api/upload', {
            method: 'POST',
            body: formData,
        })

        if (!response.ok) {
            throw new Error('Network response was not ok')
        }

        const data = await response.json()
        setUploadData(data)
        setUploadStatus('Upload successful!')
    } catch (error) {
        console.error('Error uploading file:', error)
        setUploadStatus('Error uploading file. Please try again.')
    }
}
Demo
Other than the details response data, the user can also download the generated narrative audio and the original video files.
Further Enhancements
These are enhancements recommendations to make this base project better and usable:
- Add video composer function which composes the generated narrative audio and the original video.
- Add longer video duration upload.
- Add a video user interface to show the final result.
Code Repository Link
Use branch narrate-ai
$ git clone https://github.com/griddbnet/Blogs.git --branch narrate-ai
If you have any questions about the blog, please create a Stack Overflow post here https://stackoverflow.com/questions/ask?tags=griddb .
Make sure that you use the “griddb” tag so our engineers can quickly reply to your questions.
