
In this blog post, we’ll walk through how to build a personal AI assistant that simplifies managing your calendar. By the end, you’ll know how to create an assistant capable of handling event submissions and retrieving schedules through simple conversations. We’ll use Spring Boot, Spring AI, and OpenAI to build a system that’s both practical and enjoyable to interact with.
Why Build a Personal AI Calendar Assistant?
Managing tasks through natural language might seem like something straight out of a sci-fi movie, but it’s more useful than you might expect. This AI assistant can save you time, eliminate the hassle of manual input, and make managing your schedule a breeze.
Additionally, building this project is a fantastic way to sharpen your skills as a developer. If you’re a computer science student or an aspiring developer, you’ll gain valuable hands-on experience with AI integration, backend development, and database management, all while creating a tool you can use in your daily life.
System Overview
Before diving into the details of coding, let’s take a moment to understand how the entire system is structured. Here’s a high-level overview of how everything works:
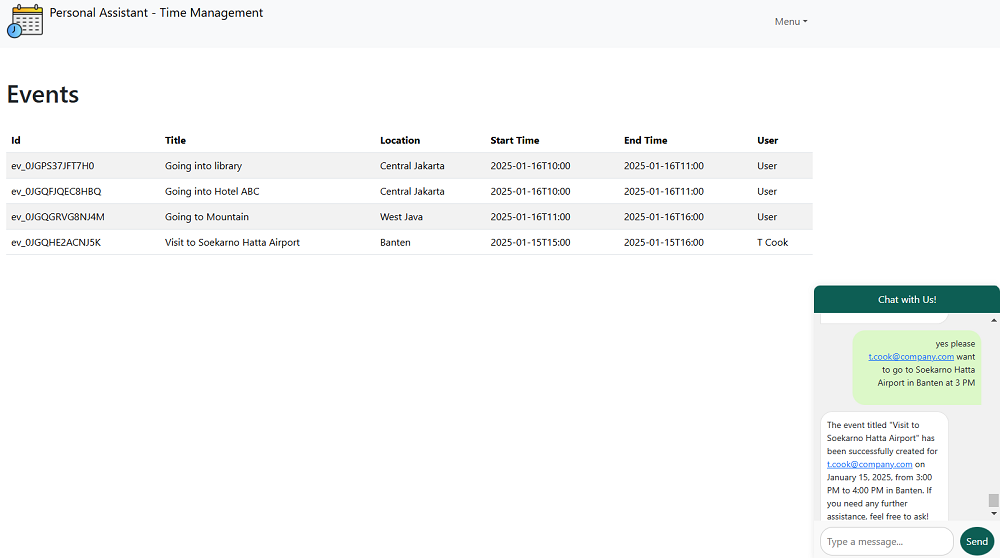
This application features a single page to display the event list and includes a chatbot interface for user interaction.
User Interaction via Chat
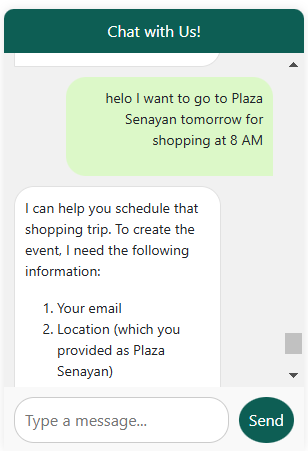
The chatbot interface allows users to interact with the AI assistant using natural language commands. For example:
- Submit Events: Add events by chatting with the assistant. For example, you could say, “I want to go to the Shopping Center Tomorrow at 2 PM.“
- List Events: Check your schedule by asking, “Show my events for tomorrow“
The AI assistant processes these commands by understanding the user’s queries, extracting critical details such as intent, time, and location, and then performing the appropriate action—like saving the event or retrieving a list of upcoming events.
Backend System (Spring Boot)
The backend serves as the engine of the system, handling several key tasks:
- API Handling: Receives user input from the chatbot interface.
- Event Management: Manages the storage and retrieval of events from the database.
- Spring AI: Manages the AI logic and communicates with the OpenAI API.
AI Module (Spring AI + OpenAI API)
This module functions as the brain of the assistant. Here’s how it operates:
-
Input Parsing: The AI module processes user queries and leverages the OpenAI API to extract key details such as the event title, time, and location.
-
Intent Recognition: Determines the user’s intention, whether it’s adding an event or listing upcoming events.
-
Response Generation: Produces a user-friendly response based on the action performed.
Spring AI acts as a wrapper around the OpenAI API, streamlining the integration process and allowing you to focus on core application logic instead of implementation complexities.
Data Storage (Database Layer)
The database layer ensures that all events are securely stored and can be retrieved when needed. Here’s what happens at this level:
- Event Storage: Stores each event submitted through the chatbot.
- Query: Fetches relevant events from the database when the user requests their schedule.
For this project, we’ll use GridDB as our database solution.
Now that we’ve covered the system architecture, let’s get started with building the application!
Step-by-Step Guide to Building the Project
The following items should be installed in your system:
- Java 17 or later: OpenJDK
- Maven
- Your preferred IDE: VS Code, Initellij IDEA
- Docker Compose
OpenAI API
We need to create an API Key with OpenAI to access ChatGPT models. Create an account and generate the token on the API Keys page.
Initialize a Spring Boot Project
You can use this pre-initialized project and click Generate to download a Zip file.
You can also fork the project from Github and open it in your IDE or other editor.
Spring AI Dependency
Add Milestone and Snapshot Repositories
<repositories>
  <repository>
    <id>spring-milestones</id>
    <name>Spring Milestones</name>
    <url>https://repo.spring.io/milestone</url>
    <snapshots>
      <enabled>false</enabled>
    </snapshots>
  </repository>
  <repository>
    <id>spring-snapshots</id>
    <name>Spring Snapshots</name>
    <url>https://repo.spring.io/snapshot</url>
    <releases>
      <enabled>false</enabled>
    </releases>
  </repository>
</repositories>
Add Spring AI Bill of Materials (BOM)
<dependencyManagement>
    <dependencies>
        <dependency>
            <groupId>org.springframework.ai</groupId>
            <artifactId>spring-ai-bom</artifactId>
            <version>1.0.0-SNAPSHOT</version>
            <type>pom</type>
            <scope>import</scope>
        </dependency>
    </dependencies>
</dependencyManagement>
Add SpringAI OpenAI Spring Boot starter
<dependency>
    <groupId>org.springframework.ai</groupId>
    <artifactId>spring-ai-openai-spring-boot-starter</artifactId>
</dependency>
Add GridDB dependency
<dependency>
    <groupId>com.github.griddb</groupId>
    <artifactId>gridstore</artifactId>
    <version>5.6.0</version>
</dependency>
Storing and Managing Events
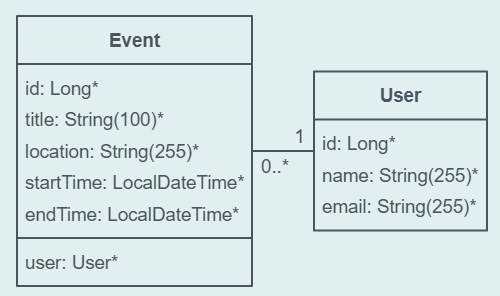
In this project we have a simple calendar system with two main entities: User and Event. Each event is associated with a specific user.
Based on the schema above, we will create the entity classes as follows:
@Data
public class User {
    @RowKey
    String id;
    String email;
    String fullName;
}

@Data
public class Event {
    @RowKey
    private String id;
    private String title;
    private String location;
    private Date startTime;
    private Date endTime;
    private String userId;
}
Next, we create the GridDBConfig class as a central configuration for database operation.
The class will do the following:
- Read environment variables for connecting to the GridDB database
- Create a GridStore class for managing database connection to the GridDB instance
- Create GridDB Collection’s container (Table) to manage a set of rows. The container is a rough equivalent of the table in a relational database.
- On creating/updating the Collection we specify the name and object corresponding to the column layout of the collection.
Also for each collection, we add an index for a column that is frequently searched and used in the condition of the WHERE section of TQL. - Make the container available in the Spring container
@Configuration
public class GridDBConfig {

    @Value("${GRIDDB_NOTIFICATION_MEMBER}")
    private String notificationMember;
    @Value("${GRIDDB_CLUSTER_NAME}")
    private String clusterName;
    @Value("${GRIDDB_USER}")
    private String user;
    @Value("${GRIDDB_PASSWORD}")
    private String password;

    @Bean
    public GridStore gridStore() throws GSException {
        Properties properties = new Properties();
        properties.setProperty("notificationMember", notificationMember);
        properties.setProperty("clusterName", clusterName);
        properties.setProperty("user", user);
        properties.setProperty("password", password);
        GridStore store = GridStoreFactory.getInstance().getGridStore(properties);
        return store;
    }

    @Bean
    public Collection<String, User> userCollection(GridStore gridStore) throws GSException {
        Collection<String, User> collection = gridStore.putCollection(AppConstant.USERS_CONTAINER, User.class);
        collection.createIndex("email");
        return collection;
    }

    @Bean
    public Collection<String, Event> eventCollection(GridStore gridStore) throws GSException {
        Collection<String, Event> movieCollection = gridStore.putCollection(AppConstant.EVENT_CONTAINER, Event.class);
        movieCollection.createIndex("userId");
        return movieCollection;
    }
}
Business Logic
EventService class
This service class handles event creation and listing.
@Slf4j
@Service
public class EventService {

    private final Collection<String, Event> eventCollection;
    private final Collection<String, User> userCollection;

    public EventService(Collection<String, Event> eventCollection, Collection<String, User> userCollection) {
        this.eventCollection = eventCollection;
        this.userCollection = userCollection;
    }

    public List<EventDTO> findAll(String userId) {
        if (userId != null && !userId.isBlank()) {
            return fetchAll(userId).stream().map(event -> mapToDTO(event, new EventDTO())).toList();
        }
        final List<Event> events = fetchAll();
        return events.stream().map(event -> mapToDTO(event, new EventDTO())).toList();
    }

    public String create(final EventDTO eventDTO, String userId) {
        final Event event = new Event();
        mapToEntity(eventDTO, event);
        event.setUserId(userId);
        event.setId(IdGenerator.next("ev_"));
        try {
            eventCollection.put(event);
            return event.getId();
        }
        catch (GSException e) {
            throw new AppErrorException("Failed to create event");
        }
    }
}
UserService class
This class handles user creation.
@Slf4j
@Service
public class UserService {

    private final Collection<String, User> userCollection;

    public UserService(Collection<String, User> userCollection) {
        this.userCollection = userCollection;
    }

    public Optional<User> findByEmail(final String emailString) {
        try (Query<User> query = userCollection.query("SELECT * WHERE email='" + emailString + "'", User.class)) {
            RowSet<User> rowSet = query.fetch();
            if (rowSet.hasNext()) {
                User user = rowSet.next();
                return Optional.of(user);
            }
            else {
                throw new NotFoundException("User not found");
            }
        }
        catch (GSException e) {
            throw new AppErrorException("Failed to find user");
        }
    }
Connecting OpenAI
To connect to OpenAI’s API, we need to configure the API key and specify the name of the OpenAI model for accessing the LLM.
This configuration is done in the application.yml file:
spring:
  ai:
    openai:
      api-key: ${OPENAI_API_KEY}
      chat:
        options:
          model: gpt-4o-mini
Here, ${OPENAI_API_KEY} retrieves the API key from an environment variable.
For this project, we are using the gpt-4o-mini model.
Initialize the Spring AI ChatClient
Below is the implementation of the PersonalAssistant class, which initializes the ChatClient, processes user queries, and sends them to the OpenAI API.
@Service
public class PersonalAssistant {
private final ChatClient chatClient;
public PersonalAssistant(ChatClient.Builder modelBuilder, ChatMemory chatMemory) {
// @formatter:off
this.chatClient = modelBuilder.defaultSystem("""
You are a personal assistant and travel planner.
Your job is to answer questions about and to perform actions on the user's behalf, mainly around
calendar events, and time-management.
You are required to answer an a professional manner. If you don't know the answer, politely tell the user
you don't know the answer, then ask the user a followup question to try and clarify the question they are asking.
If you do know the answer, provide the answer but do not provide any additional followup questions.
Use the provided functions to fetch user's events by email, and create new event.
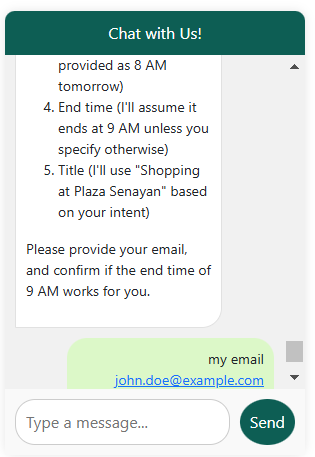
Before creating new event, you MUST always get the following information from the user:
1. Email
2. Location
3. Start time
4. End time: If not provided, assume it ended in one hour.
5. Title: Get title from user's intent and interest.
Today is {current_date}.
""")
.defaultAdvisors(
new MessageChatMemoryAdvisor(chatMemory, DEFAULT_CHAT_MEMORY_CONVERSATION_ID, 10),
new SimpleLoggerAdvisor()
)
.defaultFunctions("getUserEvents", "createEvent")
.build();
// @formatter:on
}
public String chat(String chatId, String userMessageContent) {
return this.chatClient.prompt()
.system(s -> s.param("current_date", LocalDate.now().toString()))
.user(userMessageContent)
.call().content();
}
}- We obtain an auto-configured
ChatClient.Builderand use it to create theChatClient. TheChatClientis a Spring Bean provided by Spring AI that manages sending user input to the LLM. - To make our chatbot focus on functioning as a personal assistant and avoid providing irrelevant information, we utilize a system message to guide the model’s behavior and specify the desired output. This system message is defined within the
defaultSystem()method. - We add chat memory to maintain context for up to 10 previous messages when using the chatbot, ensuring more cohesive interactions.
- We include a
SimpleLoggerAdvisorto log request and response data from theChatClient, which is helpful for debugging and monitoring AI interactions. - We register the
getUserEvents()andcreateEvent()functions to enable the LLM to interact with existing business logic. - The
chat()method accepts a user message, passes it to the Spring AI ChatClient bean as input, and returns the result from thecontent().
Function Calling
Here’s how function calling works in this project:
- The user types something like,
Give me my schedule for tomorrow. - Spring AI connects to the OpenAI API, processes the text, and extracts the required information.
- Using function calling, the AI model dynamically determines which function to trigger.
- Spring AI executes the relevant function with the extracted parameters (e.g.,
getUserEvents()). - Spring AI calls the OpenAI API again, including the function’s response, to generate the final reply.
Now, let’s map our functions so we can use them with Spring AI.
@Configuration
public class EventTools {
    private static final Logger logger = LoggerFactory.getLogger(EventTools.class);
    @Autowired
    private EventService eventService;
    @Autowired
    private UserService userService;

    public record EventListRequest(String email) {}

    public record EventViewDTO(String id, String title, String location, LocalDateTime startTime, LocalDateTime endTime,
            UserViewDTO user) {}

    public record UserViewDTO(String name) {}

    @Bean
    @Description("Get event list for given users email")
    public Function<EventListRequest, List<EventViewDTO>> getUserEvents() {
        return request -> {
            Optional<User> user = userService.findByEmail(request.email());
            return eventService.findAll(user.get().getEmail()).stream().map(this::mapToViewDTO).toList();
        };
    }

    private EventViewDTO mapToViewDTO(EventDTO eventDTO) {
        return new EventViewDTO(eventDTO.getId(), eventDTO.getTitle(), eventDTO.getLocation(), eventDTO.getStartTime(),
                eventDTO.getEndTime(), new UserViewDTO(eventDTO.getUser().name()));
    }

    public record CreateEventRequest(String email, String title, String location, LocalDateTime startTime,
            LocalDateTime endTime) {
    }

    @Bean
    @Description("Create new event with specified email, title, location, start-time, and end-time.")
    public Function<CreateEventRequest, String> createEvent() {
        return request -> {
            logger.debug("call function create event {}", request);
            Optional<User> user = userService.findByEmail(request.email());
            EventDTO eventDTO = new EventDTO();
            eventDTO.setTitle(request.title());
            eventDTO.setLocation(request.location());
            eventDTO.setStartTime(request.startTime());
            eventDTO.setEndTime(request.endTime());
            return eventService.create(eventDTO, user.get().getId());
        };
    }
}- Define a
@Beanmethod that returns ajava.util.function.Function. - Add the
@Descriptionannotation to provide a clear explanation of what this function does. - Spring AI can leverage the service classes we’ve already developed without requiring a complete rewrite.
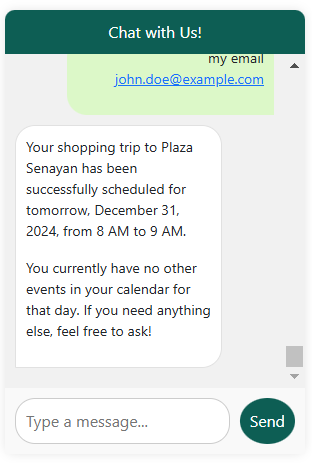
Chat Interface
The chatbox UI is developed using Thymeleaf, Javascript, and CSS.
The chatbox is designed to resemble message bubbles, similar to iMessage, and supports using the Enter key to send messages.
We use AJAX to handle HTTP requests and responses seamlessly.
Running the Project with Docker Compose
To spin up the project we will utilize Docker Compose.
The entire code for the web application is available on Github.
Before starting the application, make sure you have the API Key from OpenAI.
Create .env file with the following content:
OPENAI_API_KEY='YOUR_OPENAI_API_KEY'Build the services: docker compose build
Start the services: docker compose up
After starting the application it is accessible under localhost:8080.
Conclusion
Spring AI makes it easier to add AI features to Spring-based applications. It allows AI code to work alongside existing business logic in the same codebase.
What can be improved?
- Add logs for chatbox messages (input and output).
- Make it easy for users to give feedback on chatbox responses.
- Implement safety measures like moderation.
If you have any questions about the blog, please create a Stack Overflow post here https://stackoverflow.com/questions/ask?tags=griddb .
Make sure that you use the “griddb” tag so our engineers can quickly reply to your questions.