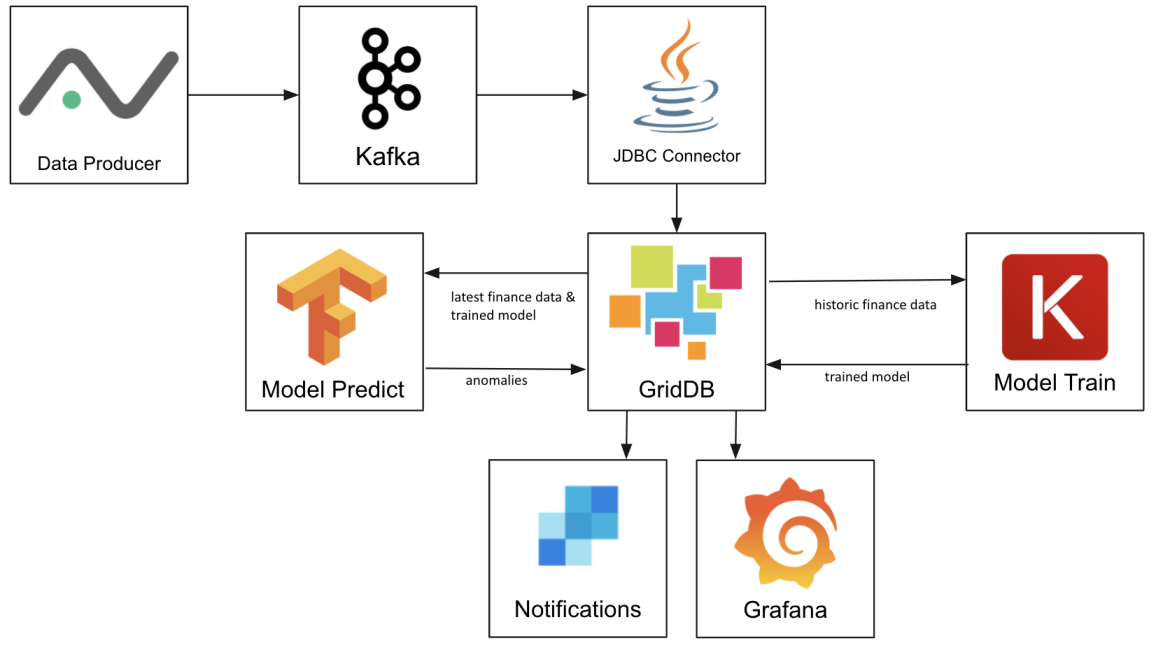
In this project, we use GridDB to create a Machine Learning platform where Kafka is used to import stock market data from Alphavantage, a market data provider. Tensorflow and Keras train a model that is then stored in GridDB, and then finally uses LSTM prediction to find anomalies in daily intraday trading history. The last piece is that the data is visualized in Grafana and then we configure GridDB to send notifications via its REST Trigger function to Twilio’s Sendgrid.
The actual machine learning portion of this project was inspired by posts on Towards Data Science and Curiously. This model and the data flow is also applicable to many other datasets such as predictive maintenance or machine failure prediction or wherever you want to find anomalies in time series data. An anomaly as it relates to machine learning is when the predicted value is significantly different than the actual value, in this case stock price anomalies may mean there are good trading opportunities but anomalies in sensor data from an engine may mean failure is imminent.
The following GridDB features are showcased: – Key-Container data model – kafka-connect-jdbc & JDBC – Pandas Data Frames – Grafana Connector – Triggers
GridDB’s remarkable write performance is necessary as hundreds of thousands of rows of data for just a few stocks are loaded daily after the market close. It’s Key-Container architecture means queries for individual stocks are efficient, it is not necessary to scan GOOG’s intraday data to find the price anomalies in AAPL’s stocks. If you do not already have GridDB set up, follow the Getting Started manual to first install GridDB.
Kafka
Kafka is a data streaming platform with many different possible inputs and outputs that are easy to create. Kafka can be downloaded from their downloads page; we’re using version 2.12-2.5.0. You will also need to have a Java 1.8 development environment installed on your system. After downloading, we simply untar and start the Zookeeper and Kafka Servers.
$ tar xzvf kafka_2.12-2.5.0.tgz
$ cd kafka_2.12-2.5.0
$ export PATH=$PATH:/path/to/kafka_2.12-2.5.0/bin
$ zookeeper-server-start.sh  --daemon config/zookeeper.properties
$ kafka-server-start.sh --daemon config/server.properties
We will use Kafka Connect JDBC, a connector that allows Kafka to write to many different JDBC databases. We’ve already added GridDB support to the connector, but it is only available from our own Github repository. Download the JAR
We will also need to use the gridstore-jdbc.jar from GridDB.net’s Github repository. It has implemented additional JDBC functions requiured by the Kafka Connect JDBC connector.
Once you’ve downloaded both JARs, place them in /path/to/kafka_2.12-2.5.0/libs/.
Now we’ll create a config file for kafka-connect-jdbc, configs/jdbc-connect.json. The config files tells the connector what JDBC URL to connect to, the topics to listen to, and how to transform the string time field to an actual timestamp used by the database.
Before starting Kafka Connect, we’ll create all the topics for the stocks we intend to use.
Now start Kafka Connect:
Load Data
Data is first fetched in a CSV format from AlphaAdvantage using different endpoints to get the past 4 months of data for training and then with the daily API to find anomalies. The REST endpoints are: – Batch mode (Monthly) https://www.alphavantage.co/query?function=TIME_SERIES_INTRADAY_EXTENDED&symbol=${SYMBOL}&interval=1min&slice=year1month${MONTH}&apikey=${AV_API_KEY} – Daily https://www.alphavantage.co/query?function=TIME_SERIES_INTRADAY&datatype=csv&symbol=${SYMBOL}&interval=1min&apikey=${AV_API_KEY}
The returned CSV is put into a Python dictionary:
The produce() function uses the row data dictionary to generate the JSON record required by Kafka:
Finally the data is sent to Kafka on the ‘INTRADAY_${SYMBOL}’ topic where it will be written to GridDB by the Kafka Connect JDBC connector.
Before running, we install the Python dependencies with Pip:
Then manually run loadbatch.py
The daily import can be added to crontab so it runs every night (this assumes the system clock is set to UTC):
Train
First install the Python module dependencies with Pip:
Once the historic batch data is loaded in GridDB we can train a model. The last three months of data are queried and fetched as a Pandas data frame.
From here we modifiy the data to fit inputs expected the Keras LSTM model. 95% of the data will be used for training, the last 5% used for verification
Model Storage
To store the model in GridDB requires a bit of a work around as it’s only possible to export a complete model to the filesystem through Keras. First, we create a temporary file which we save to the model to. Then open the temporary file and write it as a bytearray in GridDB. Finally, remove the temporary file.
To load a model, the reverse is done. Read the latest from GridDB, write it to temporary, load it with Keras and then remove the temporary file.
Anomaly Detection
Like with training, data is queried from GridDB and read into a Pandas Data Frame before being transformed into the format expected by the model.
Then the model is loaded and prediction is run. To find anomalies, the difference of the predicted value versus the actual value is calculated (loss) and then all values where the loss is greater than 0.65 are then written back to GridDB.
The anomaly detection script is also put in crontab to run 1 hour after the daily data load is started.
Notifications
One of GridDB’s unique features is its Trigger functionality: whenever a row is written to a specified container, it can be configured to send a JMS message or make a REST API call.
For more architectural and implementation details on Triggers, check out the Technical and API Reference documents.
The GridDB Python client does not support adding triggers so Java must be used:
Since the REST API calls are fairly basic and do not support adding Authorization headers, we create a Flask Application that will then Twilo’s SendGrid to send an email.
PIP can be used to install all of the dependencies before running the Trigger Handler application.
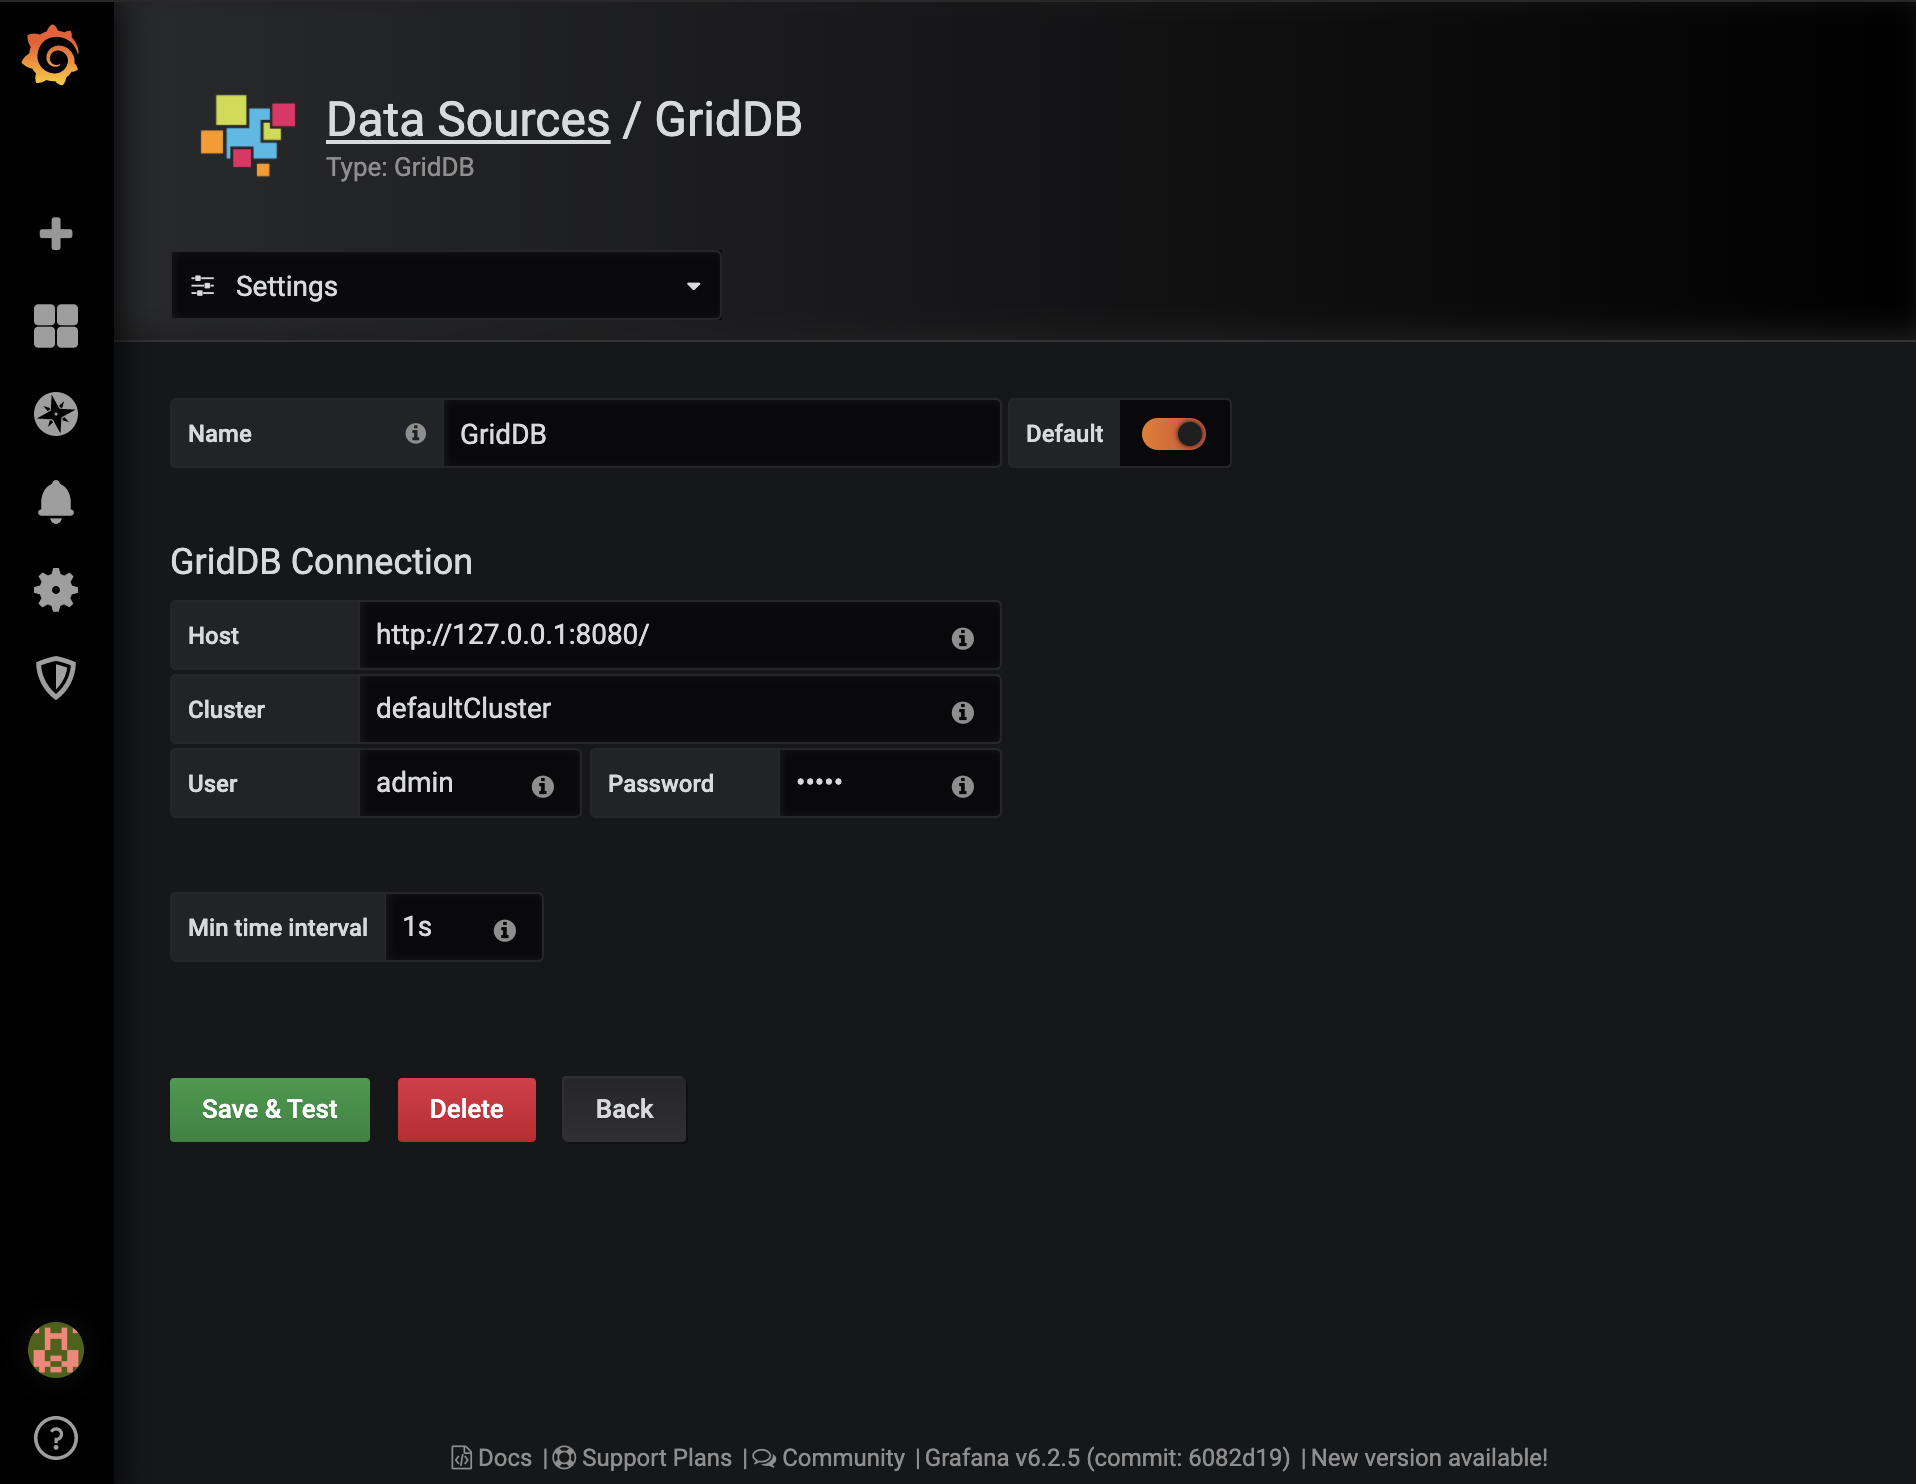
Grafana can be installed using their instructions. Once installed and running, the first step is to create the default GridDB data source and configure it based on our system settings.
To install the GridDB data source, first download and extract the tar and copy the dist directory to the Grafana system directory.
More detailed instructions for the Grafana GridDB data source are here.
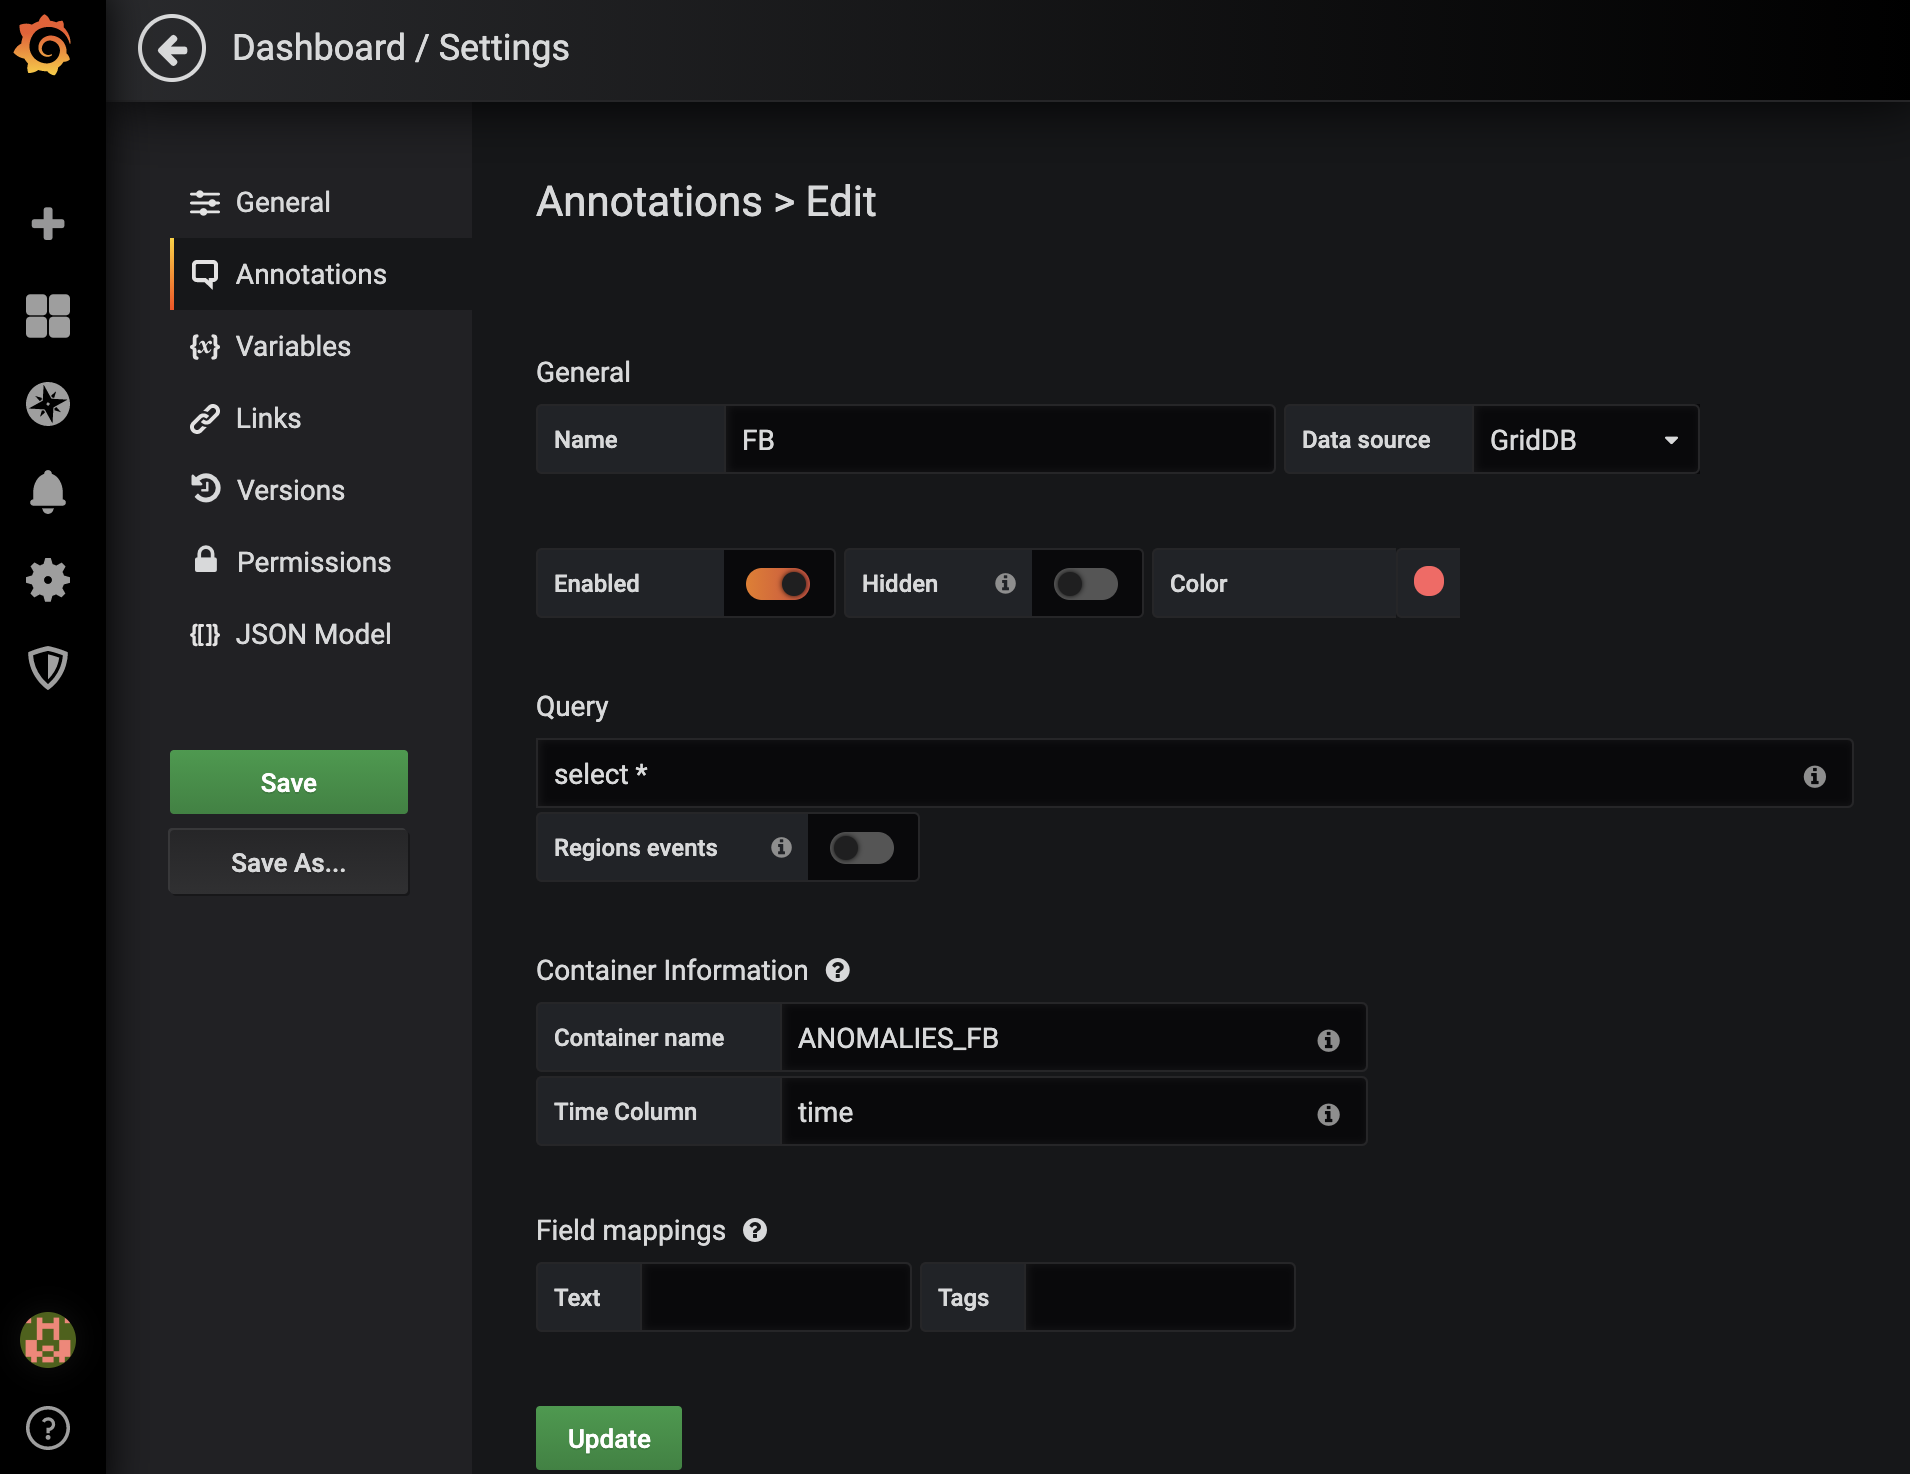
Now, create create one dashboard for every symbol we’re monitoring. Each dashboard will have one annotation that will mark each time an anomaly occured in the given stock. In this case, we’re looking at Facebook’s (FB) anomalies.
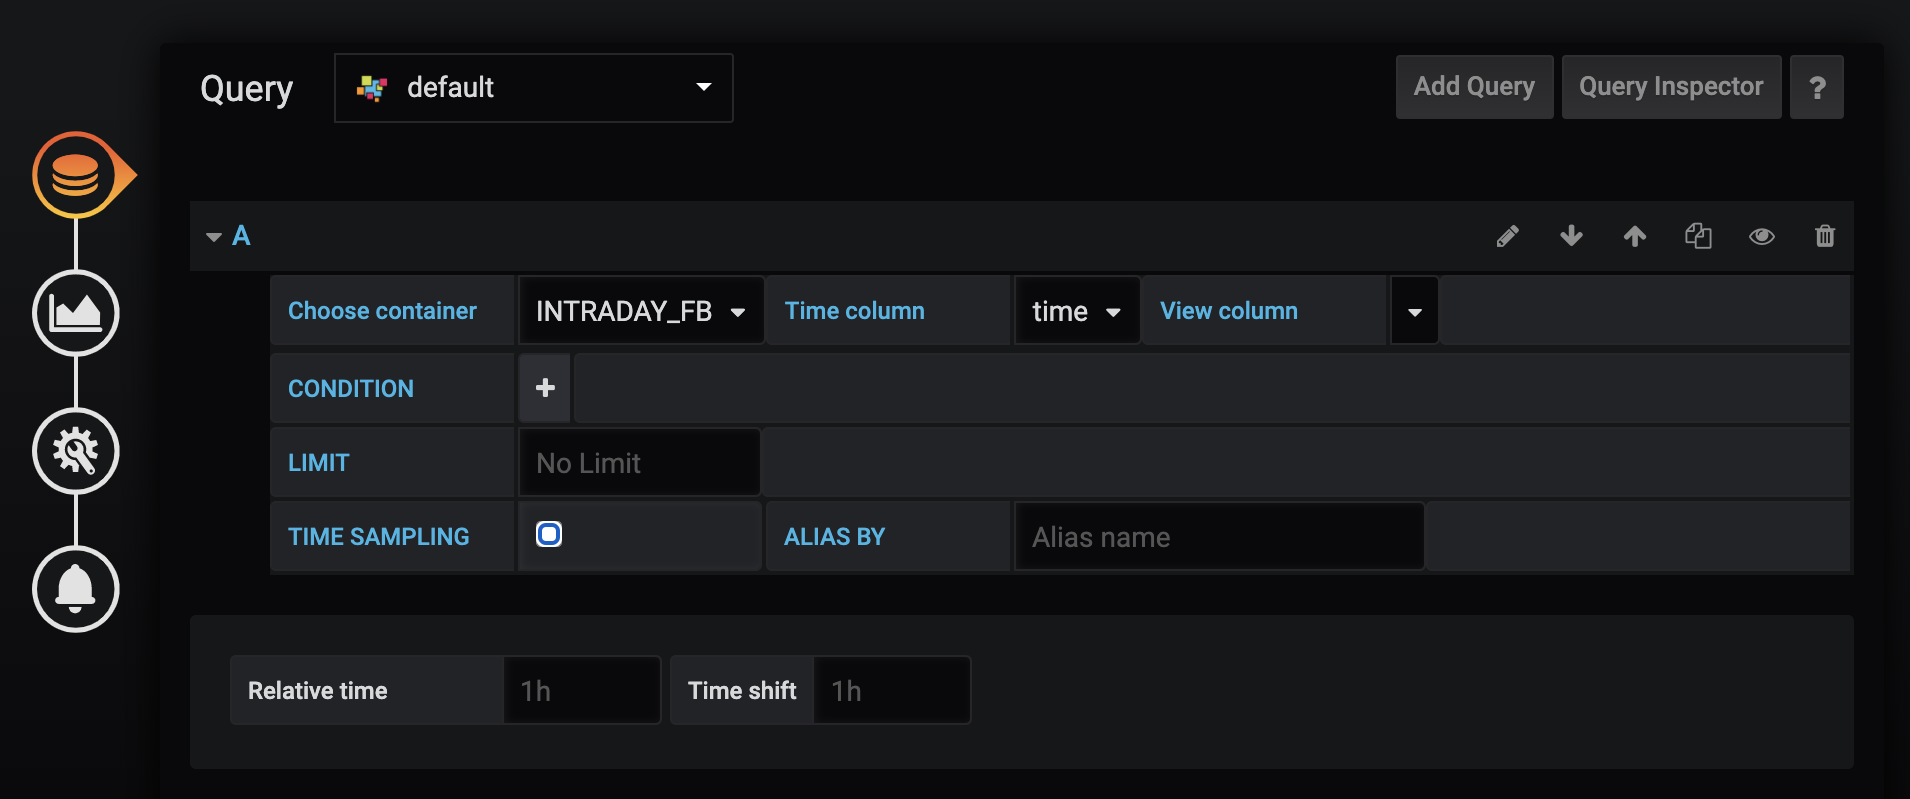
We will create a new panel and create the query, setting the container name to “INTRADAY_FB” and removing any limits on returned records. The default limit of 10000 will only give a few weeks of data.
Finally, we visualize the stock price and anomalies:
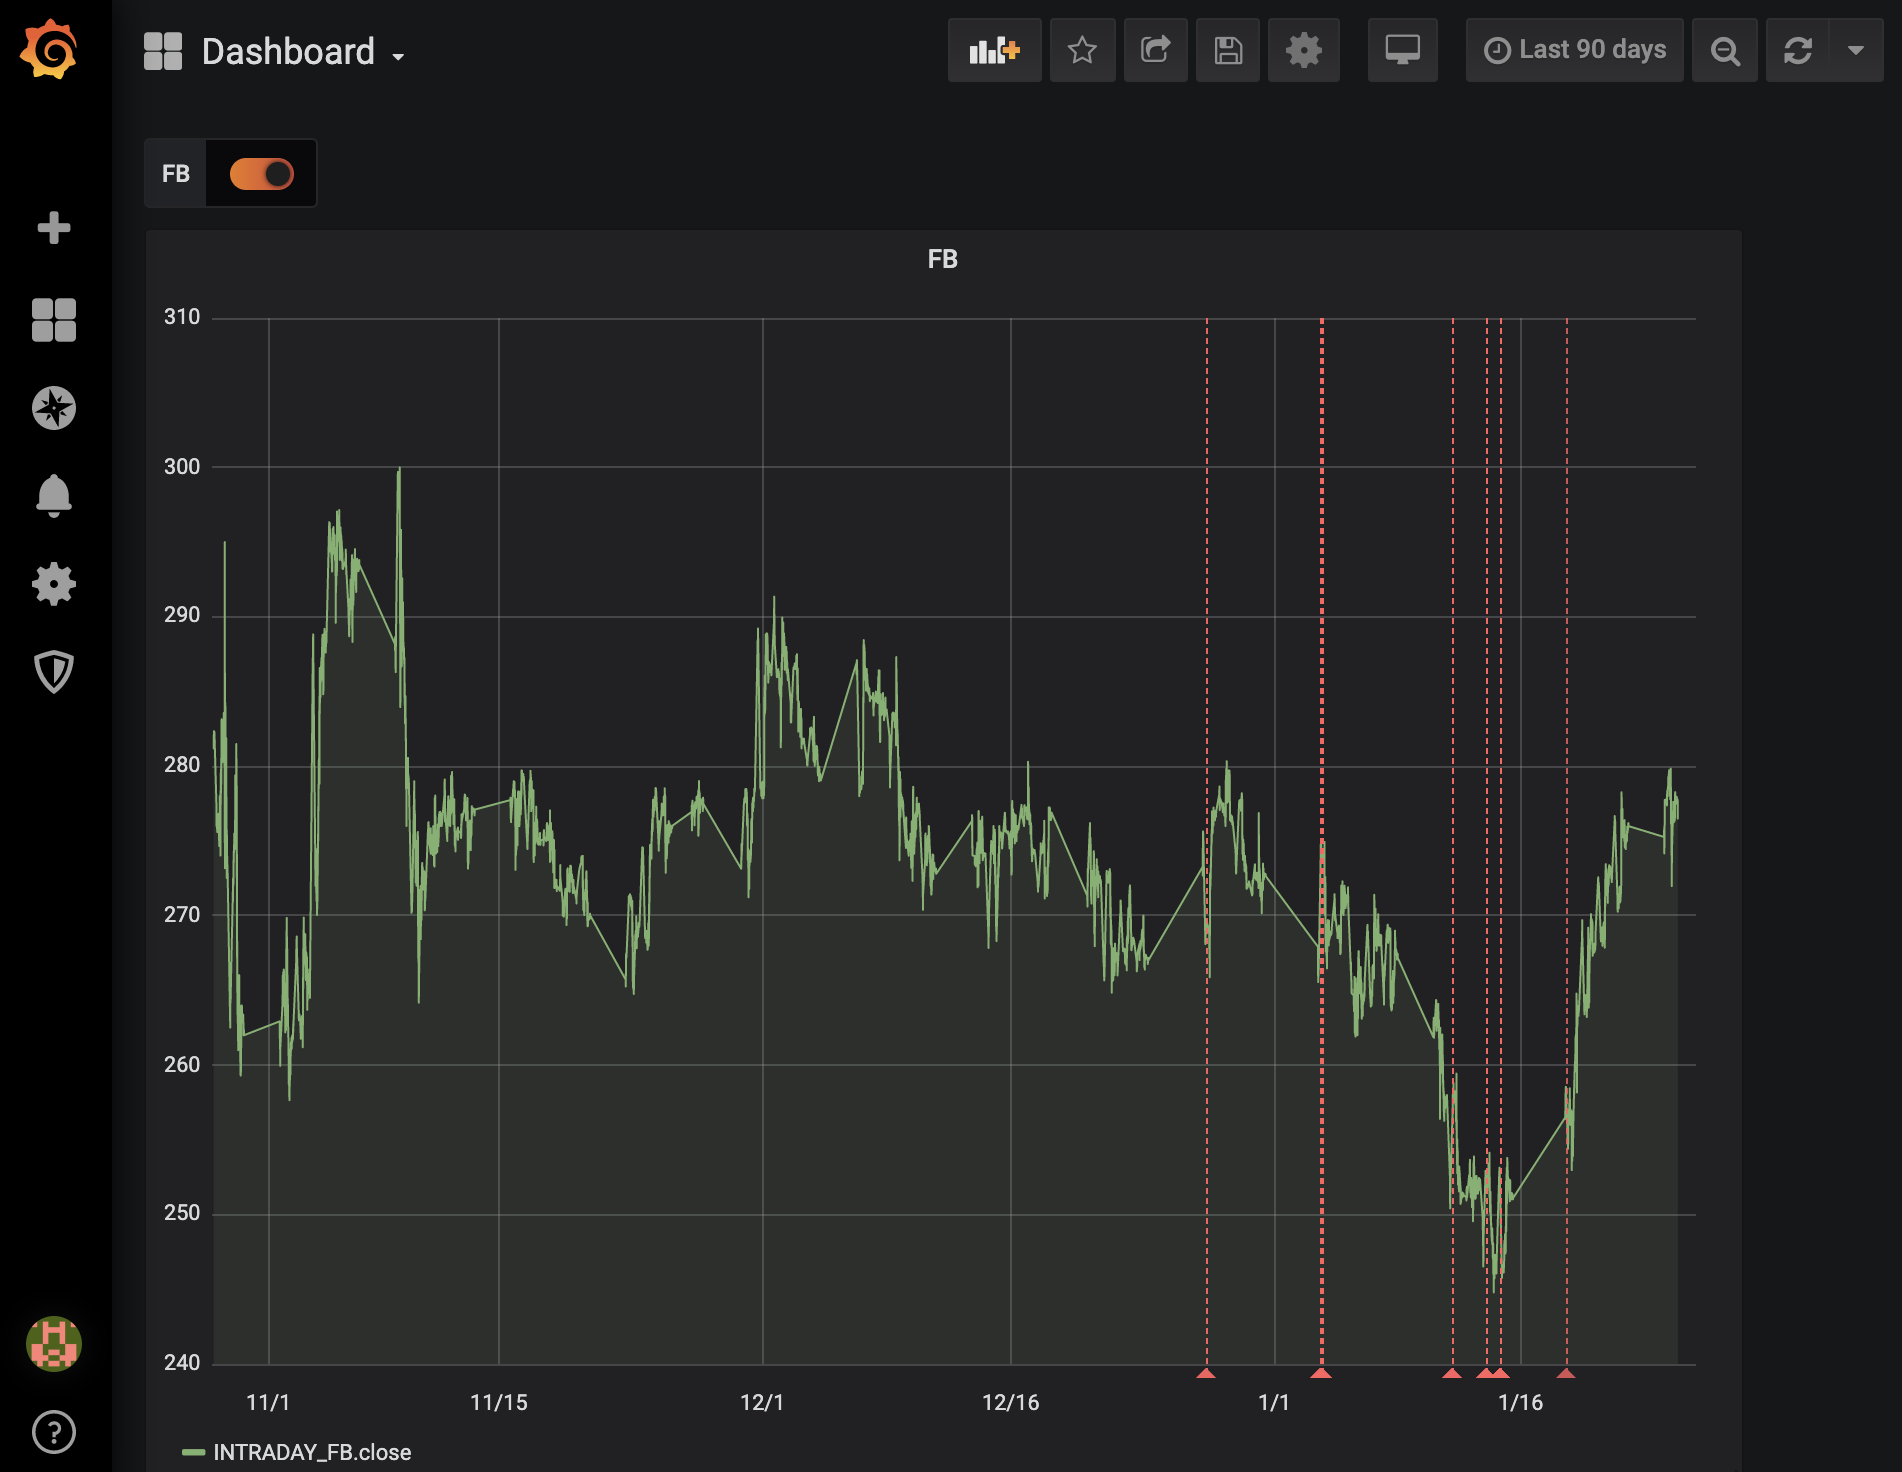
In the above graph, stock price is the primary time series shown and the anomalies (or where the predicted price significantly differs from the actual price) are denoted by the dashed red lines.
Conclusion
This project has demonstrated how effective GridDB can be as the data store in the deployment of a real world, production ready machine learning project, mainly by showcasing its ability to store both the models and the input/output data. Open source tools such as Kafka and Grafana were also successfully integrated into the project to help implement effective data streaming and visualization. And lastly, GridDB’s Trigger functionality was used in conjunction with SendGrid to ensure the anomalies were not missed.
The full source code for this project can be found on GridDB.net’s GitHub page (here)[https://github.com/griddbnet/stock-anomaly-ml-project].