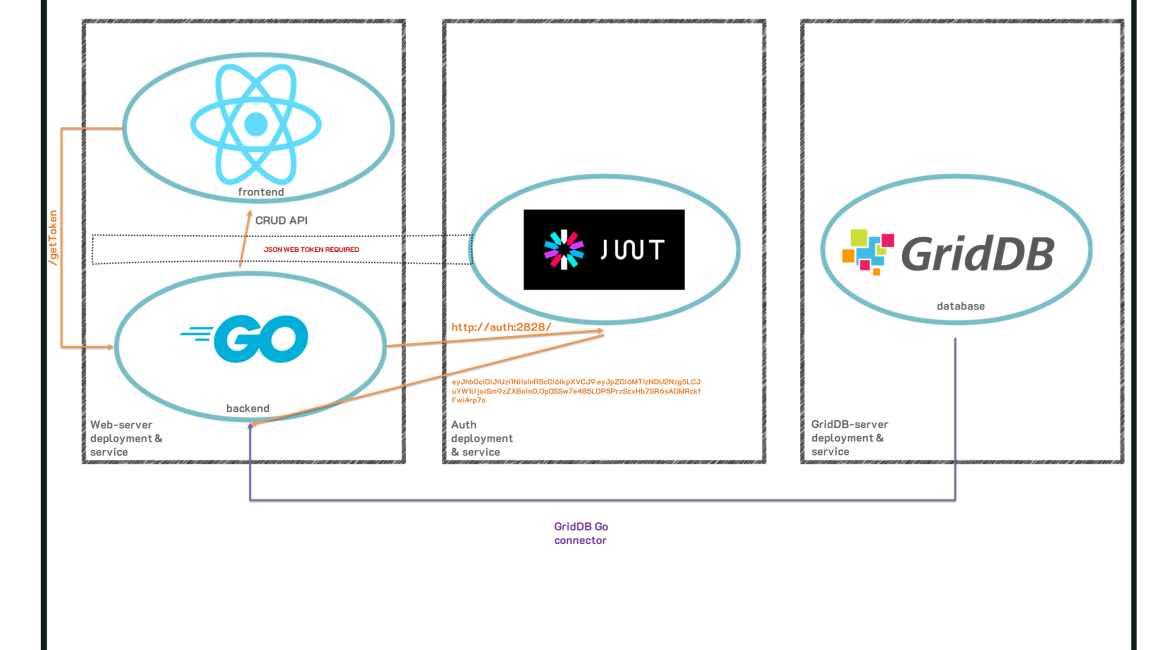
In a previous article, we covered how to create a GridDB-backed application which utilized the microservice architecture. We created a total of three docker containers to help illustrate the concept: a GridDB server, a Go web server which served up a Todo application, and a JSON Web Token-backed authentication service. You can read about that entire process as well as view all source code here: blog
To build upon this previous effort, we felt the next logical step would be to move on from using docker compose to a kubernetes cluster. Specifically, we aim to use a single-node, local kubernetes cluster to run the three containers we have previously built. If you are unfamiliar with kubernetes, it is a container orchestration system which aims to allow you to easily deploy your applications which are then managed and allowed to be easily scaled and are made much more robust.
To put it succinctly: we will convert our three docker containers to be run in kubernetes as a cluster of pods; kubernetes will handle all of the networking, all of the hostnames, the persistent storage, etc. By the time we are done, we will have a fully scaleable and robust application which can be run on our local machines or on a cloud provider and eventually be ready for a production-grade application.
Overview
Before we get into the meat of this project, let’s talk about the overall design and overview and prerequisites.
Here is a screenshot of the app you will be building. A simple todo app with persistent storage, an endpoint which needs a web token, and built by kubernetes.

Prerequisites
To follow along, you will need to have docker installed on your machine; we will go over installing the kubernetes software in the following section.
You can download the source code here:
$ git clone https://github.com/griddbnet/Blogs.git --branch kubernetesHow it works
As explained before, we will be using the docker containers we built in our previous article and convert them into kubernetes services. This way, we get a much more robust system where kubernetes will handle networking, scaling, and bringing the containers back up automatically if they fail. As this is a series, you can read the previous blog to learn more about the source specific source code of the containers we will be using to form our kubernetes cluster.
As for how it all works, we will be creating three kubernetes pods, each one corresponding to our docker containers: web-server, authentication, and GridDB. Along with those pods, each pod gets its own service to take care of the networking. Because our pods all rely on each other and need to communicate in a secure way, they each need their own service to dictate networking rules. We will go more in-depth on this later. And lastly we will create persistent storage to allow our data to persist through machine shutdowns, etc.
So by the time we are finished, we will have 3 pods, 3 services, a persistent volume, and a persistent volume claim; you will be able to access the web todo application in your browser, port 8080.
Installing kubernetes
Before we begin creating our cluster, we will need to choose our local, single node kubernetes cluster. For this article, we will be using the lightweight and simple: k3s.
k3s
To install:
$ curl -sfL https://get.k3s.io | sh - NOTE: if you choose to run this inside a virtual machine, please make a note of the system requirements, and also remember that these container images generally take up more space than you’d think, so please provision a big enough virtual disk. For my VM, I used 4 vCPUs, 2 GB of ram, and a 40 GB virtual disk.
I’d also recommend you input the following commands to avoid having to use sudo when using kubectl commands:
$ export KUBECONFIG=~/.kube/config
$ echo "export KUBECONFIG=~/.kube/config" >> ~/.bashrc
$ mkdir ~/.kube 2> /dev/null
$ sudo k3s kubectl config view --raw > "$KUBECONFIG"
$ chmod 600 "$KUBECONFIG"
What we’re doing here is copying our kubectl config inside of our user home directory to allow permissions of using kubectl unencumbered.
With that out of the way, we can now begin the process of creating all of our various kubernetes infrastucture.
Creating the Kubernetes Cluster
For this section, we will be using the docker images created of our todo application and converting them into kubernetes pods and services; this process will be done by using special kubernetes config files in the form of yaml files which will contain all instructions for our cluster. We will go through this by going over each microservice, one-by-one.
But before that, there is a small step of getting our app images into a place where our kubernetes yaml files can find them.
Docker Registry
When creating our kubernetes yaml files, though you may be tempted to reference a locally built image of your application, kubernetes will not be able to access this file. Instead, you will need to either push your docker images onto dockerhub, or spin up a local docker registry container and upload there. For this article, we will proceed with using a local docker registry.
First, let’s pull and run the docker registry image.
$ docker run -d -p 5000:5000 --name registry registry:2
This command will pull the image if it’s not on your local machine yet and then will run it in the background. You can verify with docker ps.
And with that, let’s push our docker images to our registry — these images will be the basis for our kubernetes pods in the next few sections.
As an example, here is the process of building, tagging, and then pushing images onto our local registry. We will go over these again.
$ docker build . -t web-server:01
$ docker tag web-server:01 localhost:5000/web-server:01
$ docker push localhost:5000/web-server:01
The Kubernetes GridDB Object
First, let’s create our kubernetes object of our GridDB server, which houses all of our data.
Creating and Tagging GridDB Image
Let’s create our image and tag it.
Navigate to the griddb-server directory and build the image (there is a Dockerfile with all of the instructions). And build
$ docker build . -t griddb-serverAnd then tag and push to your local docker registry
$ docker tag griddb-server:01 localhost:5000/griddb-server:01
$ docker push localhost:5000/griddb-server:01
This does exactly what it sounds like, it creates an image of the contents in our Dockerfile and saves it in the local registry.
Creating Kubernetes a Pod/Deployment (GridDB)
Next we will refer to the local GridDB image in our yaml file. First, let’s post the entirety of our config file.
apiVersion: apps/v1
kind: Deployment
metadata:
  name: griddb-server-deployment
spec:
  replicas: 1
  selector:
    matchLabels:
      app: griddb-server
  template:
    metadata:
      labels:
        app: griddb-server
    spec:
      volumes:
        - name: griddb-pv-storage
          persistentVolumeClaim:
            claimName: griddb-server-pvc
      containers:
        - name: griddbcontainer
          image: localhost:5000/griddb-server:01
          imagePullPolicy: IfNotPresent
          ports:
            - containerPort: 10001
          volumeMounts:
            - mountPath: "/var/lib/gridstore/data"
              name: griddb-pv-storage
          securityContext:
            runAsUser: 0
            runAsGroup: 0
          env:
          - name: NOTIFICATION_MEMBER
            value: '1'
          - name: GRIDDB_CLUSTER_NAME
            value: "myCluster"
To begin, let’s focus on the following section: spec.template.spec.containers. You can see here we set the image to refer to our image we pushed to our local registry. For the imagePullPolicy, we set it to IfNotPresent, which tells our kubernetes cluster to pull from the local registry and not look on docker hub.
Another section what I will mention is securityContext and the env. First, the env sets the pod’s environment variables — specifically here we are telling our container to run in Fixed_List mode and setting the cluster name to the default name. And as a part of the process of running in Fixed_List mode, we need to edit the griddb config file, so we need to run as root user to have the sufficient permissions to save the changes to the config file, hence running the container as user 0, also known as root user.
And so now, when we tell kubernetes to create this pod, kubernetes will ensure that this pod is always up and running; if an error occurs and the container crashes, kubernetes will be aware of the situation and delete and spin up a new pod. It is so robust that if you wish to restart a pod, the way to do so is to delete the pod and let Kubernetes auto-restart it.
The very last thing to point out is at the top: Kind. We are setting the kind of kubernetes object to deployment, which will create a pod. There is an API setting to select Pod here but it is mostly relegated to niche situations; deployments are more robust and well-rounded objects.
As explained before, we will also need to create a service to handle the networking.
Creating Kubernetes a Service (GridDB)
In the same file, let’s put in the service information, separated by ---.
---
apiVersion: v1
kind: Service
metadata:
  name: griddb-server
  labels:
    app: griddb-server
spec:
  type: ClusterIP
  ports:
  - port: 10001
    name: griddb-server
    targetPort: 10001
  selector:
    app: griddb-server
Here the type is going to be of ClusterIP, meaning we went to expose a port to other objects/pods within our cluster. In this case, we are sharing port 10001 which we will use to access to GridDB in Fixed_List mode. The nice thing here is that we can simply tell our kubernetes cluster to create our objects by pointing to this singular file to create both of these objects.
$ kubectl create -f griddb-server.yamlAnd now you can verify that these objects are running
$ kubectl get pods
$ kubectl get svc
Both of these commands should show their respect objects running. And to get the logs of each:
$ kubectl logs You can also see a more in-depth information of your object:
$ kubectl describe pod
$ kubectl describe svc
Okay, now let’s repeat the process for the other two parts of our applications
The Kubernetes Web-Server Object
This microservice will be our actual todo app’s server — both the backend and the frontend. So we have code in web-server directory which creates a GridDB API and serves up endpoints which are called by the javascript frontend.
First, navigate over to the web-server directory to build, tag, and push your image as explained above. Now let’s take a look at creating the objects.
Creating Kubernetes a Pod/Deployment (Web-Server)
These yaml files are all largely the same, so I will paste the deployment portion without much explanation.
apiVersion: apps/v1
kind: Deployment
metadata:
  name: web-server-deployment
spec:
  replicas: 1
  selector:
    matchLabels:
      app: web-server
  template:
    metadata:
      labels:
        app: web-server
    spec:
      containers:
        - name: webcontainer
          image: localhost:5000/web-server:01
          imagePullPolicy: IfNotPresent
          ports:
            - containerPort: 8000
There is nothing here we haven’t seen yet.
Where it gets a little interesting is in the service object.
Creating Kubernetes a Service (Web-Server)
The difference here between the previous service will be the type
---
apiVersion: v1
kind: Service
metadata:
  name: web-server
  labels:
    app: web-server
spec:
  type: LoadBalancer
  ports:
  - port: 8080
    name: web-server
    targetPort: 8000
  selector:
    app: web-server
Notice here, instead of using the type of ClusterIP, we are using LoadBalancer. You can read about what a load balancer is here: https://en.wikipedia.org/wiki/Load_balancing_(computing). In this case, we are using the load balancer type to allow our web app to be discoverable outside of the kubernetes cluster, in this case on the port we specify in the section called port: 8080.
The Kubernetes Authentication Object
This service handles authentication by issuing out JSON Web Tokens which are required when using the endpoints made by our web-server service. Because the rollout of this object to our kubernetes cluster is identical to our previous efforts, we will not go over it here. Here is the full file:
apiVersion: apps/v1
kind: Deployment
metadata:
  name: auth-deployment
spec:
  replicas: 1
  selector:
    matchLabels:
      app: auth
  template:
    metadata:
      labels:
        app: auth
    spec:
      containers:
        - name: authcontainer
          image: localhost:5000/auth:latest
          imagePullPolicy: IfNotPresent
          ports:
            - containerPort: 2828
---
apiVersion: v1
kind: Service
metadata:
  name: auth
  labels:
    app: auth
spec:
  type: ClusterIP
  ports:
  - port: 2828
    name: auth
    targetPort: 2828
  selector:
    app: auth
The Kubernetes Persistent Storage Objects
To create a persistent storage of our GridDB instance, we need to create a file for the persistent volume and then another one for the persisten volume claim. Once we do that, we create the PV and then the PVC which will bound together. We then tell our deployment to use that volume if everything goes well, our data will persist, even if the host machine goes down or it needs to be rebooted for maintence.
Persistent Volume
First let’s get into the PV:
apiVersion: v1
kind: PersistentVolume
metadata:
  name: griddb-server-pv
spec:
  storageClassName: standard
  accessModes:
  - ReadWriteOnce
  capacity:
    storage: 2Gi
  volumeMode: Filesystem
  hostPath:
    path: "/var/lib/gridstore/data"
Here we are setting the storage class name, the kind, and the path on the host machine to use as our path of data. Using the host as the source of the data is only for dev purposes; in a production setting, you would likely set up an azure cloud storage or something similar.
$ kubectl create -f pv.yamlPersistent Volume Claim
Next let’s make the volume claim. This kubernetes object will seek out any volumes which match the characteristics it needs and once it finds it, automatically binds itself to that volume, thus allowing it to be mounted onto a deployment/pod.
apiVersion: v1
kind: PersistentVolumeClaim
metadata:
  name: griddb-server-pvc
spec:
  storageClassName: standard
  accessModes:
    - ReadWriteOnce
  resources:
    requests:
      storage: 1Gi
The most important thing is that the storageClassName match between the two items.
$ kubectl create -f pvc.yamlAnd now let’s add our volume information to our griddb-server deployment.
    spec:
      volumes:
        - name: griddb-pv-storage
          persistentVolumeClaim:
            claimName: griddb-server-pvc
      containers:
        - name: griddbcontainer
          image: localhost:5000/griddb-server:latest
          imagePullPolicy: IfNotPresent
          ports:
            - containerPort: 10001
          volumeMounts:
            - mountPath: "/var/lib/gridstore/data"
              name: griddb-pv-storage
And now we can see here that we are mounting both the persistent storage and the claim to our griddb-server deployment.
You can delete the svc and then re-make it to reflect the changes.
$ kubectl delete deployment griddb-server-deployment
$ kubectl create -f griddb-server.yaml
You won’t need to worry about this messing with the griddb-server svc — kubernetes will simply reject that because it already exists.
Conclusion
And now with all of this stuff running, you can head over to the ip address of your host machine, go to port 8080 and check out your extremely robust and scaleable todo app, complete with a persistent backing of GridDB.