What is an Artificial Neural Network?
Artificial neural networks (ANNs) are a subset of machine learning and they form the heart of deep learning algorithms. Their structure is inspired by the human brain, mimicking the way biological neurons send signals to each other.
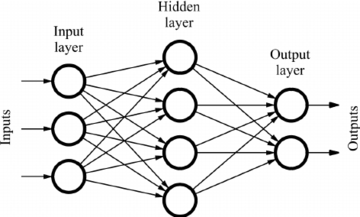
ANNs are made up of node layers, which contain an input layer, hidden layer(s), and an output layer. Each node is connected to another and is associated with a weight and a threshold. If an output of a particular node exceeds the specified threshold value, the node is activated, forwarding data to the next layer of the network. Otherwise, no data is forwarded to the next layer of the network.
Neural network programmers use data to train and improve the accuracy of models over time. Once the learning algorithm is fine-tuned for accuracy, it becomes a powerful tool for prediction.
Write the Data into GridDB
In this article, we will help a bank to increase its customer retention rate. We will implement a neural network model that predicts the customers who are most likely to leave the bank. The dataset to be used shows the various details of bank customers, including their credit score, bank balance, whether they have a credit card, whether they are active, their estimated salary, and more.

In total, there are 14 attributes in the dataset. We want to read the data from the CSV file and store it in GridDB. Let’s first import all the libraries to be used for this:
import java.io.IOException;
import java.util.Properties;
import java.util.Collection;
import java.util.Scanner;

import com.toshiba.mwcloud.gs.Collection;
import com.toshiba.mwcloud.gs.GridStore;
import com.toshiba.mwcloud.gs.GSException;
import com.toshiba.mwcloud.gs.GridStoreFactory;
import com.toshiba.mwcloud.gs.RowKey;
import com.toshiba.mwcloud.gs.Query;
import com.toshiba.mwcloud.gs.RowSet;

import java.io.File;
The data has been stored in a CSV file named Churn_Modelling.csv. We will store this data in a GridDB container, so let us create a static class to represent the container schema:
public static class BankCustomers {

     @RowKey String rowNumber;
     String  surname, geography, gender, tenure, hasCrCard, isActiveMember;
     int customerId,  creditScore, age, numOfProducts, exited;
     Double balance, estimatedSalary;
}
The above class is similar to a SQL table, with the variables representing the table columns.
It’s now time to establish a connection to GridDB. Let’s create a Properties instance with the details of our GridDB installation:
        Properties props = new Properties();
        props.setProperty("notificationAddress", "239.0.0.1");
        props.setProperty("notificationPort", "31999");
        props.setProperty("clusterName", "defaultCluster");
        props.setProperty("user", "admin");
        props.setProperty("password", "admin");
        GridStore store = GridStoreFactory.getInstance().getGridStore(props);
Change the above details to match the specifics of your GridDB installation.
Next, let’s select the BankCustomers container:
Collection<String, BankCustomers> coll = store.putCollection("col01", BankCustomers.class);An instance for the container has been created and given the name coll. We will be using it any time we need to refer to the container.
It’s now time to read the data from the CSV file and store it in a GridDB container. We can use the following code:
File file1 = new File("Churn_Modelling.csv");
                Scanner sc = new Scanner(file1);
                String data = sc.next();


                while (sc.hasNext()){
                        String scData = sc.next();
                        String dataList[] = scData.split(",");


                        String rowNumber = dataList[0];
                        String customerId = dataList[1];
                        String surname = dataList[2];
                        String creditScore = dataList[3];
                        String geography = dataList[4];
                        String gender = dataList[5];
                        String age = dataList[6];
                        String tenure = dataList[7];
                        String balance = dataList[8];
                        String numOfProducts = dataList[9];
                        String hasCrCard = dataList[10];
                        String isActiveMember = dataList[11];
                        String estimatedSalary = dataList[12];
                        String exited = dataList[13];


                        BankCustomers bc = new BankCustomers();


                        bc.rowNumber = rowNumber;
                        bc.customerId = Integer.parseInt(customerId);
                        bc.surname = surname;
                        bc.creditScore = Integer.parseInt(creditScore);
                        bc.geography = geography;
                        bc.gender = gender;
                        bc.age = Integer.parseInt(age);
                        bc.tenure = tenure;
                        bc.balance = Double.parseDouble(balance);
                        bc.numOfProducts = Integer.parseInt(numOfProducts);
                        bc.hasCrCard = hasCrCard;
                        bc.isActiveMember = isActiveMember;
                        bc.estimatedSalary = Double.parseDouble(estimatedSalary);
                        bc.exited =Integer.parseInt(exited);
                        coll.append(bc);
                }
The code read data from the CSV file and created an object named bc. The object has then been appended to the container.
Retrieve the Data from GridDB
We can now pull the data from GridDB. The following code demonstrates how to do this:
Query<bankcustomers> query = coll.query("select *");
                RowSet</bankcustomers><bankcustomers> rs = query.fetch(false);
            RowSet res = query.fetch();</bankcustomers>
The select * statements helps us to select all data stored in the GridDB container.
Data Pre-Processing
Since there are categorical variables in the dataset, we will transform them before feeding them to the neural network. The last field of the dataset, that is, Exited, shows whether the customer left the bank or not. A value of 1 indicates that the customer has left the bank, thus, this attribute will be our output label.
The first three attributes, that is, RowNumber, CustomerId, and Surname can be ignored as they are not deciding factors. This leaves us with 10 attributes for consideration and the output label.
The values for Geography and Gender are not numerical, so we should convert them into digits. The Gender label will be mapped to binary values, that is, 0 or 1 (male/female). Since there are multiple values for Geography, we will use one hot encoding to encode them into digit values.
We will use the DeepLearning4j (DL4J) library to define a schema for this dataset and then feed the schema into a transform process. The data can then be taken through encoding and transformation.
First, let’s import a set of additional libraries to be used:
import org.datavec.api.records.reader.RecordReader;
import org.datavec.api.records.reader.impl.transform.TransformProcessRecordReader;
import org.datavec.api.records.reader.impl.csv.CSVRecordReader;
import org.datavec.api.split.FileSplit;
import org.datavec.api.transform.TransformProcess;
import org.deeplearning4j.api.storage.StatsStorage;
import org.datavec.api.transform.schema.Schema;
import org.deeplearning4j.datasets.datavec.RecordReaderDataSetIterator;
import org.deeplearning4j.datasets.iterator.DataSetIteratorSplitter;
import org.deeplearning4j.nn.conf.NeuralNetConfiguration;
import org.deeplearning4j.nn.conf.MultiLayerConfiguration;
import org.deeplearning4j.nn.conf.layers.DenseLayer;
import org.deeplearning4j.nn.conf.layers.OutputLayer;
import org.deeplearning4j.nn.weights.WeightInit;
import org.deeplearning4j.nn.multilayer.MultiLayerNetwork;
import org.deeplearning4j.optimize.listeners.ScoreIterationListener;
import org.deeplearning4j.ui.api.UIServer;
import org.deeplearning4j.ui.storage.InMemoryStatsStorage;
import org.deeplearning4j.ui.stats.StatsListener;
import org.deeplearning4j.util.ModelSerializer;
import org.nd4j.evaluation.classification.Evaluation;
import org.nd4j.linalg.api.ndarray.INDArray;
import org.nd4j.linalg.activations.Activation;
import org.nd4j.linalg.dataset.api.iterator.DataSetIterator;
import org.nd4j.linalg.dataset.api.preprocessor.NormalizerStandardize;
import org.nd4j.linalg.dataset.api.preprocessor.DataNormalization;
import org.nd4j.linalg.factory.Nd4j;
import org.nd4j.linalg.learning.config.Adam;
import org.nd4j.linalg.io.ClassPathResource;
import org.nd4j.linalg.lossfunctions.impl.LossMCXENT;
import org.slf4j.LoggerFactory;
import org.slf4j.Logger;

import java.util.Arrays;
You can then use the following code to implement the schema:
 private static Schema createSchema() {
        final Schema scm = new Schema.Builder()
                                    .addColumnString("rowNumber")
                                    .addColumnInteger("customerId")
                                    .addColumnString("surname")
                                    .addColumnInteger("creditScore")
                                    .addColumnCategorical("geography", Arrays.asList("France","Germany","Spain"))
                                    .addColumnCategorical("gender", Arrays.asList("Male","Female"))
                                    .addColumnsInteger("age", "tenure")
                                    .addColumnDouble("balance")
                                    .addColumnsInteger("numOfProducts","hasCrCard","isActiveMember")
                                    .addColumnDouble("estimatedSalary")
                                    .addColumnInteger("exited")
                                    .build();
        return scm;

    }
Now that we have created a schema for the data, we can pass it through a transform process. The following code demonstrates this:
 private static RecordReader dataTransform(RecordReader reader, Schema scm){
    final TransformProcess transformation = new TransformProcess.Builder(scm)

        .removeColumns("rowNumber","customerId","surname")
        .categoricalToInteger("gender")
        .categoricalToOneHot("geography")
        .removeColumns("geography[France]")
        .build();

        final TransformProcessRecordReader transformationReader = new TransformProcessRecordReader(reader,transformation);
        return  transformationReader;

    }
The encoding will transform the geography label into multiple columns with binary values. For example, if we have 3 countries in the dataset, they will be mapped into 3 columns with each column representing a country value.
We have also removed one categorical variable to avoid the dummy variable trap. The removed variable should become the base category against the other categories. We removed France, so it will act as the base for indicating the other country values.
Split the Data into Train and Test Sets
The training dataset will be used to train the neural network model while the test dataset will help us to validate how well the model has been trained. Here is the code for splitting the data:
private static RecordReader generateReader(File file) throws IOException, InterruptedException {
    final RecordReader reader = new RecordReader();
    reader.initialize(new FileSplit(res));


      reader.initialize(res);
        final RecordReader transformationReader=applyTransform(reader,createSchema());
        return transformationReader;
    }
Define the Input and Output Labels
It’s now time to define the input and output labels. After applying transformations, the resulting data should have 13 columns. This means the indexes should run from 0 to 12. The last columns shows the output labels and the other columns are the input labels.
It’s also good to define the batch size for the dataset. The batch size will define the quantity by which data will be transferred from the dataset to the neural network. We will create a DataSetIterator for that as shown below:
final int labIndex=11;
    final int numClasses=2;
    final int batchSize=8;
    final INDArray weightArray = Nd4j.create(new double[]{0.57, 0.75});

    final RecordReader reader = generateReader(res);
    final DataSetIterator iterator = new RecordReaderDataSetIterator.Builder(reader,batchSize)
        .classification(labIndex,numClasses)
        .build();
Data Scaling
The labels of the data you feed to a neural network should be comparable to each other. In our case, the magnitude of the balance and estimated salary labels is too high than the other labels. If we use the data as it is, these two labels will hide the impact of the other labels in making predictions.
To solve this problem, we will use feature scaling as shown in the following code:
final DataNormalization normalization = new NormalizerStandardize();
       normalization.fit(iterator);
       iterator.setPreProcessor(normalization);
       final DataSetIteratorSplitter iteratorSplitter = new DataSetIteratorSplitter(iterator,1250,0.8);
At this point, the data is ready to be fed into a neural network.
Define the Neural Network
It’s now time to define the neural network configuration. This involves defining the number of neurons to be added to the input layer, the structure and connections for the hidden layer, output layer, the activation function to be used in each layer, the optimizer function, and the loss function for the output layer.
The following code demonstrates this:
final MultiLayerConfiguration config = new NeuralNetConfiguration.Builder()

    .weightInit(WeightInit.RELU_UNIFORM)

    .updater(new Adam(0.015D))

    .list()

    .layer(new DenseLayer.Builder().nIn(11).nOut(6).activation(Activation.RELU).dropOut(0.9).build())

    .layer(new DenseLayer.Builder().nIn(6).nOut(6).activation(Activation.RELU).dropOut(0.9).build())

    .layer(new DenseLayer.Builder().nIn(6).nOut(4).activation(Activation.RELU).dropOut(0.9).build())

    .layer(new OutputLayer.Builder(new LossMCXENT(weightArray)).nIn(4).nOut(2).activation(Activation.SOFTMAX).build())

    .build();
Note that we have added dropouts in between the input and the output layers to help us avoid over-fitting. Also, only 10% of the neurons was dropped to avoid under-fitting. We also set the number of inputs to 11 and the number of outputs to 1.
We have also used the sigmoid activation function in the output layer of the network. We also specified the loss function together with the error rate to be calculated. In this case, we are calculating the sum of squares of the difference between the actual output and the expected output. The corresponding loss function is the binary cross-enthropy.
Train the Model
Let’s first compile and then initialize the model:
  final UIServer ui = UIServer.getInstance();
        final StatsStorage stats = new InMemoryStatsStorage();

        final MultiLayerNetwork multiNetwork = new MultiLayerNetwork(config);
        multiNetwork.init();
        multiNetwork.setListeners(new ScoreIterationListener(100),
                                       new StatsListener(stats));
        ui.attach(stats);
Let’s call the fit() method to train the neural network model:
multiNetwork.fit(iteratorSplitter.getTrainIterator(),100);Let us use the Evaluation class provided by DL4J to evaluate the model results:
final Evaluation ev =  multiNetwork.evaluate(iteratorSplitter.getTestIterator(),Arrays.asList("0","1"));
        System.out.println(ev.stats());
The results will be shown in the form of a confusion matrix.
Make Predictions
We want to see the neural network model in action. We will make a prediction to tell us whether a particular customer will leave the bank.
The test dataset will not have an output label, thus, we should create a new schema for it. You only have to remove the label from the previously defined schema. Your new schema should be as shown below:
 private static Schema createSchema() {
        final Schema scm = new Schema.Builder()
           .addColumnString("rowNumber")
           .addColumnInteger("customerId")
           .addColumnString("surname")
           .addColumnInteger("creditScore")
           .addColumnCategorical("geography", Arrays.asList("France","Germany","Spain"))
           .addColumnCategorical("gender", Arrays.asList("Male","Female"))
           .addColumnsInteger("age", "tenure")
           .addColumnDouble("balance")

           .addColumnsInteger("numOfProducts","hasCrCard","isActiveMember")
           .addColumnDouble("estimatedSalary")
           .build();
        return scm;

    }
We can now create an API function that will return the prediction results as INDArray:
public static INDArray predictedOutput(File inputFile, String modelPath) throws IOException, InterruptedException {
        final File file = new File(modelPath);
        final MultiLayerNetwork net = ModelSerializer.restoreMultiLayerNetwork(file);
        final RecordReader reader = generateReader(inputFile);
        final NormalizerStandardize normalizerStandardize = ModelSerializer.restoreNormalizerFromFile(file);
        final DataSetIterator iterator = new RecordReaderDataSetIterator.Builder(reader,1).build();
        normalizerStandardize.fit(iterator);
        iterator.setPreProcessor(normalizerStandardize);
        return net.output(iterator);

    }
Next, we will be compiling and executing the code.
Compile and Run the Code
First, login as the gsadm user. Move your .java file to the bin folder of your GridDB located in the following path:
/griddb_4.6.0-1_amd64/usr/griddb-4.6.0/bin
Next, run the following command on your Linux terminal to set the path for the gridstore.jar file:
export CLASSPATH=$CLASSPATH:/home/osboxes/Downloads/griddb_4.6.0-1_amd64/usr/griddb-4.6.0/bin/gridstore.jarNext, run the following command to compile your .java file:
javac BankRetention.javaRun the .class file that is generated by running the following command:
java BankRetentionThe neural network will predict the probability that the customer leaves the bank. If the probability is above 0.5 (50%), it is an indication of an unhappy customer.