The output of any given model in machine learning is only ever as good as its input data. As such it becomes crucial that the algorithm creating it can be fed, at will, with specific data. Data which possibly needs to fulfil a large variety of criteria. And that’s what databases are for. But not any database will do either. Given the quantities of data, there is a need for fast data handling. Which is where GridDB comes in, with its design for speed and the possibility to represent complex structures through computationally advantageous container schemes and hierarchies.
Let’s take a look then with a very fundamental example using php and its php-ai/php-ml library in connection with GridDB. Of course you could also use python or one of the many other languages for which GridDB features a connector.
Environment Setup, PHP & GridDB
First setup then. We need php v7.2 or newer, the php-ai/php-ml library, and a GridDB server.
Your server will need php just as much as your local workstation, so that both the database server and client can interact with the shared language.
On CentOS php can simply be installed with:
yum install php7
yum install php7-devel
Through the use of composer we can then add the ml library:
composer require php-ai/php-ml
You might also need the php-mbstring extension and more general libraries, installable with:
yum install php-mbstring
yum groupinstall 'Development Tools'
GridDB can be installed in a variety of ways, detailed instructions can be found .
The possibly easiest method to install it, is to use docker:
docker pull griddbnet/griddb
Check that your database is ready to go with:
su - gsadm
gs_stat -u "user"/"password"
(Replace “user” and “password” with your admin credentials.)
Container Creation
With the database up and running, it is time to create the database container and its associated layout scheme.
include('griddb_php_client.php');
$factory = StoreFactory::get_default();
$container_name = "income_ml";
$gridstore = $factory->get_store(
    array(
        // Connection specifications.
        "notification_address" => $argv[1],
        "notification_port" => $argv[2],
        "cluster_name" => $argv[3],
        "user" => $argv[4],
        "password" => $argv[5]
    )
);
// Connect to the target container (create it if does not exist).
$gridstore->get_container("container_name");
// Place a collection into the container.
$collection = $gridstore->put_container($container_name,
    array(
            // Definition of the container layout scheme.
            array("id" => GS_TYPE_INTEGER),
            array("age" => GS_TYPE_INTEGER),
            array("workclass" => GS_TYPE_STRING),
            array("fnlwgt" => GS_TYPE_INTEGER),
            array("education" => GS_TYPE_STRING),
            array("family" => GS_TYPE_STRING),
            array("occupation" => GS_TYPE_STRING),
            array("relationship" => GS_TYPE_STRING),
            array("race" => GS_TYPE_STRING),
            array("gender" => GS_TYPE_STRING),
            array("nation" => GS_TYPE_STRING),
            array("income_status" => GS_TYPE_STRING),
            ),
      GS_CONTAINER_COLLECTION);
Data Insertion
Now that the container has been created, it is time to fill it. Here we’ll use one of the simplest and most modifiable methods. We call GridDB’s API via php functions, and pass values from corresponding arrays.
In order for this project to remain in an easily replicable scope, we’ll chose a comparatively small data set. Having said that, with the hardware and time available to train a much larger model, and the excellent scalability of GridDB you could employ significantly more data just as easily.
for($i = 0; $i < $row_count; $i++){
    // Creation of a new row.
    $row_list[$i] = $collection->create_row();
    // Setting the fields of the row.
    $row_list[$i]->set_field_by_integer(0, $i);
    $row_list[$i]->set_field_by_integer(1, $age_list[$i]);
    $row_list[$i]->set_field_by_string(2, $emp_list[$i]);
    $row_list[$i]->set_field_by_integer(3, $wgt_list[$i]);
    $row_list[$i]->set_field_by_string(4, $edc_list[$i]);
    $row_list[$i]->set_field_by_string(5, $fam_list[$i]);
    $row_list[$i]->set_field_by_string(6, $job_list[$i]);
    $row_list[$i]->set_field_by_string(7, $rel_list[$i]);
    $row_list[$i]->set_field_by_string(8, $rce_list[$i]);
    $row_list[$i]->set_field_by_string(9, $gnd_list[$i]);
    $row_list[$i]->set_field_by_string(10, $cid_list[$i]);
    $row_list[$i]->set_field_by_string(11, $inc_list[$i]);
    // Place the new row in the container.
    $collection->put_row($row_list[$i]);
}
Data Modification
If one were to realise later on that there is no need, for some of this data, it can of course simply be deleted again. Similarly if something is missing, it can just be added later on.
To delete or add a column, the put_container function is called again with the updated scheme, and parsed “true” as an additional argument to set it to update.
Shown below is the deletion of a unwanted column (compare with above, the fnlwgt column is removed).
$collection = $gridstore->put_container($containerName,
    array(
            // Definition of the new contianer layout scheme.
            array("id" => GS_TYPE_INTEGER),
            array("age" => GS_TYPE_INTEGER),
            array("workclass" => GS_TYPE_STRING),
            array("education" => GS_TYPE_STRING),
            array("familiy" => GS_TYPE_STRING),
            array("occupation" => GS_TYPE_STRING),
            array("relationship" => GS_TYPE_STRING),
            array("race" => GS_TYPE_STRING),
            array("gender" => GS_TYPE_STRING),
            array("nation" => GS_TYPE_STRING),
            array("income_status" => GS_TYPE_STRING),
            ),
      GS_CONTAINER_COLLECTION, true);
One thing to note is that you can not change the type of a column. Instead create a new column with a different name. Switching types would force the database to execute some implicit type conversions, an error prone operation and thus not supported.
More rows can be inserted in the exact same way as shown previously, see the section “Data Insertion”.
In order to delete a row it is necessary to first fetch said row. Like before first one selects the container, then the row via specification of an appropriate TQL query. Attention needs to be paid to the fact that we will have to set auto-commit to false, before the query and fetch commands are executed. Then finally the selected row is deleted. We will use this to delete all rows which have incomplete data entries.
$container_name = "income_ml";
$query_string = "SELECT * WHERE workclass='?' OR education='?' OR familiy='?'
        OR occupation='?' OR relationship='?' OR race='?' OR gender='?' OR nation='?'";
$collection = $gridstore->get_container($container_name);
$collection->set_auto_commit(false);
$query = $collection->query($query_string);
$rows = $query->fetch($update);
while ($rows->has_next()) {
    // Select a row.
    $row = $collection->create_row();
    $rows->get_next($row);
    // Delete the selected row.
    $rows->delete_current();
}
$collection->commit();
Rows can also be deleted by specifying the row-key instead of performing a search, for details consult the GridDB documentation.
No Machine Learning without Data Bias
With GridDB we can easily get an overview over the data that is in the database. Using one of the many chart libraries that exist for php we can also visualize this to help our understanding. The source code of all the charts in this blog is available here. Furthermore you can download the chart library needed to create these, and read its documentation on the website of FusionCharts.
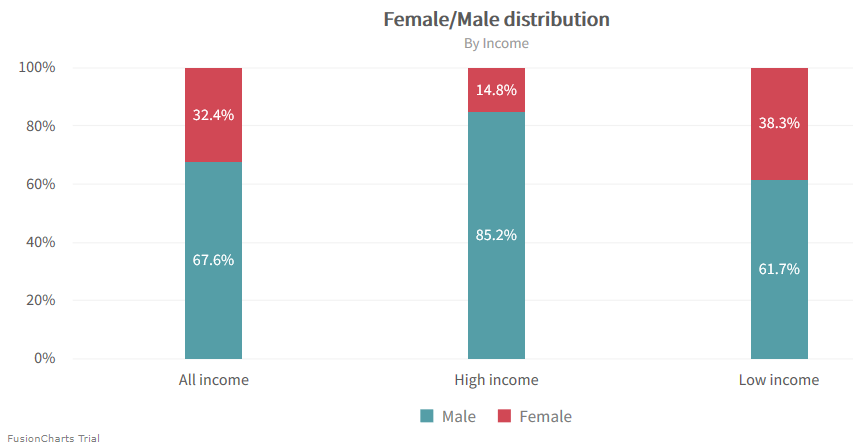
Using said charts to take a deeper look shows the data is biased in various ways. Comparatively few subjects are women. Especially, there are significantly fewer female subjects with a high income.
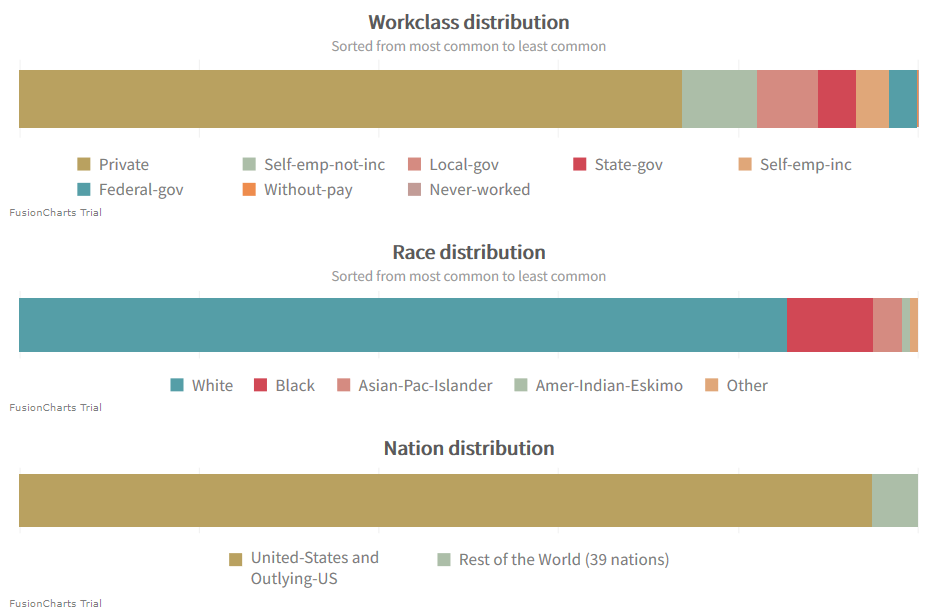
Other problematic data points are work class, race and nationality. All of which feature a dominant subgroup.
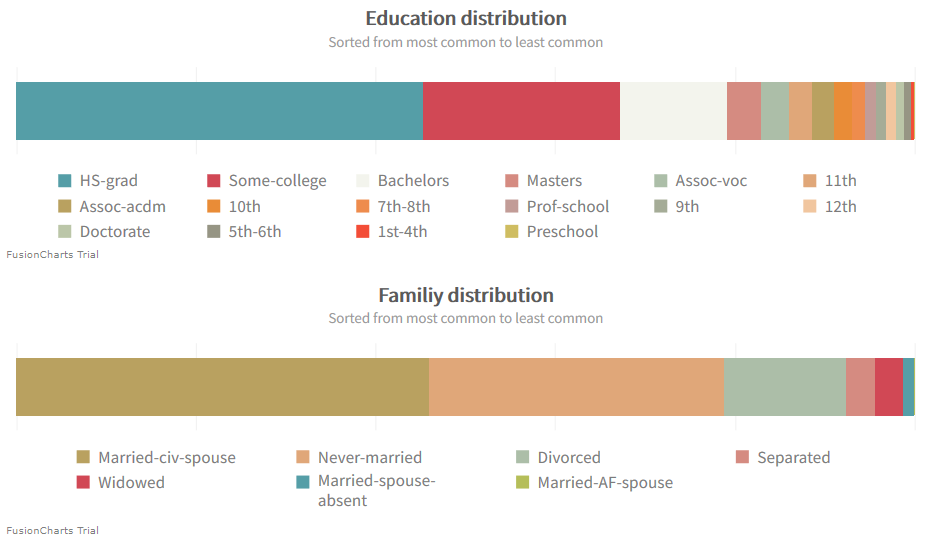
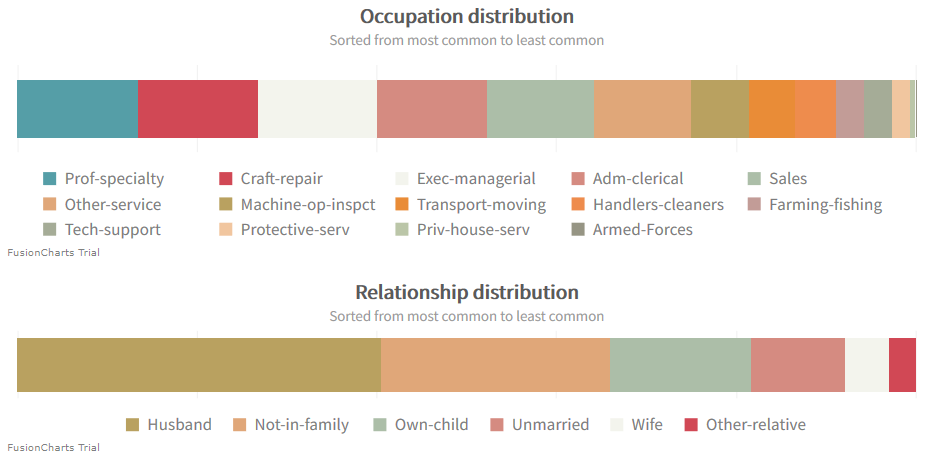
A better distribution can be found in regards to education, family, occupation and relationships.
Adjusting the Biases
With the help of GridDB and TQL we can shift the distribution of the data that we will feed into the machine learning algorithm. For example, we might want to create a balance between data points that are female and those that are male. For this we will define a $train_query_limit variable. Which will specify how many rows fulfilling the query request are fetched. And thus in effect will allow us to retrieve an equal amount of data points for both genders.
 $query_list[0] = "SELECT * WHERE (gender='Male') LIMIT " . $train_query_limit;
 $query_list[1] = "SELECT * WHERE (gender='Female') LIMIT" . $train_query_limit;
Fetching data is analogous to writing data to the database. The columns are in the same order as they were set in the scheme.
Before doing so it might be necessary to increase the PHP memory limit depending on your php.ini settings. It is possible to either set the available memory to a bigger value, or to simply remove the limit in its entirety. Considering that the machine learning algorithm will require even more memory later on, the code below specifies no limit.
// Remove the memory limit temporarily.
ini_set('memory_limit', '-1');
// Loop through all rows returned by the query.
while ($rows->has_next()) {
    // Update row.
    $rows->get_next($row);
    // Write fields into temporary variables.
    $age = $row->get_field_as_integer(1);
    $employement = $row->get_field_as_string(2);
    $education = $row->get_field_as_string(3);
    $family = $row->get_field_as_string(4);
    $occupation = $row->get_field_as_string(5);
    $relationship = $row->get_field_as_string(6);
    $race = $row->get_field_as_string(7);
    $gender = $row->get_field_as_string(8);
    $country = $row->get_field_as_string(9);
    $income_status = $row->get_field_as_string(10);
    // Write to array.
    ...
}
Collecting the data points into two arrays, one for the input data called $samples and one for the expected results called $targets, allows us to feed them then to machine learning algorithm.
Training and Prediction
A support vector machine, is the machine learning algorithm deployed here, it is referenced in the library as SVC (support vector classification). In this blog we will use it with RBF kernel. Naturally other kernels, and algorithms are available in the php-ai/php-ml library.
For the algorithm to understand the data, it will need to be represented as a feature array. For that purpose the raw data will undergo vectorization and tf-idf transformation. Afterwards a small portion of the train dataset will be set aside as test dataset to provide a first impression of the models performance. If it is unsatisfying then the algorithm variables need to be adjusted accordingly.
// Tokenizing the raw data.
$vectorizer = new TokenCountVectorizer(new WordTokenizer());
$vectorizer->fit($samples);
$vectorizer->transform($samples);
$tf_idf_transformer = new TfIdfTransformer();
$tf_idf_transformer->fit($samples);
$tf_idf_transformer->transform($samples);
​
// Setting up the train and test datasets.
$dataset = new ArrayDataset($samples, $targets);
$random_split = new StratifiedRandomSplit($dataset, 0.1);
​
// Selection of the algorithm and its kernel.
$classifier = new SVC(
    Kernel::RBF,    // kernel
    1.0,            // cost
    3,              // degree
    null,           // gamma
    0.0,            // coef 0
    0.001,          // tolerance
    100,            // cache size
    true,           // use shrinking
    false           // generate probability estimates
);
​
// Train and prediction.
$classifier->train($random_split->getTrainSamples(), $random_split->getTrainLabels());
$predicted_labels = $classifier->predict($random_split->getTestSamples());
​
// Accuracy score:
$accuracy = Accuracy::score($predicted_labels, $random_split->getTestLabels());
Validation of the Machine Learning Algorithm
Once a good accuracy score is reported on the test dataset it is time to check the model against a validation dataset. We can create such a dataset easily by fetching additional data points from the GridDB. All data points for a validation-set should be unknown to the model. As such it is important to ensure that the chosen query returns no data points which have been used already.
This can be achieved for example with GridDB’s indexes, row-keys or the OFFSET keyword.
// Train/Test dataset queries:
"SELECT * WHERE (gender='Male') LIMIT " . $train_query_limit;
"SELECT * WHERE (gender='Female') LIMIT " . $train_query_limit;
​
// Validation dataset queries:
"SELECT * WHERE (gender='Male') OFFSET " . $train_query_limit . " LIMIT " . $validation_query_limit;
"SELECT * WHERE (gender='Female') OFFSET " . $train_query_limit . " LIMIT " . $validation_query_limit;
The model can understand the new dataset once it has been transformed by the feature array, which had been previously created from the training data.
// Apply the transformations to the validation data.
$vectorizer->transform($validation_samples);
$tf_idf_transformer->transform($validation_samples);
​
// Calculate accuracy score for the validation data:
$validation_predicted_labels = $classifier->predict($validation_samples);
$accuracy = Accuracy::score($validation_targets, $validation_predicted_labels;
Exploring the Model
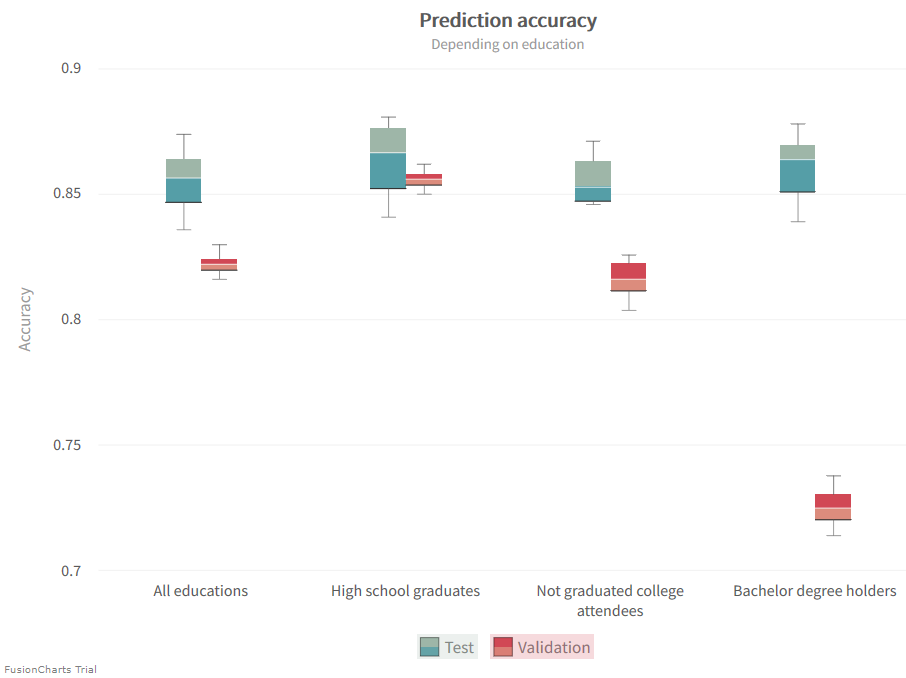
To learn more about the created model we will want to test it against various validation data sets. For example we could choose to validate it on specific subjects grouped by education. This does not just potentially tell us about the prediction capabilities of our model, but also of the importance of these characteristics in relation to income.
"SELECT * WHERE (education='HS-grad') LIMIT " . $validation_query_limit;
"SELECT * WHERE (education='Some-college') LIMIT " . $validation_query_limit;
"SELECT * WHERE (education='Bachelor') LIMIT " . $validation_query_limit;
​
In the chart below the achieved accuracies are depicted. While the test accuracies remain more or less constant, we can see a large variation in the validation accuracies. This shows that the model does indeed make different classification choices based on education. A look at the accuracies reported for a general dataset, one that contains all educations, furthermore illustrates the practical difference between the test and validation datasets. Predictions are not as accurate for the later set. The vectorizer is taking the test dataset into account, as a part of the larger train set, during the construction of the feature array. However it has no knowledge of the validation set, thus can’t necessarily completely map it onto the feature array itself. This accuracy gap can be used to adjust bias and variance to achieve a better fitting.
The model does particularly good in the case of Highschool graduates and rather poorly in the case of Bachelor degree holders. It might overvalue education as an indicator in the later case. Therefore it struggles if there’s a roughly equal likelihood for high or low income in regards to a specific education.
Other Data Subsets
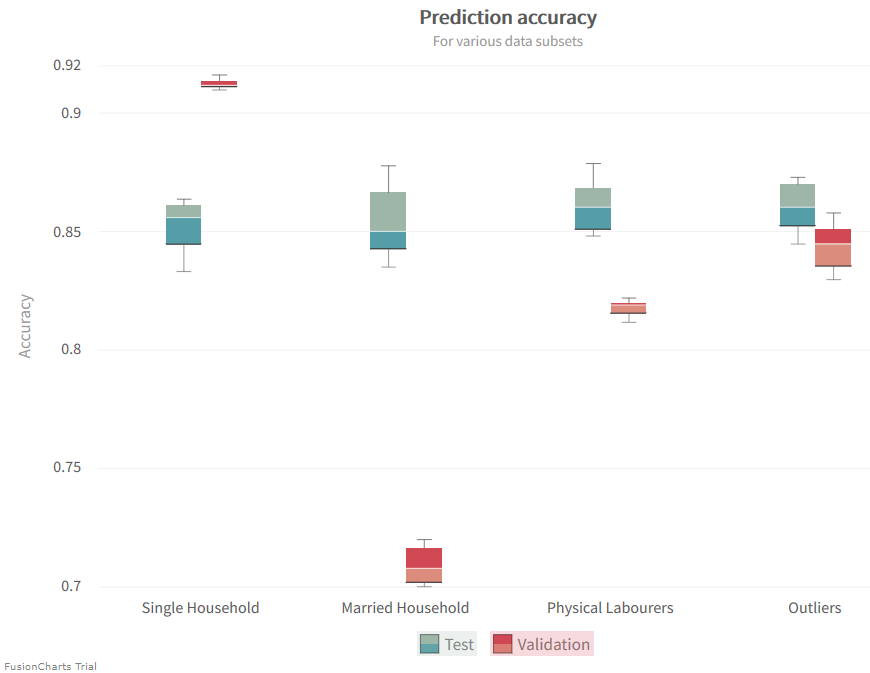
Now let’s take a look at what else we can learn. We do so with the help of a more complicated database query. Here we essentially group together several data subsets. These groupings can be just as helpful as the specific selection we performed before.
// Married households:
"SELECT * WHERE (familiy='Married-civ-spouse' OR familiy='Married-AF-spouse') LIMIT " . $validation_query_limit;
​
// Single households:
"SELECT * WHERE (familiy='Divorced' OR familiy='Never-married' OR familiy='Separated' OR familiy='Widowed') LIMIT " . $validation_query_limit;
​
// Physical laborers:
"SELECT * WHERE (occupation='Craft-repair' OR occupation='Handlers-cleaners' OR occupation='Farming-fishing' OR occupation='Priv-house-serv') LIMIT " . $validation_query_limit;
​
// Outliers of the dataset:
"SELECT * WHERE (NOT race='White' AND NOT nation='United-States' AND NOT nation='Outlying-US(Guam-USVI-etc)') LIMIT " . $validation_query_limit;
​
In Machine Learning Data makes a Difference
If you have any questions about the blog, please create a Stack Overflow post here https://stackoverflow.com/questions/ask?tags=griddb .
Make sure that you use the “griddb” tag so our engineers can quickly reply to your questions.