Last year we released a guide/tutorial on how to ingest data using GridDB and Kafka. In that guide, we walked developers through the process of feeding data from a CSV, into the console producer, through Kafka and then through the GridDB JDBC Sink through to GridDB itself.
For this blog, because of the new update to the JDBC Kafka Connector, we will be going backwards. That is, we will be using the GridDB JDBC Source to move data from GridDB the database, through to Kafka and out to the consumer (or another Kafka Sink plugin).
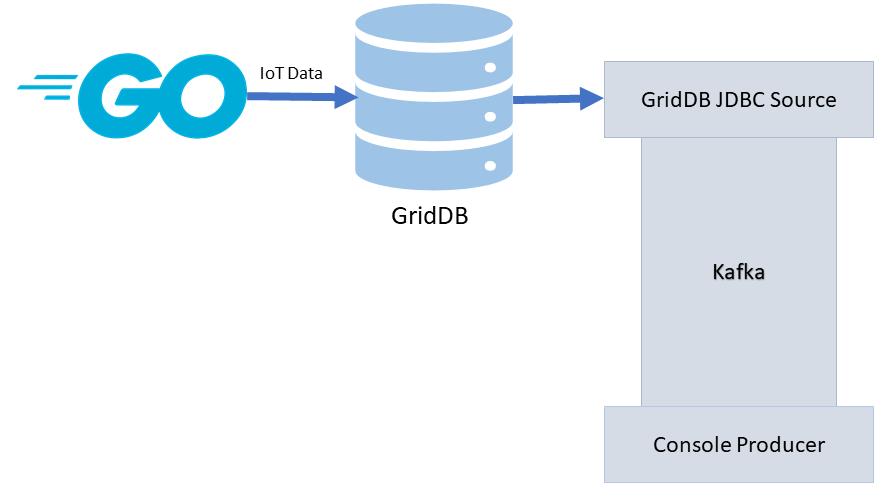
To help demonstrate this process, we will be employing the help of our go script from our most recent tutorial: Simulating IoT Data with Go. In that tutorial, we go through the process of creating a simple script that inserts a large amount of generated/random data to simulate/mimic an IoT dataset — the purpose being for creating quick and dirty IoT proof of concepts.
So, if with the help of that tutorial and script, the basic flow will look like this: a go script will write data into our GridDB database, which will then be read by the source connector, which will then be fed into Kafka, and then finally can be output to the console.
Installation
A majority of the instructions to getting this running can be found in the original tutorial. Essentially you will need to download/setup Kafka, run the zookeeper server, and then run the kafka server. From there, you can build the Kafka-Connect-JDBC-GridDB connector from the Git Repo with mvn package.
Once you build the .jar file, cp it into your kafka/libs directory. You should also place your GridDB JDBC Driver .jar into that directory as well. And with that of the way, we will now diverge from the original tutorial into new territory.
Configuring the GridDB Source Connector
We will now need to configure our GridDB sink connector’s config file. This file will define the parameters and connection information to give the credentials to allow our Kafka server to communicate with our GridDB server. If you have the default GridDB installation, you can almost use this configuration file verbatim.
So, for your config/connect-jdbc.properties file, you can add the following:
bootstrap.servers=localhost:9092
name=griddb-sources
connector.class=io.confluent.connect.jdbc.JdbcSourceConnector
tasks.max=1
key.converter.schemas.enable=true
value.converter.schemas.enable=true
batch.size=1
mode=bulk

topic.prefix=gridstore-02-
table.whitelist="kafkaBlog"

connection.url=jdbc:gs://239.0.0.1:41999/defaultCluster/public
connection.user=admin
connection.password=admin
auto.create=true

transforms=TimestampConverter
transforms.TimestampConverter.type=org.apache.kafka.connect.transforms.TimestampConverter$Value
transforms.TimestampConverter.format=yyyy-MM-dd hh:mm:ss
transforms.TimestampConverter.field=datetime
transforms.TimestampConverter.target.type=Timestamp
The main difference here (when compared to the original tutorial) is that the connector class has been changed and we have added a table.whitelist parameter. For the purposes of this demo, we will simply take a look at a singular GridDB container that will make up the entirety of our Kafka topic.
Usage
GridDB as a Data Source
Inserting
For this blog, we will use our go script/tutorial which will insert random values into our GridDB database. The tutorial documentation goes over it with some more details, but essentially the script allows a developer to insert “generated” IoT data over X amount of times, with N amount of sensors, into a GridDB server. Because it’s IoT-based data, all data from the “sensors” are inserted into a Time Series container.
To run the script:
$ go run singlePut.go 24 5The first number is total number of hours to simulate, and the second number is the increments of data being “emitted”. So in this case, the script will generate data from a timespan of current time through 24 hours from now, with data coming in every 5 minutes. The script also has a default of 15 sensors which will be generated for each point in time into the same container.
If you are following along, make sure you change the singlePut.go script to update the container name to whatever you like; just make sure the container name matches the table whitelisted in the jdbc.properties file. For this blog, we are using kafkaBlog.
containerName := "kafkaBlog"
conInfo, err := griddb_go.CreateContainerInfo(map[string]interface{} {
    "name": containerName,
    "column_info_list":[][]interface{}{
        {"timestamp", griddb_go.TYPE_TIMESTAMP},
        {"id", griddb_go.TYPE_SHORT},
        {"data", griddb_go.TYPE_FLOAT},
        {"temperature", griddb_go.TYPE_FLOAT}},
    "type": griddb_go.CONTAINER_TIME_SERIES,
    "row_key": true})
if (err != nil) {
    fmt.Println("Create containerInfo failed, err:", err)
    panic("err CreateContainerInfo")
}
defer griddb_go.DeleteContainerInfo(conInfo)
The rest of the the script will handle the actual data generation with a couple of for loops
for i := 0; i < int(arrLen); i++ {

    innerLen := numSensors
    fullData[0][i] = make([]interface{}, innerLen)
    times[i] = make([]time.Time, innerLen)
    id[i] = make([]int, innerLen)
    data[i] = make([]float64, innerLen)
    temp[i] = make([]float64, innerLen)

    var rowList []interface{}

    // iterates through each sensor (ie. will emit data N amount of times )
    for j := 0; j < innerLen; j++ {
        addedTime := i * minutes
        timeToAdd := time.Minute * time.Duration(addedTime)
        incTime :=  now.Add(timeToAdd)

        times[i][j] = incTime
        id[i][j] = j
        data[i][j] = (r1.Float64() * 100) + numSensors // using the random seed
        x := (r1.Float64() * 100) + 2
        temp[i][j] = math.Floor(x*100) / 100 // temp should only go 2 decimal places

        var row []interface{}
        row = append(row, times[i][j])
        row = append(row, id[i][j])
        row = append(row, data[i][j])
        row = append(row, temp[i][j])
        rowList = append(rowList, row)
        // fmt.Println("fullData: ", fullData[0][i][j])
    }
    fullData[0][i] = rowList
}
Using The Source Connector
Once this is complete, we can use our Source Connector to read the table and feed our data into Kafka. So, let’s run the source connector.
From your kafka directory, run the following:
$ ./bin/connect-standalone.sh config/connect-standalone.properties config/connect-jdbc.propertiesThis will kick off the connector and it will begin looking for the table that is whitelisted. If none is found, you will get the following message:
[2021-08-14 01:04:08,047] WARN No tasks will be run because no tables were found (io.confluent.connect.jdbc.JdbcSourceConnector:150)
But once that data is populated, you will see the connector output:
[2021-08-14 01:05:18,149] INFO WorkerSourceTask{id=griddb-sources-0} flushing 0 outstanding messages for offset commit (org.apache.kafka.connect.runtime.WorkerSourceTask:487)
[2021-08-14 01:05:18,156] INFO Started JDBC source task (io.confluent.connect.jdbc.source.JdbcSourceTask:257)
[2021-08-14 01:05:18,156] INFO WorkerSourceTask{id=griddb-sources-0} Source task finished initialization and start (org.apache.kafka.connect.runtime.WorkerSourceTask:225)
[2021-08-14 01:05:18,157] INFO Begin using SQL query: SELECT * FROM "kafkaBlog" (io.confluent.connect.jdbc.source.TableQuerier:164)
With this message, we can now be sure our database is connected and is now being streamed to Kafka.
Reading Kafka Content
Now that this is working, you can see your Kafka messages in the terminal like so:
$ bin/kafka-console-consumer.sh --topic gridstore-03-kafkaBlog --from-beginning --bootstrap-server localhost:9092It should output the contents of your container as a Kafka message
{"schema":{"type":"struct","fields":[{"type":"int64","optional":false,"name":"org.apache.kafka.connect.data.Timestamp","version":1,"field":"timestamp"},{"type":"int32","optional":true,"field":"id"},{"type":"double","optional":true,"field":"data"},{"type":"double","optional":true,"field":"temperature"}],"optional":false,"name":"kafkaBlog"},"payload":{"timestamp":1628903073145,"id":4,"data":9.307559967041016,"temperature":38.70000076293945}}
{"schema":{"type":"struct","fields":[{"type":"int64","optional":false,"name":"org.apache.kafka.connect.data.Timestamp","version":1,"field":"timestamp"},{"type":"int32","optional":true,"field":"id"},{"type":"double","optional":true,"field":"data"},{"type":"double","optional":true,"field":"temperature"}],"optional":false,"name":"kafkaBlog"},"payload":{"timestamp":1628903373145,"id":3,"data":35.1313591003418,"temperature":79.73999786376953}}
Processed a total of 2 messages
Conclusion
With that done, you can now use your GridDB database as a Kafka Source Connector.
For next steps, you can play around with other Sink connectors. You can, for example, use the Kafka HTTP Sink Connector to send your payloads to an HTTP endpoint. This allows you to do almost anything, including sending your data to a slack channel of your choice for alerts.
The possibilities here are endless; you can even try a Twitter Connector.