Introduction
In this article, we will delve into the process of constructing a Desktop WiFi Network Monitor, intricately weaving together technologies like Node.js, Tauri, and React. Central to our architectural decisions is the emphasis on using GridDB for our storage needs.
But why GridDB? As we navigate through the intricacies of WiFi network monitoring, the choice of a reliable and efficient storage mechanism becomes paramount. GridDB, with its unique features and optimized performance characteristics, emerges as an ideal candidate. Paired with the versatility of Node.js, the rich user interface capabilities of React, and the cross-platform advantages of Tauri, we aim to present a holistic approach to effective network monitoring.
Source Code
There are a few steps to set up the project:
Preparation
This source code was tested on Windows 11 and with Ubuntu 20.04 on WSL2 and heavily depends on the native packet capture, which is Npcap on Windows.
Before installing, ensure that your Windows system has a WiFi device. Please note that this project has only been tested with one WiFi device.
Install Npcap
Npcap is a packet capture and sending library for Microsoft Windows. We need to install this software first so that later we can use it with the node.js npm package, such as cap, to perform packet capturing.
To download Npcap, please visit their site and choose the appropriate installer type for a hassle-free installation. Upon installation, leave every option at its default.

Clone the Source Code on Windows
Clone the source code from this GitHub repository.
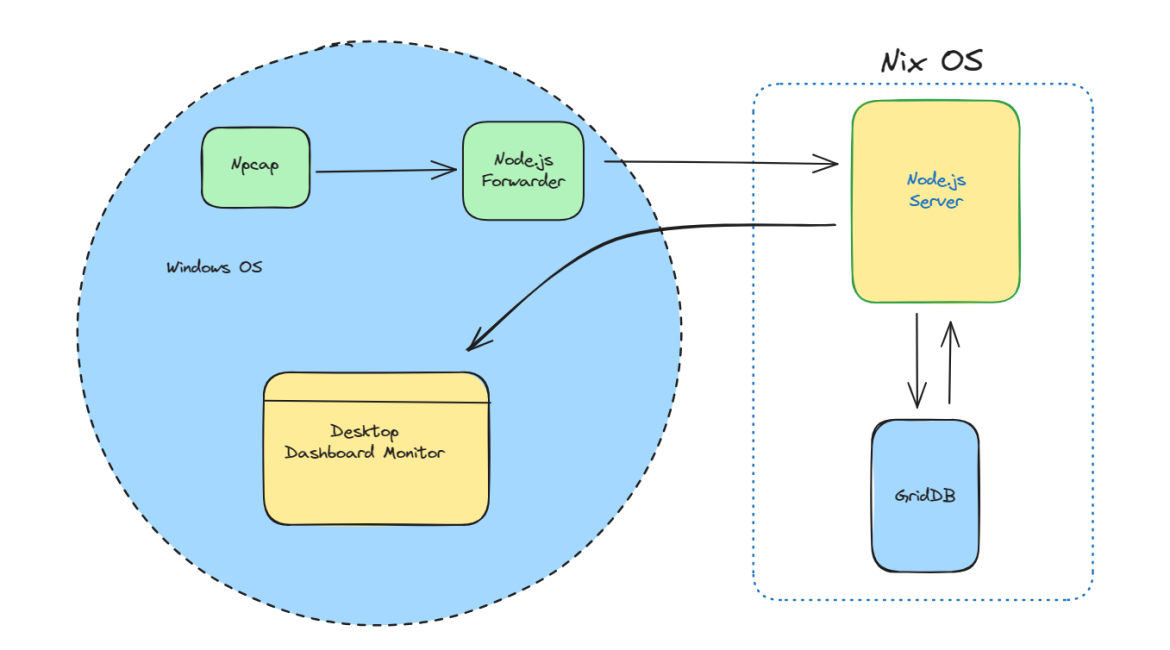
There will be two servers running on different operating systems. The first one is the Node.js server that acts like a forwarder that will run on Windows, we callled Node.js Forwarder, and the second one is the Node.js server that connects to GridDB that will run on Linux.
The Node.js Forwarder will capture the WiFi network traffic and send it to the Node.js server on Linux. The Node.js server on Linux will store the captured packets and save them in the database and also will serve the data to the Tauri desktop application.
Node.js Forwarder
git clone git@github.com:junwatu/bearsakura-netwatch.gitGo to the server directory and install all the dependencies.
cd server
npm install
To capture packets in this project, we use the cap npm package that requires node-gyp to build the native module. This native module is the bridge between Node.js and Npcap. When we run npm install, it automatically creates the native module. To make sure it works, you can install it globally.
npm install -g node-gypHowever, the node-gyp itself has dependencies, like Python and a C++ compiler, which must be installed on the system to work correctly. Please read the node-gyp Windows documentation guide.
Configure env
Configure the .env file, and change the port if you have to. These are the default values:
PACKET_PORT=5000
DATABASE_SERVER_PORT=4000PACKET_PORTis where the port of Node.js forwarder on Windows listens to. Change this if necessary.DATABASE_SERVER_PORT=4000is where the port of the Node.js server on Linux listens to.
Run the forwarder
This command will run the Node.js forwarder on Windows:
npm run devClone the Source Code on Linux
Clone the source code from this GitHub repository. Go to the server-db directory and install all the dependencies.
cd server-db
npm install
Configure env for the server on Linux
Configure the .env file and change the port if necessary. This is the default value:
DATABASE_SERVER_PORT=4000Make sure this port matches with the .env configuration on the Node.js Forwarder. For example, if the .env configuration is DATABASE_SERVER_PORT=3000, this port should be 3000 too.
Run the server on Linux
This command will run the server on Linux:
npm run devRun the desktop monitor
Download the desktop binary file from here. Run the installer and go to the installation directory.
Open the config.json file:
{
    "api": {
        "base_url": "http://localhost:4000"
    }
}
Make sure the base_url port is match with the .env configuration DATABASE_SERVER_PORT=4000.
For example, if the .env configuration have DATABASE_SERVER_PORT=3000 then the base_url should be http://localhost:3000.
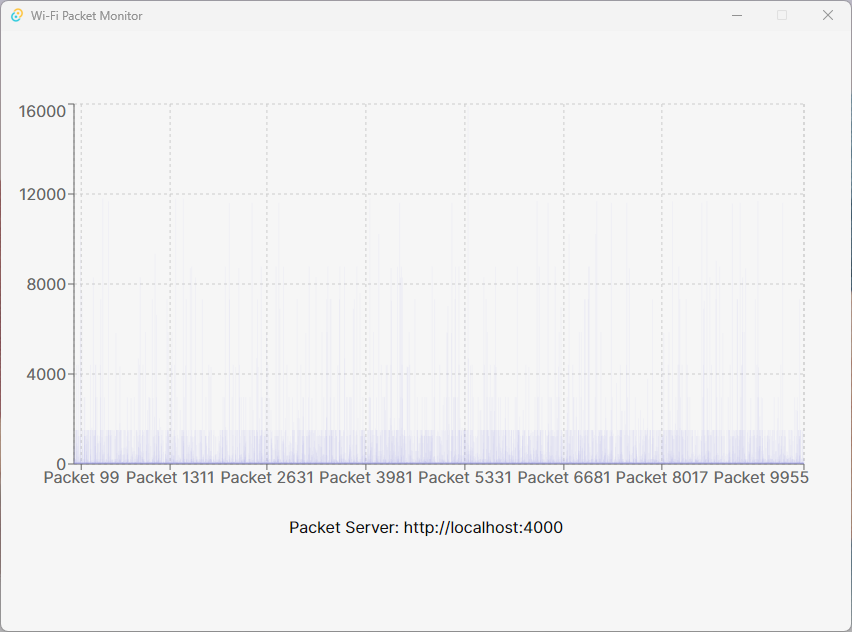
Run the desktop application, double click BearWacth.exe:
System Architecture
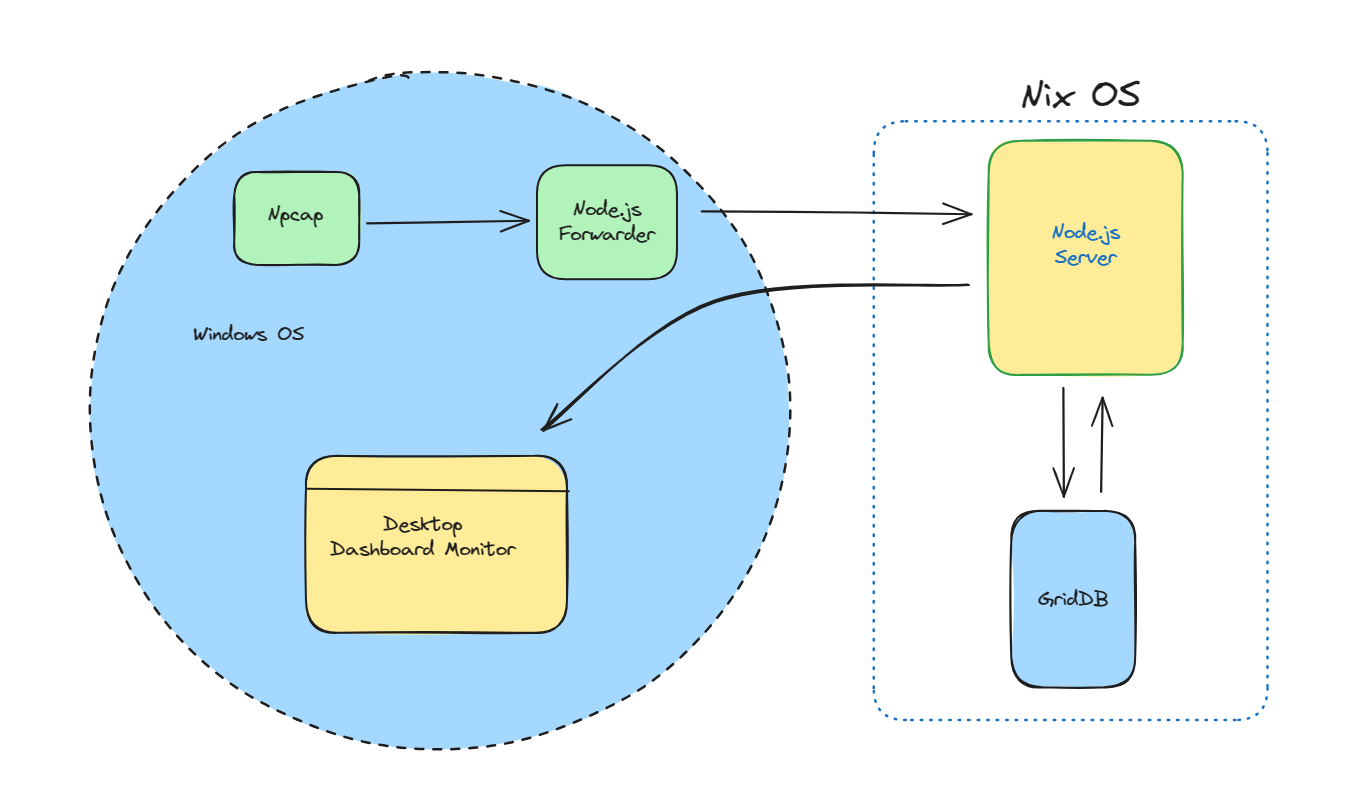
Within the architecture of the Desktop WiFi Network Monitor, Npcap stands out as a powerful packet capture module optimized for Windows OS. This utility continuously fetches WiFi network packets, subsequently channeling them to our dedicated Node.js Forwarder. This forwarder will then send the packets to the Node.js Server that will store the data in the GridDB database. The Node.js Server will also serve the data to the Desktop Database Monitor that will display the data on a desktop dashboard.
Capture Network Traffic
Capturing network traffic using Node.js typically involves native modules that interface with system-level libraries like libpcap (on Unix-like systems) or WinPcap/Npcap (on Windows). For this post, we will use Windows OS and Npcap.
Backend Development with Node.js and GridDB
Node.js
Node.js® is an open-source, cross-platform JavaScript runtime environment. Download the Windows installer from here. We will use the Node.js LTS v18.18.0 version. There are many ways to install Node.js in Windows, and please look into their documentation. We can use 3rd party Windows package installer such as chocolatey or use the manual installation.
You can check the Node.js installation in the terminal by running this command:
node --versionGridDB
GridDB is a highly scalable NoSQL database specifically tailored for time-series data. Rooted in its unique architecture, it offers both in-memory and disk-based storage, ensuring optimized performance and data durability. Its architecture is designed to handle massive volumes of data, making it a preferred choice for IoT, telemetry, and any application where time-based data is crucial. Beyond its core features, GridDB boasts advanced functions like automatic partitioning and robust failover mechanisms, ensuring data consistency and high availability.
Go to the Official GridDB website for installation information.
Packet Capture with Node.js
The code for packet capture is pretty easy. The startCapturing(ipAddress) function will start the packet-capturing process. It will detect the WiFi interface and start capturing the packets. The getPackets() function will return the captured packets.
import pkg from 'cap';
const { Cap, decoders } = pkg;

const PROTOCOL = decoders.PROTOCOL;

let packets = [];

function startCapturing(ipAddress) {
    const c = new Cap();
    const device = Cap.findDevice(ipAddress);
    const filter = 'ip';
    const bufSize = 10 * 1024 * 1024;
    const buffer = Buffer.alloc(65535);

    const devices = Cap.deviceList();
    const wifiDevice = devices.find(device => {
        const description = device.description.toLowerCase();
        return description.includes('wireless') || description.includes('wi-fi');
    });

    if (!wifiDevice) {
        console.error('No Wi-Fi device found!');
        process.exit(1);
    }

    const wifiInterfaceName = wifiDevice.name;
    const linkType = c.open(wifiInterfaceName, filter, bufSize, buffer);

    c.on('packet', function(nbytes, trunc) {
        const ret = decoders.Ethernet(buffer);

        if (ret.info.type === 2048) {
            const decodedIP = decoders.IPV4(buffer, ret.offset);
            const srcaddr = decodedIP.info.srcaddr;
            const dstaddr = decodedIP.info.dstaddr;

            let packetInfo = {
                length: nbytes,
                srcaddr: srcaddr,
                dstaddr: dstaddr
            };

            if (decodedIP.info.protocol === PROTOCOL.IP.TCP) {
                const decodedTCP = decoders.TCP(buffer, decodedIP.offset);
                packetInfo.protocol = 'TCP';
                packetInfo.srcport = decodedTCP.info.srcport;
                packetInfo.dstport = decodedTCP.info.dstport;
            } else if (decodedIP.info.protocol === PROTOCOL.IP.UDP) {
                const decodedUDP = decoders.UDP(buffer, decodedIP.offset);
                packetInfo.protocol = 'UDP';
                packetInfo.srcport = decodedUDP.info.srcport;
                packetInfo.dstport = decodedUDP.info.dstport;
            }

            packets.push(packetInfo);

            // Limit the storage to the last 100 entries (or any other number)
            if (packets.length > 100) packets.shift();
        }
    });
}

function getPackets() {
    return packets;
}

export { startCapturing, getPackets };
This packet is hosted on http://localhost:5000/packets (the port and host depend on the .env configuration settings). This Node.js server will act like a forwarder. It runs on Express.js and uses the startCapturing module to get the captured packets.
import 'dotenv/config';
import express from 'express';
import bodyParser from 'body-parser';
import axios from 'axios';
import * as packetCapturer from './packetCapturer.js';

const app = express();
app.use(bodyParser.json());

const PORT = process.env.PACKET_PORT || 3000;
const HOST = process.env.PACKET_IP_ADDRESS || 'localhost';
const SERVER_DB_HOST = process.env.DATABASE_SERVER || 'localhost';
const SERVER_DB_PORT = process.env.DATABASE_SERVER_PORT || 4000;

packetCapturer.startCapturing(process.env.PACKET_IP_ADDRESS);

setInterval(async () => {
    const packets = packetCapturer.getPackets();
    try {
        await axios.post(`http://${SERVER_DB_HOST}:${SERVER_DB_PORT}/save-packets`, packets);
        console.log('Packets sent successfully');
    } catch (error) {
        console.error('Error sending packets:', error);
    }
}, 5000);  // Adjust the interval to your needs


app.get('/packets', (req, res) => {
    res.json(packetCapturer.getPackets());
});

app.listen(PORT, HOST, () => {
    console.log(`Server started on http://${HOST}:${PORT}`);
});
You can check the packets before sending to the Node.js server on Linux by opening http://localhost:5000/packets in the browser. This forwarder will send packets to the Node.js server on Linux for every 5 seconds.
Node.js Server
The Node.js server is a simple Node.js server that runs on Linux and will receive the captured packets and store them in the GridDB database. The database server will run on http://localhost:4000 (the port depends on the .env configuration settings).
import 'dotenv/config';
import cors from 'cors';
import express from 'express';
import bodyParser from 'body-parser';
import* as griddb from './griddbservice.js'

const app = express();
app.use(cors());
app.use(bodyParser.json());

const PORT = process.env.DATABASE_SERVER_PORT || 4000;
const HOST = process.env.DATABASE_SERVER || 'localhost';

app.get(
    '/info', (req, res) = > { res.json({message : 'database server'}); });

app.post(
    '/save-packets', async(req, res) = > {
      const packets = req.body;

      for (let packet of packets) {
        const {length, srcaddr, dstaddr, protocol, srcport, dstport} = packet;
        await griddb.saveData(
            {length, srcaddr, dstaddr, protocol, srcport, dstport});
      }

      res.json({message : 'saved'});
    });

app.get('/get-all-packets', async (req, res) => {
  const packets = await griddb.getAllData();
  res.json({packets});
})

app.listen(PORT, HOST, () => {
    console.log(`Server started on http://${HOST}:${PORT}`);
});
The packets data will received via POST method on /save-packets endpoint. The saveData function will save the data to the GridDB database.
await griddb.saveData({length, srcaddr, dstaddr, protocol, srcport, dstport});The getAllData function will get all the data from the GridDB database. This data that will be send to the desktop application.
app.get('/get-all-packets', async (req, res) => {
  const packets = await griddb.getAllData();
  res.json({packets});
})
You can check the packets data by opening http://localhost:4000/get-all-packets in the browser, to make sure the packets data is saved in the database.
Front-end Development with Tauri and React
Tauri
Tauri is a toolkit for building small, secure, and fast applications with web technologies. It’s a competitor to Electron, aiming to provide a leaner and more performant solution for creating desktop applications with web front-ends. The core idea is to enable developers to use familiar web technologies while reducing the bloat and potential security issues associated with bundling a complete Chromium instance, which is what Electron does.
Tauri is built in Rust, a memory-safe language and its core is a very lightweight webview rendering engine. This allows for significantly smaller binary sizes and lower resource usage compared to Electron. It also provides a strong security model by minimizing the necessary permissions and isolating the web content from the system.
The motivation behind Tauri’s creation was to address the common criticisms of Electron regarding size, speed, and security while preserving the ease of development and cross-platform capabilities that web technologies provide.
React
React is a JavaScript library for building user interfaces, maintained by Facebook and a community of individual developers and companies. It was created to facilitate the development of complex, interactive UIs in an efficient and flexible manner. React’s virtual DOM further optimizes rendering and improves app performance. The declarative nature of React simplifies the code, making it easier to debug and manage. The component-based architecture allows developers to build encapsulated components that manage their own state, which can then be composed to make complex UIs. React also empowers developers with the ability to create web applications that can update and render efficiently in response to data changes.
Tauri and React
The code for the Tauri and React live in the desktop folder. To build it you need to install Rust and node.js. Please follow the Tauri installation guide for more information.
The main UI for desktop WiFi monitor is:
import React, { useState, useEffect } from 'react'
import PacketVisualization from './packet-visualization'
import { invoke } from "@tauri-apps/api/tauri";

import "./App.css";

function App() {
  const [packetData, setPacketData] = useState(null)
  const [apiBaseUrl, setApiBaseUrl] = useState(null)

  useEffect(() => {
    async function fetchPacketData() {
      const config = await invoke('read_config');
      const apiBaseUrlConfig = await invoke('get_api_base_url', { config: config });
      const response = await fetch(`${apiBaseUrlConfig}/get-all-packets`)
      const data = await response.json()

      setPacketData(data)
      setApiBaseUrl(apiBaseUrlConfig)
    }

    fetchPacketData()

    // fetch every 5 seconds
    const intervalId = setInterval(fetchPacketData, 5000)
    // cleanup interval on component unmount
    return () => clearInterval(intervalId)
  }, [])


  return (
    <div className="container">
      {packetData && <packetvisualization data={packetData}></packetvisualization>}
      <p className='packet-server'>
        Packet Server: {apiBaseUrl}
      </p>
    </div>
  );
}

export default App;
This code invoke rust code that read our config.json configuration.
const config = await invoke('read_config');
const apiBaseUrlConfig = await invoke('get_api_base_url', { config: config });
const response = await fetch(`${apiBaseUrlConfig}/get-all-packets`)
The JavaScript code will call the rust code that reads the config.json file and get the apiBaseUrl configuration. The apiBaseUrl configuration is the base_url configuration in the config.json file.
{
    "api": {
        "base_url": "http://localhost:4000"
    }
}
This is the rust code that reads the config.json file:
// Prevents additional console window on Windows in release, DO NOT REMOVE!!
#![cfg_attr(not(debug_assertions), windows_subsystem = "windows")]

use std::fs;
use serde_json::Value;

// Learn more about Tauri commands at https://tauri.app/v1/guides/features/command
#[tauri::command]
fn greet(name: &str) -> String {
    format!("Hello, {}! You've been greeted from Rust!", name)
}

#[tauri::command]
fn read_config() -> Result<String, String> {
  let path = "config.json";
  let config = fs::read_to_string(path).map_err(|e| e.to_string())?;
  Ok(config)
}

#[tauri::command]
fn get_api_base_url(config: String) -> Result<String, String> {
  let parsed_config: Value = serde_json::from_str(&config).map_err(|e| e.to_string())?;
  let base_url = parsed_config
    .get("api")
    .and_then(|api| api.get("base_url"))
    .and_then(|base_url| base_url.as_str())
    .ok_or("Missing 'api.base_url' setting")?;
  Ok(base_url.to_string())
}

fn main() {
    tauri::Builder::default()
        .invoke_handler(tauri::generate_handler![greet, read_config, get_api_base_url])
        .run(tauri::generate_context!())
        .expect("error while running tauri application");
}
Every custom method that we want to call from JavaScript must be registered in the tauri::Builder::default().invoke_handler method. For example, we want to call the read_config method from JavaScript, so we need to register it in the tauri::Builder::default().invoke_handler method.
Future Enhancements
The desktop WiFi monitor is a proof of concept, and there are many things that can be improved. Here are some of the future enhancements:
- Working on different machines
- Better packet visualization
- Better setup process and deployment
If you have any questions about the blog, please create a Stack Overflow post here https://stackoverflow.com/questions/ask?tags=griddb .
Make sure that you use the “griddb” tag so our engineers can quickly reply to your questions.