
As of version 4.5, GridDB now supports SQL via JDBC, allowing you to integrate your favorite applications that support JDBC. In this case, we’re going to teach you to use SQLWorkbench/J to view data stored in GridDB by using simple SQL queries.
We’re going assume you’ve gotten the GridDB server running already by following the Quick start guide so the first step will be to build the GridDB JDBC driver.
Building the GridDB JDBC Driver
$ sudo yum -y install java-1.8.0-openjdk-devel
 $ git clone https://github.com/griddb/jdbc.git griddb_jdbc
 $ cd griddb_jdbc
 $ ant
 $ sudo cp bin/gridstore-jdbc.jar /usr/share/java/
Depending on your GridDB configuration, you will need to edit JDBCSelect.java to correct the configuration parameter such as clusterName, username, and password. In particular, the clusterName is “myCluster” while most GridDB documentation uses “defaultCluster”. Now we’ll run the sample:
$ cd sample/en/jdbc/
$ javac JDBCSelect.java
$ export CLASSPATH=:/usr/share/java/gridstore-jdbc.jar
$ java JDBCSelect
SQL Create Table name=SampleJDBC_Select
SQL Insert count=5
SQL row(id=3, value=test3)
SQL row(id=4, value=test4)
success!
SQLWorkbench/J Download and Execution
First, we download and unzip the SQLWorkbench/J from their Downloads page. The executable file
$ wget https://www.sql-workbench.eu/Workbench-Build125.zip
$ mkdir sqlworkbench
$ cd sqlworkbench
$ unzip ../Workbench-Build125.zip
$ chmod +x *.sh
Now we can run the command line SQLWorkbench/J:
$ ./sqlwbconsole.sh
Now we can connect to GridDB with the WBConnect command. We need to set the driver classpath and JAR file along with the JDB URL, username and password as shown below.
SQL Workbench/J (125) console interface started.
 Enter exit to quit.
 Enter WbHelp for a list of SQL Workbench/J specific commands
 Config directory: /home/owen/.sqlworkbench

 SQL> WbConnect -driver=com.toshiba.mwcloud.gs.sql.Driver -driverJar=/usr/share/java/gridstore-jdbc.jar -url=jdbc:gs://239.0.0.1:41999/defaultCluster/public -username=admin -password=admin
;

 Connection to "User=admin, URL=jdbc:gs://239.0.0.1:41999/defaultCluster/public"
 successful

SQL> select * from SampleJDBC_Select;

id | value
---+------
 0 | test0
 1 | test1
 2 | test2
 3 | test3
 4 | test4

(5 Rows)
SELECT executed successfully

 SQL>
The above select statement reads data created by the Sample application.
Graphical SQLWorkbench/J
$ ./sqlworkbench.sh
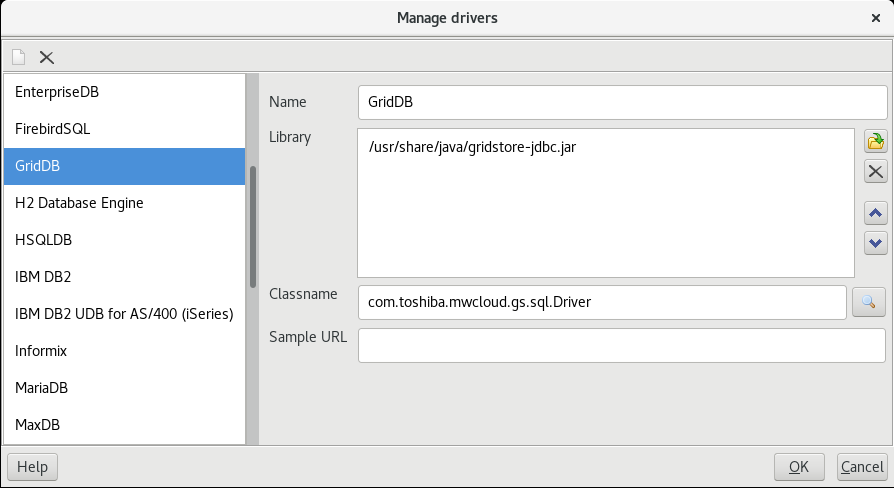
After SQLWorkbench starts, first close the new connection window so we can add the GridDB driver. This can be done from the File->Manage Drivers menu.
First, input a name for the driver, such as “GridDB”, and then use the file selection dialog to find and input the JAR location. In our case it’s /usr/share/java/gridstore-jdbc.jar and for us, it auto-filled the class path.
After adding the GridDB driver, navigate to File->Connect Window or press Alt-C. Within the Connection Window, you set the name of the connection such as “Local GridDB”, select the GridDB from the drop down menu of Drivers. For the URL, we’re using jdbc:gs://239.0.0.1:41999/defaultCluster/public which is appropriate for a standard GridDB installation and the username and password set via gs_passwd.
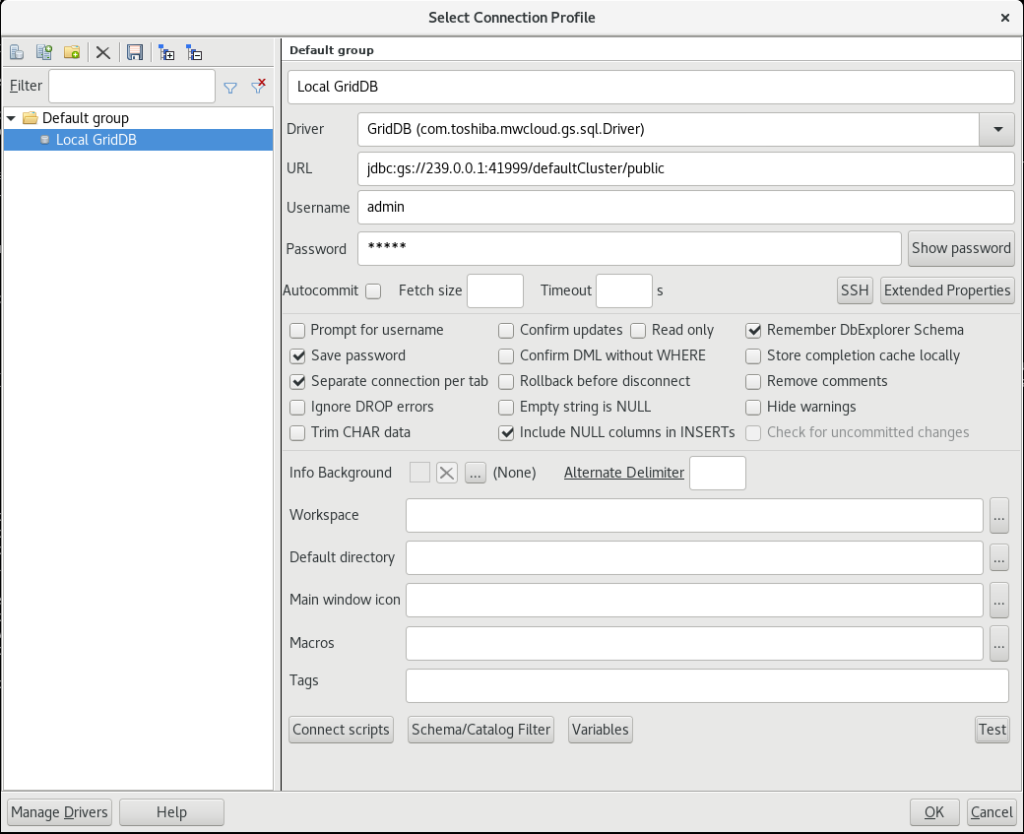
Once all of the above fields are filled, click the “Test” button and if everything is configured properly, a dialog “Connection to jdbc:gs://239.0.0.1:41999/defaultCluster/public successful” will be shown.
Now we can query GridDB using SQL; here we typed select * from SampleJDBC_Select into the Statement text field and clicked on the Play button. This will query data written by JDBCSample. The returned rows are shown in a grid in the Results tab.
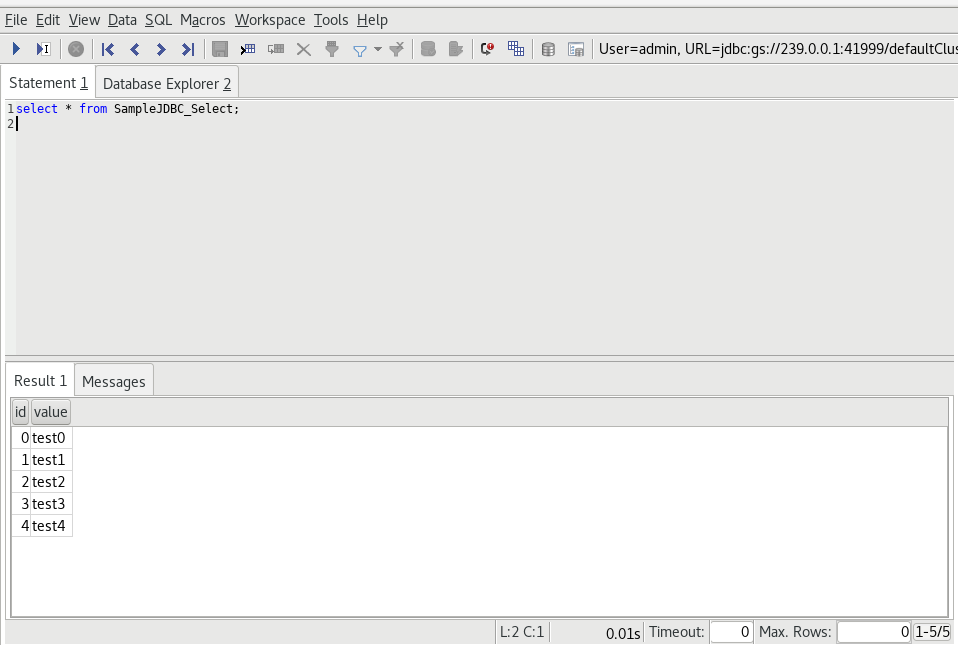
This was just a quick look into using GridDB and SQLWorkbench/J and how you can get started using SQL with GridDB.