Introduction
Common concerns developers might have when doing a database migration including having to remodel the existing database to fit with a NoSQL model. Another concern is having to figure a way to fetch and rearrange the relational data into the new database. Luckily in this post we will show a brief example of how to perform a migration of MySQL database to a new NoSQL GridDB database.
Industry Example
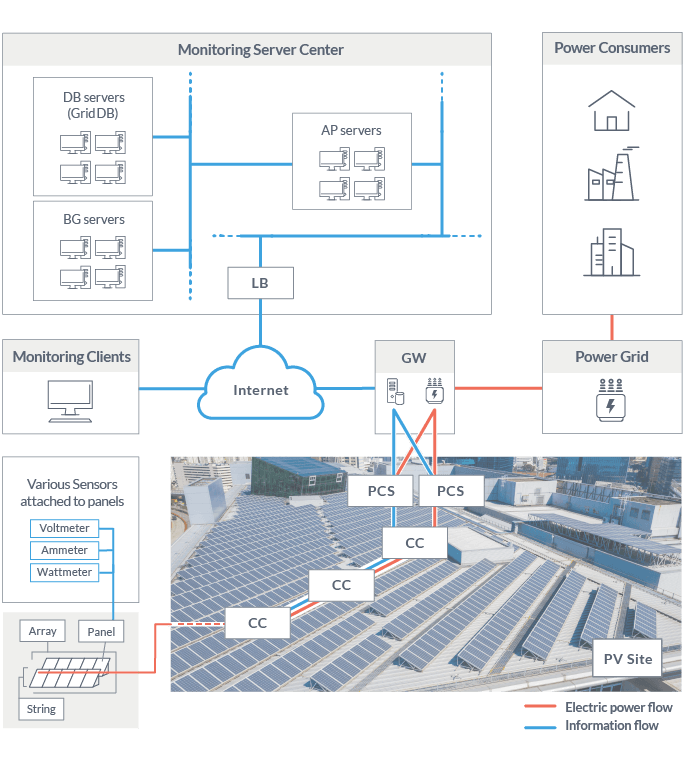
All of the data for our migration will relate to the maintenance of a Photovoltaic site, PV site . A PV site is an industrial site equipped with hundreds to thousands of solar panels that collect power and transmit it to a power grid. A PV site can also be known as a solar farm. There could be up to thousands of internet-capable sensors involved in this process. Data reports from these sensors could include measurements such as voltage readings and alerts. An industrial site like this could scale to many different sizes and involve various types of devices.
Depending on the scenario, fast performance and reliability might be needed as well. This makes GridDB with its high performance, scalability, and flexibility the best database to migrate to for this PV site.
Initial MySQL Database
The MySQL database for this site will have 4 Tables. These 4 tables will translate into 4 container schemas in GridDB. These schemas will be implemented as 4 Java classes since we will be performing the migration in Java.
The tables and their GridDB schemas are listed below:
- Facilities: Contains information and specifications for the facilities of the PV site.
- Sensor: Stores general information like sensor-type and name on the PV site’s sensors
- Readings: Stores the timestamps and values of the measurements recorded by the PV site’s sensors
- Alerts: Stores information related to alerts and notification sent by the sensors
CREATE TABLE IF NOT EXISTS facilities (
   facilityId VARCHAR(40) NOT NULL,
   name VARCHAR(60) NOT NULL,
   specifications BLOB,
   PRIMARY KEY (facilityId)
);
public class Facility{
    @RowKey
    public String facilityId;
    public String name;
    public Blob specifications;
}
CREATE TABLE IF NOT EXISTS sensors (
   sensorId VARCHAR(40) NOT NULL PRIMARY KEY (sensorId),
   facilityId VARCHAR(40) NOT NULL,
   name VARCHAR(60) NOT NULL,
   type VARCHAR(30) NOT NULL,
   FOREIGN KEY (facilityId) REFERENCES facilities(facilityId)
     ON DELETE CASCADE ON UPDATE CASCADE
);
//Row schema class similar to the 'Sensors' table
public class Sensor {
    @RowKey
    public String sensorId;

    public String name;
    public String type;
}
CREATE TABLE IF NOT EXISTS readings (
   record_id INT AUTO_INCREMENT PRIMARY KEY(record_id),
   sensorId VARCHAR(40) NOT NULL,
   tstamp TIMESTAMP NOT NULL,
   value DECIMAL(19,4) NOT NULL,
   status VARCHAR(255) NOT NULL,
   FOREIGN KEY (sensorId) REFERENCES sensors(sensorId)
     ON DELETE CASCADE ON UPDATE CASCADE
);
//Row schema class similar to the 'Readings' table
public class Reading {
    @RowKey
    public Date tstamp;

    public double value;

    public String status;
}
CREATE TABLE IF NOT EXISTS alerts (
  id INT AUTO_INCREMENT PRIMARY KEY (id),
  tstamp TIMESTAMP NOT NULL,
  facilityId VARCHAR(40) NOT NULL,
  sensorId VARCHAR(40) NOT NULL,
  level INT NOT NULL,
  detail VARCHAR(255) NOT NULL,
  FOREIGN KEY (facilityId) REFERENCES facilities(facilityId)
     ON DELETE CASCADE ON UPDATE CASCADE,
  FOREIGN KEY (sensorId) REFERENCES sensors(sensorId)
     ON DELETE CASCADE ON UPDATE CASCADE
);
//Row schema class similar to 'alerts' table
public class Alert {
    @RowKey
    public int alertId;

    public String facilityId;
    public String sensorId;

    public Date tstamp;
    public int level;
    public String detail;
}
Translating Tables to Containers
When translating relational data tables into the key-container model of GridDB, it is important to which tables should have a one-to-many-relation. This can involve splitting a table into many containers. Mapping one table to many containers is a way of improving scalability, especially for timeseries data. To elaborate, one container might have many rows. Each row key in each row will also be the name of other containers in GridDB. This allows for containers to relate to each other in a scalable way.
To elaborate, a row in the facilities table corresponds to an individual facility in the PV site. Each facility holds many different sensors.
Now that we have our data model and schemas for GridDB created, we can now do the actual data migration. The approach we will use is to select all the rows from each table in MySQL and create a new row in GridDB and insert it into a GridDB container. We will use the JDBC driver to access the MySQL data and the GridDB Java API to connect to GridDB. All the data for the PV site is held in a database named pv in MySQL.
Connect to GridDB and MySQL in Java
// Connect to 'pv' database in MySQL
Class.forName("com.mysql.jdbc.Driver");
Connection connection =
 DriverManager.getConnection("jdbc:mysql://localhost/pv?user=root&password=PASSWORD");
//(snip)

//Connect to GridDB Cluster
Properties properties = new Properties();
properties.setProperty("notificationAddress","239.0.0.1");
properties.setProperty("notificationPort","31999");
properties.setProperty("clusterName","defaultCluster");
properties.setProperty("user","admin");
properties.setProperty("password","admin");

gridstore = GridStoreFactory.getInstance().getGridStore(properties);
The first table to migrate from MySQL will be the facilites table. We will migrate the facilities table to a Collection container of the same name. It will have a similar schema to the MySQL table. As a way to improve scalability, we will create a Collection (named with the facility’s facility id) with a schema similar to sensors table from MySQL. Each facility container will be responsible storing the sensors for that facility.
Collection<String,Facility> collection = gridstore.putCollection("facilities",Facility.class);
To translate a row from MySQL to GridDB, simply fetch each row field from MySQL and map it to the corresponding column in GridDB. Translating Blob types in Java are not so intuitive but an example is provided below on how to translate a Blob data from MySQL to GridDB.
Statement statement = connection.createStatement();
//Obtain all rows from the 'facilities' table in MySQL
ResultSet resultSet = statement.executeQuery("SELECT * FROM pv.facilities");

//For every row in the 'facilities' table
while(resultSet.next()){
   //Create a GridDB row for each MySQL row
   Facility facility = new Facility();
   //Set facilityId column in GridDB to facilityId in MySQL column
   facility.facilityId = resultSet.getString("facilityId");

   //First search if there is an existing Collection of that has the facilityId as its name.
   //If it doesn't exist, create it
   Collection<String,Sensor> sensorCollection =
    gridstore.getCollection(facility.facilityId,Sensor.class);

   if(sensorCollection == null){
     gridstore.putCollection(facility.facilityId,Sensor.class);
   }

   //Set 'name' column in GridDB row to 'name' in MySQL row
   facility.name = resultSet.getString("name");

   InputStream stream = null;
   //Stream to Create GridDB Blob Object
   ByteArrayOutputStream byteStream = new ByteArrayOutputStream();
   try {
     //Get Blob column of MySQL row as a Binary stream
     stream = new BufferedInputStream(resultSet.getBinaryStream("specifications"));
     //Take binary stream and use it as an InputStream

     byte buffer[] = new byte[1024];
     while(stream.read(buffer) != -1){
       //Write blob data from MySQL to buffer stream for GridDB
       byteStream.write(buffer);
       }
    } finally {
      if(stream != null){
        stream.close();
      }
    }

    //Create GridDB Blob value from Inputstream
    facility.specifications = new SerialBlob(byteStream.toByteArray());

    //Insert new row into GridDB container for facilites
    collection.put(facility.facilityId,facility);
The second table to migrate is the sensors from MySQL. Each row in this table has a FOREIGN KEY column, facilityId. This column details which facility a sensor belongs to. When we migrate this row into GridDB, we will get that column value from the row and retrieve the Collection container that corresponds to that facility. We then create a new Sensor row from the rest of the column values in the MySQL row and insert it into the container. Just like the one-to-many mapping for facilities, we will create a similar mapping with sensors. Each sensor will get its own TimeSeries container for storing the sensor’s measurements. (Its sensor id will be the Timeseries’s name).
//Get all rows from the 'sensors' table in MySQL
ResultSet resultSet = statement.executeQuery("SELECT * FROM pv.sensors");

//For every in 'sensors' table
while(resultSet.next()){
   //Create a new row for Sensor storing container
   Sensor sensor = new Sensor();

   //Get facilityId to find the corresponding Collection container in GridDB
   String facilityId = resultSet.getString("facilityId");

   //Map sensorId, name, and type columns to the corresponding columns in the GridDB container
   sensor.sensorId = resultSet.getString("sensorId");
   sensor.name = resultSet.getString("name");
   sensor.type = resultSet.getString("type");

   //Find the Collection container of the facility that the sensor belongs to
   Collection<String,Sensor> collection = gridstore.getCollection(facilityId,Sensor.class);

   //Insert 'sensor' row into Collection container
   collection.put(sensor.sensorId,sensor);

   //Check if there is an existing Timeseries container
   //that is responsible for storing that sensor's measurements
   TimeSeries<Reading> timeseries = gridstore.getTimeSeries(sensor.sensorId,Reading.class);

   //If the container doesn't exist create it and insert it into GridDB
   if(timeseries == null){
      gridstore.putTimeSeries(sensor.sensorId,Reading.class);
   }
}
The third table we migrate is the readings table. Just like all the other tables we fetch all the other column values for our new row in GridDB from the column fields of the row in MySQL. We will use the sensorId column value from the MySQL row to determine which Timeseries container the new GridDB row will be inserted into. Note, in GridDB, Timestamp columns are represented from java.util.Date while in MySQL JDBC it is java.sql.Timestamp, convert the value accordingly.
//Function for translating a MySQL timestamp to GridDB Timestamp
Date parseTimestamp(Timestamp timestamp){
   Date date = new Date(timestamp.getTime());
   return date;
}

//(snip)

//Get and iterate through all measurements in the 'readings' table
ResultSet resultSet = statement.executeQuery("SELECT * FROM pv.readings ORDER BY tstamp");


while(resultSet.next()){
   //Find out which sensor the measurement belongs to
   String sensorId = resultSet.getString("sensorId");

   //Obtain the Timeseries container that corresponds to that sensor
   TimeSeries<Reading> timeseries = gridstore.getTimeSeries(sensorId,Reading.class);

   //Obtain and parse the MySQL row's timestamp column
   Timestamp timestamp = resultSet.getTimestamp("tstamp");
   Date rowKey = parseTimestamp(timestamp);

   //Create a new GridDB row and map all the columns accordingly
   Reading reading = new Reading();
   reading.tstamp = rowKey; //Set row timestamp to parse timestamp from MySQL TIMESTAMP column
   reading.value = resultSet.getDouble("value"); //Parse double value from MySQL DECIMAL column
   reading.status = resultSet.getString("status");

   //Insert timestamp row into Timeseries
   timeseries.put(reading.tstamp,reading);
}
The last table we will migrate is the alerts. This migration is rather simple and fairly akin to the migration for the facilities table.
//Obtain and iterate through all the rows in the 'alerts' MySQL table
ResultSet resultSet = statement.executeQuery("SELECT * FROM pv.alerts");

Collection<Integer,Alert> collection = gridstore.putCollection(containerName,Alert.class);

while(resultSet.next()){
   //Create a new GridDB row for 'alerts' container
   Alert alert = new Alert();

   Timestamp timestamp = resultSet.getTimestamp("tstamp");//Obtain timestamp from TIMESTAMP column

   alert.alertId = resultSet.getInt("id"); //Parse integer id from INTEGER COLUMN of row
   alert.facilityId = resultSet.getString("facilityId");
   alert.sensorId = resultSet.getString("sensorId");

   //Translate SQL Timestamp to GridDB Timestamp format
   alert.tstamp = parseTimestamp(timestamp);

   alert.level = resultSet.getInt("level"); //Parse integer id from INTEGER COLUMN of row
   alert.detail = resultSet.getString("detail");

   //Insert new row into 'alerts' Collection
   collection.put(alert.alertId,alert);
}
Our migration is now complete, all data from our MySQL database is now in GridDB. Now you can drop your old MySQL database and continue with a new faster, more scalable GridDB database.
MySQL is a relational database used heavily in business intelligence, web development, and marketplace and inventory management. For the purpose of this tutorial we set up an initial relational database using MySQL Version 5.7 on CentOS 7. We used GridDB Community Edition Build 3.0.1 as our GridDB database.