
Introduction
For this blog, we wanted to showcase using GridDB as a web app’s best friend. We decided to keep all functionality from this app on the web itself — this means we will be utilizing the GridDB WebAPI for all steps of the process: schema creation, ingestion, and querying.
The entire process will be handled by our React.js frontend. This means the user will enter their GridDB WebAPI credentials, upload a CSV file of their choosing, select if that container will be COLLECTION or TIMESERIES and then create the proper schema onto GridDB. Once the container is created, the entirety of the .csv file will be uploaded onto the database.
Once the data is in place, you can query to receive the data from your server and then finally visualize it using the recharts library.
Prerequisites
To follow along, you will need a GridDB server up and running. You will also need to install the GridDB WebAPI and have that running on your server.
For the frontend, you will need to install react.js, along with the charts library. You can see what the package.json file looks like here:
{
  "name": "griddb-charts",
  "version": "0.1.0",
  "private": true,
  "dependencies": {
    "@emotion/react": "^11.8.2",
    "@emotion/styled": "^11.8.1",
    "@mui/material": "^5.5.0",
    "@testing-library/jest-dom": "^5.16.2",
    "@testing-library/react": "^12.1.4",
    "@testing-library/user-event": "^13.5.0",
    "axios": "^0.26.1",
    "react": "^17.0.2",
    "react-dom": "^17.0.2",
    "react-scripts": "5.0.0",
    "recharts": "^2.1.9",
    "web-vitals": "^2.1.4"
  },
  "scripts": {
    "start": "react-scripts start",
    "build": "react-scripts build",
    "test": "react-scripts test",
    "eject": "react-scripts eject"
  },
  "eslintConfig": {
    "extends": [
      "react-app",
      "react-app/jest"
    ]
  },
  "browserslist": {
    "production": [
      ">0.2%",
      "not dead",
      "not op_mini all"
    ],
    "development": [
      "last 1 chrome version",
      "last 1 firefox version",
      "last 1 safari version"
    ]
  }
}
The top of your file will also take all of your imports:
import React, { useState, useEffect } from 'react';
import './App.css';
import { usePapaParse } from 'react-papaparse';

import {
  BarChart,
  Bar,
  XAxis,
  YAxis,
  Tooltip,
  Legend
} from "recharts";
import Box from '@mui/material/Box';
import InputLabel from '@mui/material/InputLabel';
import MenuItem from '@mui/material/MenuItem';
import FormControl from '@mui/material/FormControl';
import Select from '@mui/material/Select';
import Container from '@mui/material/Container';
import TextField from '@mui/material/TextField';
import Button from '@mui/material/Button';
import Dialog from '@mui/material/Dialog';
import DialogActions from '@mui/material/DialogActions';
import DialogContent from '@mui/material/DialogContent';
import FormHelperText from "@mui/material/FormHelperText";
import Grid from '@mui/material/Grid'
ETL
For implementation, we will walk through in the following order: user credentials, creating and send schema/container, pushing data into the container, querying the data, and then we will finish with showing the data into a chart.
Credentials
To begin, we will create some simple text fields to allow the user to enter their user and admin credentials. For our blog, we will simply use the GridDB default values of admin/admin as a proof of concept.
Also, to keep things simple, we will be using the material ui React.js framework.
        <TextField
            id="user"
            label="Username"
            variant="standard"
            onChange={handleUser}
            required={true}
          />
          <TextField
            id="standard-basic"
            label="Password"
            variant="standard"
            onChange={handlePass}
            required={true}
          />
Here you can see that we are handling our textfields with separate functions. We will use React’s useState to handle the changes and save the user’s input. To keep it simple, we will not have any sort of checking — we will simply save every input into the state
  const [user, setUser] = useState('')
  const [pass, setPass] = useState('')

  const handleUser = (event) => {
    let val = event.target.value
    setUser(val)
  }

  const handlePass = (event) => {
    let val = event.target.value
    setPass(val)
  }
To make the proper javascript fetch requests, we will also need to transform the user’s credentials into base64. We can do so like so:
  const [encodedUserPass, setEncodedUserPass] = useState('')

  useEffect(() => {
    let encodedUserPass = btoa(user + ":" + pass)
    setEncodedUserPass(encodedUserPass)
  }, [pass])
The [pass] after the function callback for the useEffect just means we will update this specific function when the pass state variable is updated. Not the most elegant solution, but it works for our purposes.
Uploading a CSV File
First, let’s allow our user to upload a .csv file. This is very easily accomplished using HTML.
<label >Choose a CSV File to Upload:</label>

        <input type="file"
          id="csvFile" name="file" onChange={fileHandler}
          accept=".csv"></input>
Our fileHandler function will utilize the papa-parse library to read in the file and parse the contents and set some React states for use later.
import { usePapaParse } from 'react-papaparse';
  const { readString } = usePapaParse();

  const [fullCsvData, setFullCsvData] = useState(null);
  const [fileName, setFileName] = useState('');
  const [selectedFile, setSelectedFile] = useState(null);

  const fileHandler = (event) => {
    const file = event.target.files[0]
    let name = file.name
    let x = name.substring(0, name.indexOf('.')); //remove the .csv file extension
    const reader = new FileReader();
    reader.addEventListener('load', (event) => {
      var data = event.target.result

      readString(data, {
        worker: true,
        complete: (results) => {
          setFileName(x)
          console.log("selected file: ", results.data[0])
          setFullCsvData(results.data)
          setSelectedFile(results.data[0]);
          setOpen(true)
        },
      });
    });

    reader.readAsText(file);

  };
So, once the user uploads a .csv file, the fileHandler function will fire off, taking in the file as the event. It will then read the file’s contents and then parse everything. Once parsed, we will set various React states: the file name, the entirety of the csv contents, and the first array of data which corresponds to the column names.
Setting the Column Types
When parsing the user’s file, it can be difficult to reliably parse out the row’s datatype. To get around this issue, we will simply open up a modal once the file is uploaded and allow the user to set each column’s datatype. We will use this data to form our object which is used to create the schema with the Web API.
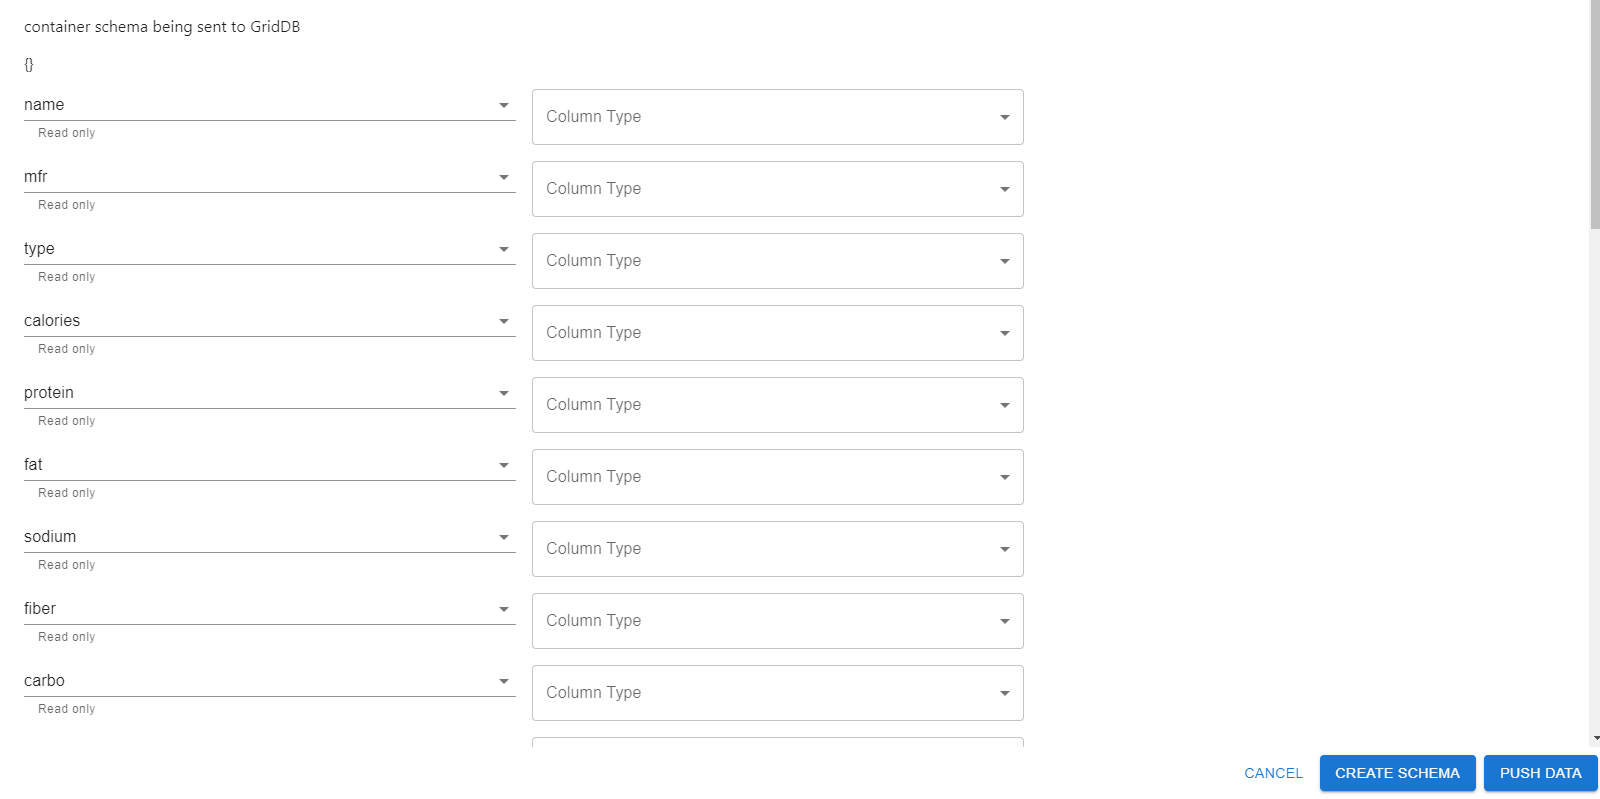
This is the structure that the WebAPI expects:
'{
    "columns": [
        {
            "name": "timestamp",
            "type": "TIMESTAMP"
        },
        {
            "name": "name",
            "type": "STRING"
        },
        {
            "name": "value",
            "type": "FLOAT"
        }
    ],
    "container_name": "test",
    "container_type": "TIME_SERIES",
    "rowkey": true
}'
Once the user enters the column information and clicks the Create Schema button, we will prepare the proper data to send via an HTTP request.
<Button onClick={handleSchema} variant="contained">Create Schema</Button>The handleSchema function simply calls our putSchema function
GridDB WebAPI HTTP Request (Put Schema/Container)
  const handleSchema = () => {
    if (Object.keys(chartColumns).length !== 0) { //chartColumns is an array of the column names from the csv
      putSchema(chartColumns)
    }
  }

  const putSchema = (obj) => {

    let data = new Object();
    data.columns = [];
    let n = Object.keys(obj).length
    let i = 0
    for (const property in obj) {
      if (i < n) {
        data.columns[i] = { "name": property, "type": (obj[property]).toUpperCase() }
        i++
      }
    }
    data["container_name"] = fileName // grabbed from the react State
    data["container_type"] = "COLLECTION" // hardcoded for now
    data["rowkey"] = "true"

    let raw = JSON.stringify(data);

    let myHeaders = new Headers();
    myHeaders.append("Content-type", "application/json")
    myHeaders.append("Authorization", "Basic " + encodedUserPass);

    let requestOptions = {
      method: 'POST',
      headers: myHeaders,
      body: raw,
      redirect: 'follow'
    };

    fetch(`http://${ADDRESS}/griddb/v2/defaultCluster/dbs/public/containers`, requestOptions)
      .then(response => response.text())
      .then(result => {
        setChartColumns("Successful. Now Push Data") // displays where the object was being formed
        console.log(result)
      })
      .catch(error => {
        setChartColumns(error)
        console.log("Error: ", error)
      });
  }
Here we are making our first Web API HTTP Request. Before we do that, we take all of data we have gathered and form the data structure the API expects. For now, we have hardcoded a COLLECTION container type, but this can be easily be fixed by adding a switch onto the modal.
The main thing we need to accomplish is to create an object which has a columns array inside with each column name and type inside. Once the data structure is set, you simply JSON.stringify it and send it in the body of the request, along with the requestOptions. The last thing to note is that once the request is made, if there is an error, it will be shown in the modal. If successful, a simple message will appear, prompting the user to now push the data.
GridDB WebAPI Pushing CSV Data to Container
Next, once the GridDB server has accepted our HTTP request to create the container and its schema, we can now send over the full .csv data to our server via an HTTP request.
The user will be required to press the PUSH DATA button which will fire off the putData function.
  const handlePushingData = () => {
    if (fullCsvData !== null) {
      putData(fullCsvData)
    }
  }

const putData = (data) => {

    data.shift();
    let removeEmpties = data.filter(ele => ele.length > 1)
    console.log("data: ", removeEmpties)

    let raw = JSON.stringify(removeEmpties)
    console.log(raw)

    let myHeaders = new Headers();
    myHeaders.append("Content-type", "application/json")
    myHeaders.append("Authorization", "Basic " + encodedUserPass);

    let requestOptions = {
      method: 'PUT',
      headers: myHeaders,
      body: raw,
      redirect: 'follow'
    };

    fetch(`http://${ADDRESS}/griddb/v2/defaultCluster/dbs/public/containers/${fileName}/rows`, requestOptions)
      .then(response => response.text())
      .then(result => setChartColumns("Successful: ", result))
      .catch(error => {
        setChartColumns(error)
        console.log("Error: ", error)
      });
  }
Similar to the putSchema function, we grab the entire contents of our data from our React’s state and then do some basic massaging to get the proper data to send. First, we get rid of the first element of the array as this one is simply the column names. We then get rid of any empty elements (if any). Everything else should be self-explanatory — the only caveat being that the HTTP Request method for this one is a PUT (vs. a POST).
If successful, the amount of columns will be displayed in the modal. If an error, it will also be displayed in the modal. So far, we’ve ingested our .csv data into our server. Next up is querying and displaying.
Querying
For demo purposes, we will also query the GridDB server to re-retrieve our data to visualize it. Querying with the WebAPI is very easy:
curl -X POST --basic -u admin:admin -H "Content-type:application/json" http://127.0.0.1:8080/griddb/v2/defaultCluster/dbs/public/containers/test/rows -d '{"limit":1000}' For this application, we will have it load after the user enters their credentials and hits the QUERY button which fires off the handleSubmitCreds function. The server will respond with the full data of your query; we will then grab that data and transform it into something that recharts can display.
  const handleSubmitCreds = () => {
    let raw = JSON.stringify({
      "limit": 100
    });

    let myHeaders = new Headers();
    myHeaders.append("Content-type", "application/json")
    myHeaders.append("Authorization", "Basic " + encodedUserPass);

    let requestOptions = {
      method: 'POST',
      headers: myHeaders,
      body: raw,
      redirect: 'follow'
    };

    fetch(`http://${ADDRESS}/griddb/v2/defaultCluster/dbs/public/containers/CEREAL/rows`, requestOptions)
      .then(response => response.text())
      .then(result => {
        let resp = JSON.parse(result)
        let rows = resp.rows

        let c = resp.columns
        let columns = [];
        c.forEach(val => columns.push(val.name))

        let map = new Map();
        let fullChartData = [];
        // transform data into more usable obj
        for (let i = 0; i < 72; i++) { //hard coding the length of rows (72)
          for (let j = 0; j < 16; j++) { // hard coding length of columns (16)
            map.set(columns[j], rows[i][j])
          }
          const obj = Object.fromEntries(map);
          fullChartData.push(obj)
        }
        setData(fullChartData)

      })
      .catch(error => console.log('error', error));
  }
The empty array in the useEffect just tells our React to only run this function on page load, not on every re-render.
Visualizing Data
The above function not only queried the data, but it also managed to transform the data into a more usable form.
To get the data that recharts expects, we will use the Javascript map object to set key:value data pairs and then create an object out of that map using the Object.fromEntries.
For this demo, we will be using the kaggle cereals dataset. With the data loaded in from the function above, we can place all the data onto a line chart, but I think a more interesting usecase would be showing one individual cereal’s macro and micro nutrients onto a bar chart. To do so, we will create a dropdown list with every single cereal listed. When a user picks a cereal, the app will find the corresponding data and display it on the chart
    <FormControl fullWidth>
      <InputLabel id="demo-simple-select-label">Cereal</InputLabel>
      <Select labelId="demo-simple-select-label" id="demo-simple-select" value={choice} label="Cereal" onChange={handleChange}>
        <MenuItem value={"100% Bran"}>100% Bran</MenuItem>
        <MenuItem value={"100% Natural Bran"}>100% Natural Bran</MenuItem>
        <MenuItem value={"All-Bran"}>All Bran</MenuItem>
        <MenuItem value={"All-Bran with Extra Fiber"}> All-Bran with Extra Fiber</MenuItem>
        <MenuItem value={"Almond Delight"}>Almond Delight</MenuItem>
When the user selects a cereal, our handleChange function will fire off:
  const handleChange = (event) => {
    let val = event.target.value
    console.log("val: ", val)
    setChoice(val);
  };
Which will set the React state for choice with the cereal name. When the app detects that change, it will fire off the following function:
  useEffect(() => {
    if (data !== null) {
      let userChoice = data.find(val => val.NAME == choice)
      setDisplayedData(userChoice);
    } else console.log("data still null")
  }, [choice])
This function will use the javascript array find method which locate the proper data from the full dataset which is saved in our React state as data. Once it finds this data, the bar chart will display the proper data (displayedData):
<BarChart
          width={1500}
          height={500}
          data={[displayedData]}
          margin={{
            top: 5,
            right: 30,
            left: 20,
            bottom: 5,
          }}
        >
          <XAxis dataKey="NAME" />
          <YAxis />
          <Tooltip />
          <Legend />
          <Bar type="monotone" stackId="a" dataKey="MANUFACTURER" fill="#FFF" />
          <Bar type="monotone" stackId="a" dataKey="TYPE" fill="#FFF" />
          <Bar type="monotone" stackId="b" dataKey="CALORIES" fill="red" />
          <Bar type="monotone" stackId="c" dataKey="PROTEIN" fill="pink" />
          <Bar type="monotone" stackId="c" dataKey="FAT" fill="orange" />
          <Bar type="monotone" stackId="d" dataKey="SODIUM" fill="#82ca9d" />
          <Bar type="monotone" stackId="d" dataKey="FIBER" fill="#82ca9d" />
          <Bar type="monotone" stackId="c" dataKey="CARBO" fill="purple" />
          <Bar type="monotone" stackId="e" dataKey="SUGARS" fill="#82ca9d" />
          <Bar type="monotone" stackId="e" dataKey="POTASS" fill="#82ca9d" />
          <Bar type="monotone" stackId="f" dataKey="VITAMINS" fill="#82ca9d" />
          <Bar type="monotone" stackId="f" dataKey="SHELF" fill="#82ca9d" />
          <Bar type="monotone" stackId="f" dataKey="WEIGHT" fill="#82ca9d" />
        </BarChart>
For this chart, you can stack up the different micro/macro nutrients however you like with different colors. For this demo, I did not set anything other than setting calories on its own bar so that we can see those. Here is the chart for Cinnamon Toast Crunch

Conclusion
Now we can easily ingest and load up our csv data into beautiful react.js recharts.
Full source code can be found in our Github page.