In this blog, we will be again showcasing the GERN stack and how to properly implement a CRUD API (Create, Read, Update, Delete) with React, Express, and GridDB. It can be thought of as a loose sequel to our previous blog in which we introduce the GERN stack and run that project on bare metal. You can read more here
To help demonstrate these principles, we will showcase a sort-of IoT-like environment in which a data table is loaded with fake IoT-like sensor data: the data being generated are both sensor temperature and humidity. We will also be creating a docker environment for this simple application so that users may try this on their machine without much hassle.
To mimic a possible real world scenario, the data and temp values are not able to be updated. Instead, there will be a location column which can be updated (think about a sensor possibly moving to a new building). The create portion of CRUD happens on page load — all sensors are generated and saved into GridDB on each page load into the container called sensorsblog. We will also allow users to add a new sensor to their table which will generate random values (except Time).
The update portion will allow users to update the location of a sensor. Deleting will delete the row outright and then re-query the container and update the table with the live data from the GridDB server.
To top it all off, we have set up some docker containers which will allow you to run the entirety of this project using a simple docker-compose command. These images are all available on Dockerhub as well.
Prerequisites
The following prerequisites are required to run this project:
- docker-engine
- docker-compose
.toc_container {
    border: 1px solid #aaa !important;
    display: table !important;
    font-size: 95%;
    margin-bottom: 1em;
    padding: 20px;
    width: auto;
}

.toc_title {
    font-weight: 700;
    text-align: center;
}

.toc_container li,
.toc_container ul,
.toc_container ul li,
.toc_container ol li {
    list-style: outside none none !important;
}
.single-post .post>.entry-content { font-size: 14px !important }
Table of Contents
Running Project with Docker
To run this project, please first install docker and docker-compose on your machine.
To check if docker-compose is already installed:
$ docker-compose --versionIf not installed, you can do so here: https://docs.docker.com/compose/install/
Docker Compose
To start, let’s grab all of the source code:
$ git clone --branch react_crud https://github.com/griddbnet/Blogs.gitTo run this project via Docker compose, simply run the following the command:
$ docker-compose upOnce it’s done pulling the images from Dockerhub, the frontend will run and the GridDB database itself will be starting up. At this point you can navigate to your browser and see the project, but you should wait until the docker output shows GridDB as fully running to actually see the project; otherwise you’ll just have a mostly blank table with no functionality.
Here’s a quick gif of the running process:

And if you’re wondering how the docker-compose.yml file looks:
version: '3'

services:

  griddb-server:
    image: griddbnet/griddb:5.0

    expose:
      - "10001"
      - "10010"
      - "10020"
      - "10040"
      - "20001"

    healthcheck:
        test: ["CMD", "tail", "-f", "tail -f /var/lib/gridstore/log/gridstore*.log"]
        interval: 30s
        timeout: 10s
        retries: 5


  frontend:
    image: griddbnet/griddb-react-crud
    command: bash -c "sleep 30"
    ports:
      - "2828:2828"

    restart: unless-stopped
    depends_on:
      - griddb-server
    links:
      - griddb-server
There’s really not much to this docker-compose file, it pulls the images for the griddb database and the frontend via dockerhub images. We have set up to have the frontend service depend_on the griddb-server because without a DB backing it, the web page doesn’t really do anything.
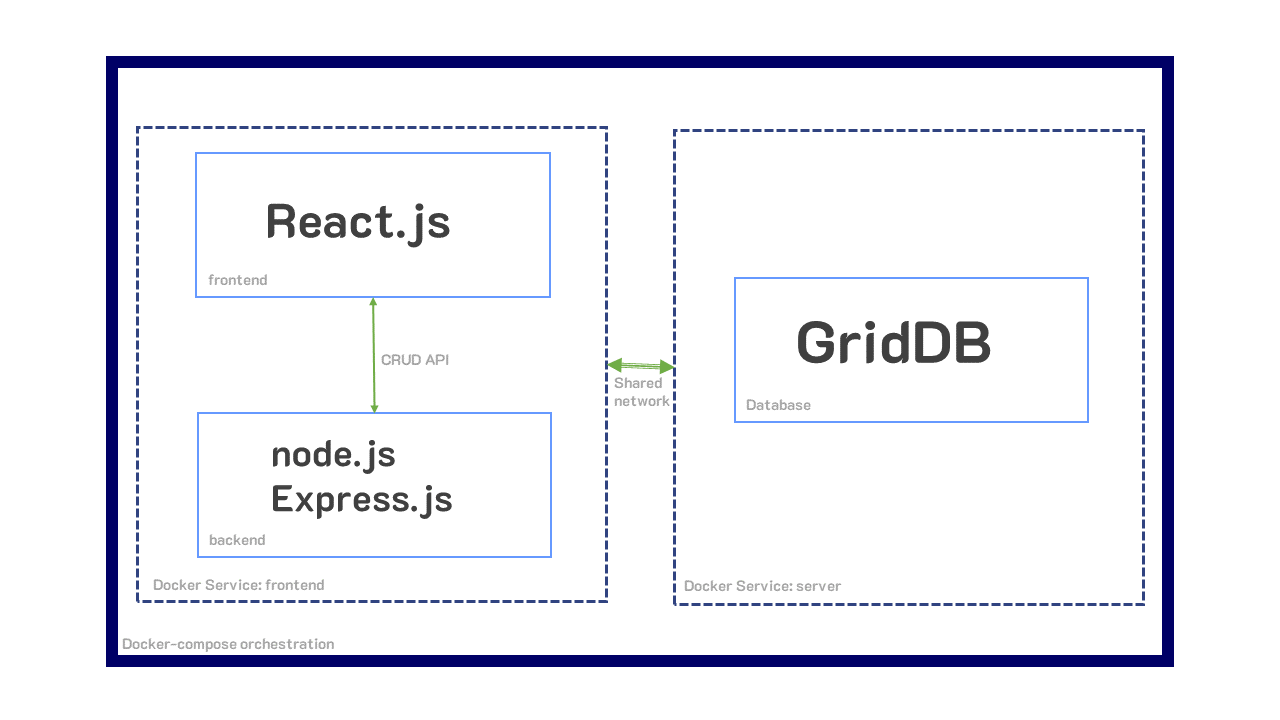
One interesting point about using docker-compose is that since they share a yaml file/environment, these two containers are automatically placed into the same network, meaning communication between the two containers is very simple.
The GridDB-Server container essentially does nothing fancy besides being built by the original docker container seen in our previous blog. The various ports being exposed are the ports GridDB needs to run. You can read more about it here in the QuickStart
Here’s a quick rundown of what ports do what:
  "cluster": {"address":"172.17.0.45", "port":10010},
  "sync": {"address":"172.17.0.45", "port":10020},
  "system": {"address":"172.17.0.45", "port":10040},
  "transaction": {"address":"172.17.0.45", "port":10001},
  "sql": {"address":"172.17.0.45", "port":20001}
And then you can of course read through each of the Dockerfile’s contents if you want to see these containers are built.
You can now skip to the CRUD section if you got this project running via docker-compose.
Alternatively, you may read through running this project not through docker-compose, but through just regular ol’ docker containers instead.
Running With Docker (sans docker-compose)
GridDB Server Container
To run GridDB server, you can simply pull from Dockerhub
$ docker network create griddb-net
$ docker pull griddbnet/griddb:5.0
We first create a Docker network to allow our application container to easily communicate with our GridDB container.
Now run your GridDB server:
$ docker run --network griddb-net --name griddb-server -d -t griddbnet/griddbNodejs Application Container
To run the Nodejs part of the application, there is a Dockerfile in the root of this directory.
You can build the image and then run pretty easily:
$ docker pull griddbnet/griddb-react-crud
$ docker run --network griddb-net --name griddb-react-crud -p 2828:2828 -d -t griddbnet/griddb-react-crud
And now if you navigate to http://localhost:2828 you will the see full app running.
If you’re curious as to how these containers work, you can read this [previous blog] (https://griddb.net/en/blog/improve-your-devops-with-griddb-server-and-client-docker-containers/)
Project Overview
This blog is running the GERN Stack in container form. This means that we have GridDB in the database layer, node.js and Express.js in the backend/server layer, and React.js in the frontend layer.
GridDB — Database
GridDB is our persistent storage database for this project, and is the G of the GERN stack. It will save our data into the sensorsblog container and will have auto-generated phoney sensor data placed into it at page load. This container is a time series container, meaning the row keys are time.
Our database will take sql query strings used alongside the node.js client API calls to receive and send our CRUD requests from our backend (node.js).
node.js & Express.js — Backend
This is where our webpage is hosted. It will serve up our routes for our CRUD functionality and host our React.js frontend. The endpoints created by Express.js will correspond to interacting with our database and frontend.
/delete, for example, will send back rowKeys from the frontend to the backend, and then out to GridDB via a SQL string, to tell our database which rows will be deleted. Each of the CRUD operations will have its own endpoint.
React.js — Frontend
And finally React.js is our frontend, which allows for reactive web pages which can take new data without doing a full page reload. For this particular project, it really helped with sending data back to the backend without needing to navigate away from the home screen which contains all of our information
CRUD Operations
As stated earlier, CRUD stands for CREATE, READ, UPDATE, and DELETE. These are the main operations used for persistant storage apps — things that will persist even after the user logs off/turns off the app.
CREATE
CREATE is exactly what it sounds like: this allows the user to add new data onto our container and frontend data table.
To showcase CREATE, we generate fake sensor data and save our records into a time series container and read that data immediately on page load. Each time the page is loaded, the container is dropped and re-made. We use express to easily create our endpoints — in this case, our endpoint /firstLoad will be called on first page load.
The following code snippet is from the frontend. The React Use Effect hook with an empty array at the end means it will run just once on page load. Here you can see it calls the /firstLoad endpoint and then washes the data that is sent from our GridDB server to fit into our data table
  const queryForRows = (endPoint) => {
    var xhr = new XMLHttpRequest();
    console.log("endpoint: ", endPoint)

    xhr.onreadystatechange = function () {

      if (xhr.readyState !== 4) return;
      if (xhr.status >= 200 && xhr.status < 300) {
        let resp = JSON.parse(xhr.responseText);
        let res = resp.results


        var t = []
        for (let i = 0; i < res.length; i++) {
          let obj = {}
          obj["id"] = i
          obj["timestamp"] = res[i][0]
          obj["location"] = res[i][1]
          obj["data"] = res[i][2].toFixed(2)
          obj["temperature"] = res[i][3]
          t.push(obj)
        }
        //console.log("rows: ", rows)
        setRows([...t])
      }
    };
    xhr.open('GET', endPoint);
    xhr.send();
  }

  useEffect(() => { //Runs on every page load
    queryForRows("/firstLoad");
  }, [])
And here is the code in the backend:
app.get('/firstLoad', async (req, res) => {
    try {
        await putCont(true, 10);
        let queryStr = "select *"
        var results = await queryCont(queryStr)
        res.json({
            results
        });
    } catch (error) {
        console.log("try error: ", error)
    }
});
Here you can see when this endpoint is called it calls the function putCont(firstload, sensorCount);. This function is what handles our CREATE.
const putCont = async (firstLoad, sensorCount) => {
    const rows = generateSensors(sensorCount);
    try {
        if (firstLoad) {
            await store.dropContainer(containerName);
        }
        const cont = await store.putContainer(conInfo)
        await cont.multiPut(rows);
    } catch (error) {
        console.log("error: ", error)
    }
}

const generateSensors = (sensorCount) => {

    let numSensors = sensorCount
    let arr = []

    for (let i = 1; i <= numSensors; i++) {
        let tmp = [];
        let now = new Date();
        let newTime = now.setMilliseconds(now.getMinutes() + i)
        let data = parseFloat(getRandomFloat(1, 10).toFixed(2))
        let temperature = parseFloat(getRandomFloat(60, 130).toFixed(2))
        tmp.push(newTime)
        tmp.push("A1")
        tmp.push(data)
        tmp.push(temperature)
        arr.push(tmp)
    }
 //   console.log("arr: ", arr)
    return arr;
}
When putCont is called, it first calls generateSensors to create the fake sensor data based on the current time. When the data is done being created, we drop the old container (if it exists and if it’s firstLoad) and then putContainer and then multiPut all rows of generated sensor data.
We also have the /createRow endpoint which will allow users to create one row/sensor at a time:
  // Frontend/React code
  const createRow = useCallback(() => {
    fetch('/create', {
      method: 'GET',
    }).then(function (response) {
      console.log(response)
      return response.json();
    });
  }, [])

  const handleCreateRow = async () => {
    await createRow();
    queryForRows("/updateRows");
  }
And the backend:
app.get("/create", async (req, res) => {
    console.log("Creating")
    try {
        await putCont(false, 1);
        console.log("creating row")
        res.status(200).json(true)
    } catch (err) {
        console.log("/create error: ", err)
    }

})
Here we again use the putCont container but this time we send a false flag to not drop our container, and then the int of 1 to make sure we are only creating one row/sensor. This shows how easy it is to create rows!
One other note here is that whenever the handleCreateRow function is called (whenever a user clicks on the appropriate UI element), you can see that once JavaScript is done awaiting for the createRow function to resolve itself, it then re-runs the READ portion of our CRUD API, the queryForRows function.
READ
To read from GridDB, we simply use a SQL string and the query API call. In this case, we ran select * against our container name and then send our results back up to the frontend as json.
Once the frontend gets and transforms the data, it uses a React hook to update the state which will then re-render our data table with the updated data.
In this case, we are using the material ui for React to make our app nice.
UPDATE
To make the app somewhat realistic our LOCATION column is the only one that is updatable. With GridDB to update a row, you simply put the row again into your container. If that rowkey already exists, it will simply update the values with the new ones that were pushed out.
In the case of the frontend, the data table component from material ui made updating a bit easier as it has a built-in function. Using the framework meant we could tell our app right from the jump which columns were editable. In this case, we also added a green background on the editable cells.
For the frontend, we handled editing the location like so:
  const updateRow = useCallback((row) => {
    fetch('/update', {
      method: 'POST',
      headers: {
        'Content-Type': 'application/json'
      },
      body: JSON.stringify({ row })
    }).then(function (response) {
      console.log(response)
      return response.json();
    });
  }, [])

  const processRowUpdate = useCallback(
    async (newRow) => {
      const response = await updateRow(newRow);
      setSnackbar({ children: `New location of  ${newRow.location} successfully saved to row: ${newRow.id}`, severity: 'success' });
      return newRow;
    },
    [],
  );
In this case, we are using the useCallback React hook to handle the processing of row updates. When the user hits ENTER or clicks away from the editable cell (essentially a stop editing event), the processRowUpdate function will run which then calls the updateRow function. This will send over our new row back to our backend with the /update endpoint. This endpoint simply expects a singular row being sent back to the backend.
If the updateRow successfully resolves, a snackbar will pop up indicating to the user that the row was successfully updated.
app.post("/update", jsonParser, async (req, res) => {
    const newRowObj = req.body.row
    const newRowArr = []

    for (const [key, value] of Object.entries(newRowObj)) {
        newRowArr.push(value)
    }
    newRowArr.shift();
    newRowArr[2] = parseFloat(newRowArr[2])
    console.log("new row: from endpoint: ", newRowArr)

    try {
        let x = await updateRow(newRowArr)
        console.log("return of update row: ", x)
        res.status(200).json(true);
    } catch (err) {
        console.log("update endpoitn failure: ", err)
    }
});
Here the endpoint grabs the data from our frontend and then transform the data from an obj down to an array as this is what GridDB expects. We then send this data to the function called updateRow
const updateRow = async (newRow) => {
    try {
        const cont = await store.putContainer(conInfo)
        const res = await cont.put(newRow)
        return res
    } catch (err) {
        console.log("update row error: ", err)
    }
}
This function is rather simple — it simply takes the new data and puts the row back into GridDB. Even if the row exists, it will update that row.
To make sure the row was actually updated, you can of course always query the container sensorsblog with the griddb shell. You can also try deleting a container as this will also retrigger a re-read of the container and a refresh of the entire data table.
DELETE
To delete, we call the GridDB remove api key. To do this, we simply feed into the API call the rowkey which we intend to remove. Because we are mimicking an IoT environment, the GridDB container is a time series container, meaning the rowkey is the timestamp.
For the frontend, we allow the user to select rows with checkboxes and then once the user clicks the Delete button, it will send the rows back to the backend to be processed and extract the rowkeys (timestamps) and then one by one removed.
First, let’s look at the backend. We are going to use the /delete endpoint:
app.post("/delete", jsonParser, async (req, res) => {
    const rows = req.body.rows

    try {
        let x = await deleteRow(rows)
        console.log("deleting rows")
        res.status(200).json(true)
    } catch (err) {
        console.log("delete row endpoint failure: ", err)
    }
})
Nothing too different here. But as you can see, we are calling the deleteRow function.
// Backend code
const deleteRow = async (rows) => {
    console.log("Rows to be deleted: ", rows)
    var rowKeys = []
    rows.forEach ( row => {
        rowKeys.push(row.timestamp)
    })
    console.log("row keys: ", rowKeys)
    try {
        const cont = await store.putContainer(conInfo)
        rowKeys.forEach ( async rowKey => {
            let res = await cont.remove(rowKey)
            console.log("Row deleted: ", res, rowKey)
        })
        return true
    } catch (err) {
        console.log("update row error: ", err)
    }

}
For the most part, this is a really simple function — all it’s doing is grabbing the rowkeys from the entire row data from the frontend and then looping through to remove each rowkey one by one.
The last bit that’s important is that immediately following the actual running of the delete function from the frontend, we will query the GridDB container again to update our data table with the actual content in our GridDB container.
The following function is what runs everytime the delete button is clicked:
// Frontend code
  const deleteRow = useCallback((rows) => {
    console.log("Str: ", rows)
    fetch('/delete', {
      method: 'POST',
      headers: {
        'Content-Type': 'application/json'
      },
      body: JSON.stringify({ rows })
    }).then(function (response) {
      console.log(response)
      return response.json();
    });
  }, [])

  const handleDeleteRow = async () => {
    await deleteRow(selectedRows);
    queryForRows("/updateRows");
  }
Here we calling queryForRows again to make sure the user gets an updated view of the contents of the container. Once the rows are deleted, it will re-read the container and transform the data and update the data table with the real contents of our GridDB container.
Conclusion
Here’s a gif of the entire project running:

Source Code
The full source code can be found here: SOURCE CODE HERE