The web-based GridDB Cloud service has been updated to version 1.6, with GridDB CE 5.2 being the basis of that update underneath the hood. And though we have written about the GridDB Cloud before: An Introduction to GridDB Cloud and Using GridDB Cloud Version 1.2.
In this article, we will go over the new features brought about by this new version, namely a new method of interfacing directly with the cloud. Previously, the Web API was the only way to access the GridDB Cloud without using an online cloud virtual network. With the Web API, you could make GET or POST HTTP requests to PUT data into your GridDB database server in the sky. Using this method, you can even run SQL or TQL commands through the Web API.
With the advent of version 1.6, the GridDB Cloud can not be accessible through your local machine via Java, JDBC, ODBC, and C. In this article, we will go over the set up and go over a small example of connecting to the cloud using Java and then JDBC.
$ git clone https://github.com/griddbnet/Blogs.git --branch griddb_cloud_1.6Managing the GridDB Cloud’s Settings
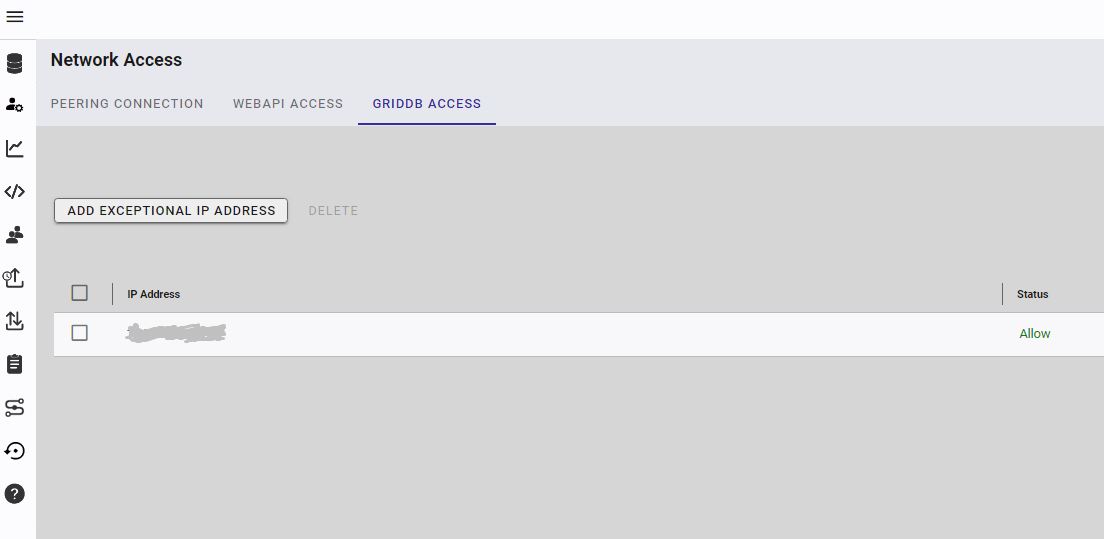
To begin, we will need to head to the network portion of the cloud’s portal. In there, we will see a new setting made fresh to us: “GridDB Access”. In this panel, we can add in our public IP Address to the Exceptional List to make a tiny sliver of space to get through the Cloud’s firewall.
Once we are done with that, we can head to the support section and download the .jar files we will need onto our local machine’s environment. From the support page, download the files under the heading of “GridDB Cloud Library and Plugin download”.
Though this .zip file includes many different files, the relevant files for this article are located inside the JDBC folder. From here, we need gridstore-5.2.0.jar, gridstore-jdbc-5.2.0.jar, and gridstore-advanced-5.2.0.jar.
Once these are downloaded, we can add them into our $CLASSPATH environment so that when we run our java commands, we have access to these new APIs.
For convenience, if you have cloned this project’s repository, we have included a simple bash file which will import the included .jar files into your machine’s environment variables.
Connecting to the Cloud via Java
Before we begin, let’s add these .jar files into our CLASSPATH. From the root of this directory:
$ source env.shAnd now we can write some Java code to make a connection with our GridDB Cloud Server.
We will not go over too much source code in this article as it is not the main point of the article. We will instead go over relevant code snippets.
Notification Provider
To connect via Java, we will be using the GridDB notification provider method. This is because the GridDB Cloud provides for us a notification provider URL which we can simply plug into our GridDB Store variable.
In your GridB Cloud portal, you can find the URL with the title: Notification Provider URL for external connection. Copy that URL and use it in your Java code.
            String provider =
            "https://dbaasshareextconsta.blob.core.windows.net/dbaas-share-extcon-blob/trial1602.json?sv=2015-04-05&sr=b&st=2023-03-14T00%3A00%3A00.00Z&se=2073-03-14T00%3A00%3A00.0000000Z&sp=r&sig=h2VJ0xAqsnfdgfgdfgRsqWVgfgfg5CAS66RifPIZ1PDCJ0x%2FiXb2FOhA%3D";

            Properties props = new Properties();
            props.setProperty("notificationProvider", provider);
            props.setProperty("clusterName", "clustername");
            props.setProperty("user", "admin");
            props.setProperty("password", "admin");
            props.setProperty("sslMode", "PREFERRED");
            props.setProperty("connectionRoute", "PUBLIC");
            store = GridStoreFactory.getInstance().getGridStore(props);
If you normally connect via the FIXED_LIST method, you will see that we are not using notificationMember and instead notificationProvider, but besides that, no major changes up top on the properties.
The other big and mandatory changes are found in the bottom, the sslMode and connectionRoute property keys. These are required because we are now using a web address secured by SSL. This inclusion means we will need to tell our connection that SSL is PREFERRED and that the connectionRoute is PUBLIC.
Assuming everything is good, we can run our java code and we will have whatever changes we made reflected in the GridDB Cloud. If you would like to run this code on your machine, of course you can checkout our GitHub page (linked above) and run the code on your machine with your credentials and URLs
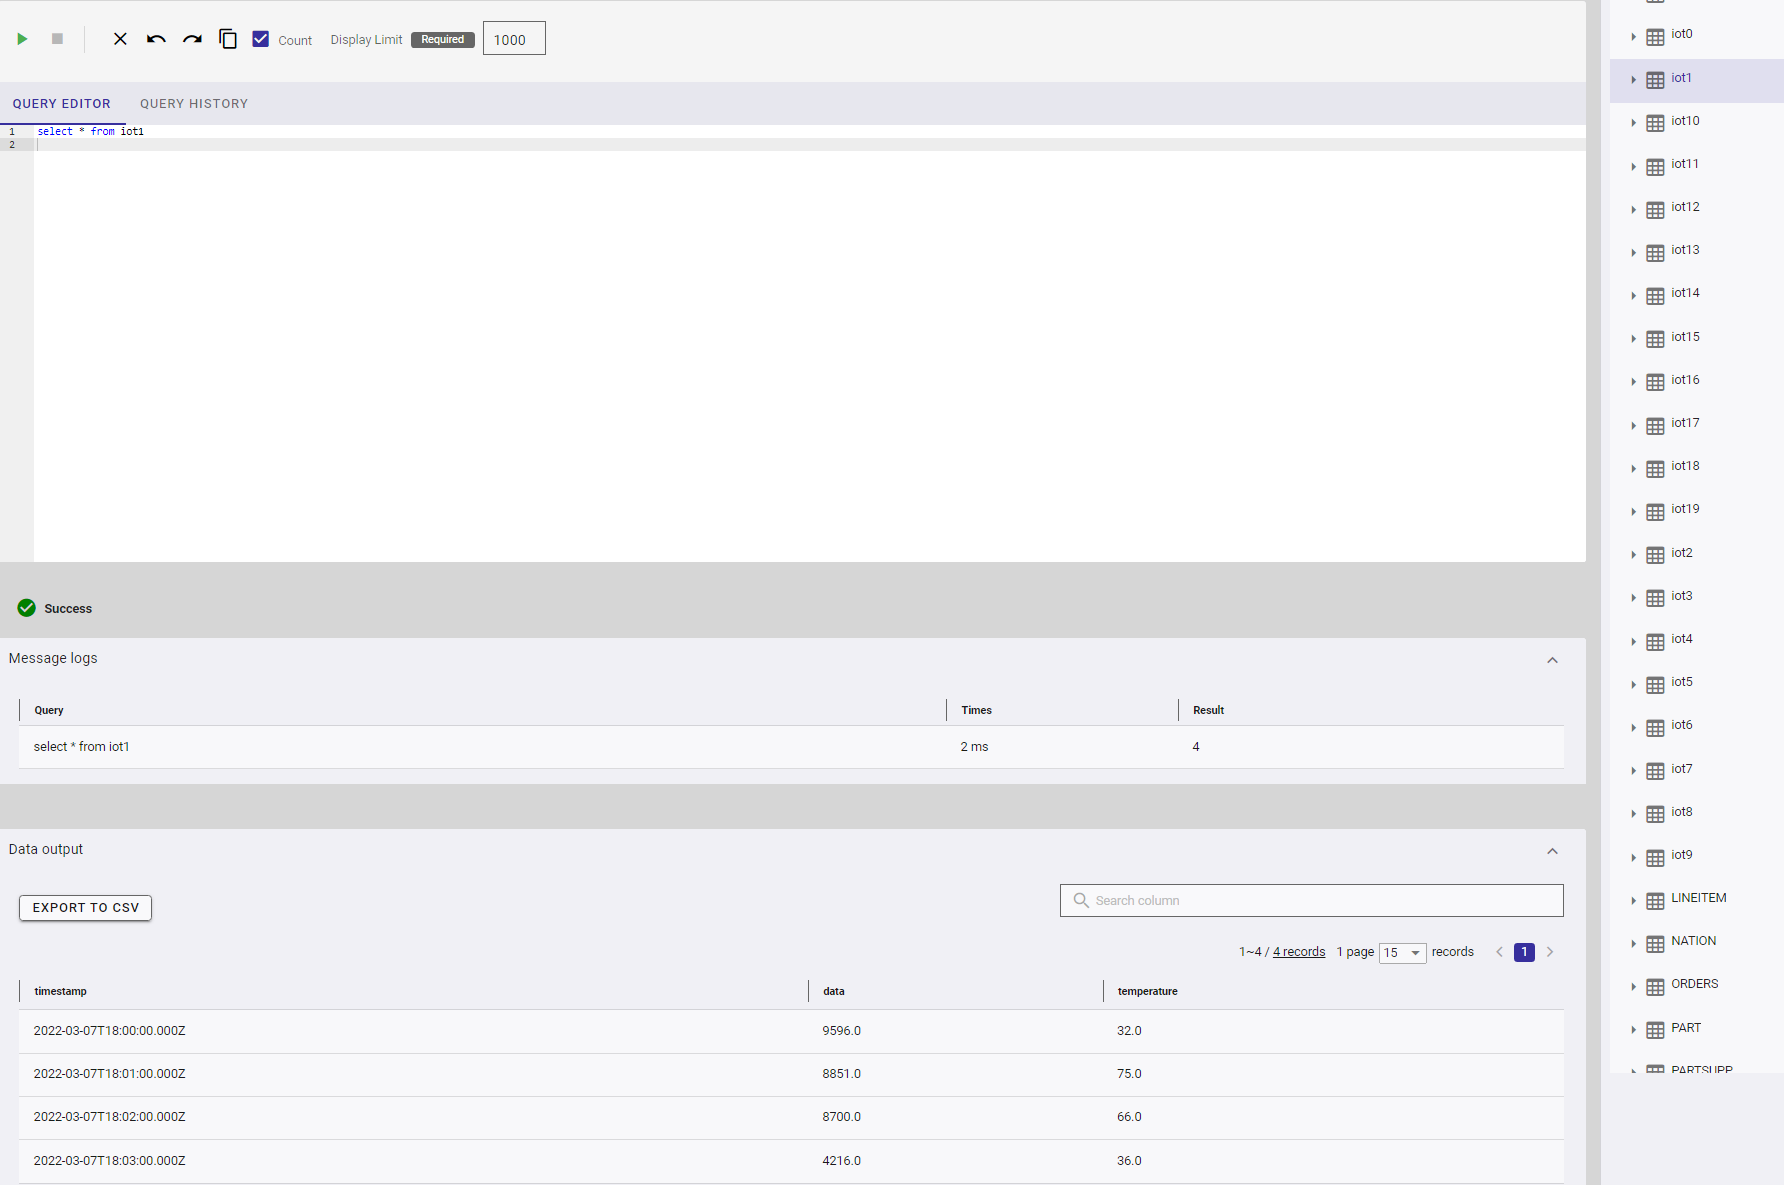
And just to have an easy demo to showcase, the code we are running here is simulating IoT data for Java, meaning we are placing a bunch of different containers into our Cloud with random data. And sure enough, when we check out the Cloud, we can see the containers along with the data in there:
Connecting to GridDB Cloud using JDBC
Of course, using JDBC with GridDB will allow for full use of SQL which has its own benefits and usecases. And luckily for us, using JDBC to connect to the Cloud will be about the same as using Java. The main difference is we need to include the jdbc jar to our CLASSPATH (already done), and we need to build out our jdbc url.
        try {
            String provider = "https://dbaasshareextconsta.blob.core.windows.net/dbaas-share-extcon-blob/trial1602.json?sv=2015-04-05&sr=b&st=2023-03-14T00%3A00%3A00.00Z&se=2073-03-14T00%3A00%3A00.0000000Z&sp=r&sig=h2VJ0xAqsnfdgfgdfgRsqWVgfgfg5CAS66RifPIZ1PDCJ0x%2FiXb2FOhA%3D";
            String encodeProviderUrl = URLEncoder.encode(provider, "UTF-8");
            String clusterName = "clustername";
            String encodeClusterName = URLEncoder.encode(clusterName, "UTF-8");
            String databaseName = "public";
            String encodeDatabaseName = URLEncoder.encode(databaseName, "UTF-8");
            String ssl = "&sslMode=VERIFY"; //Necessary
            String encodeSsl = URLEncoder.encode(ssl, "UTF-8");

            Properties props = new Properties();
            String jdbcUrl = "jdbc:gs:///" + encodeClusterName + "/" + encodeDatabaseName
      + "?notificationProvider="+encodeProviderUrl + encodeSsl;
            props.setProperty("user", "admin");
            props.setProperty("password", "admin");
            props.setProperty("loginTimeout", "60");
            props.setProperty("connectionRoute", "PUBLIC"); //Also a new necessary props for this

            System.out.println(jdbcUrl);
            conn = DriverManager.getConnection(jdbcUrl, props );
            System.out.println("Sucessfully connected!");

        } catch (Exception e) {
            System.out.println("error connecting to DB: "+e);
        }
The full url looks like this:
jdbc:gs:///gs_clustertrial1602/public?notificationProvider=https%3A%2F%2Fdbaasshareextconsta.blob.core.windows.net%2Fdbaas-share-extcon-blob%2Ftrial1602.json%3Fsv%3D2015-04-05%26sr%3Db%26st%3D2023-03-14T00%253A00%253A00.0000000Z%26se%3D2073-03-14T00%2500%253A00.0Z%26sp%3Dr%26sig%3Dh2VJ0xAqsqWV5CAS66RifPIZ1PDCJ0x%252F2FOhA%253D%26sslMode%3DVERIFY
Again, when making this JDBC URL, you will need to be sure to include the sslMode in the URL with the value of PREFERRED, and then you will also need to include connectionRoute with a value of PREFERRED.
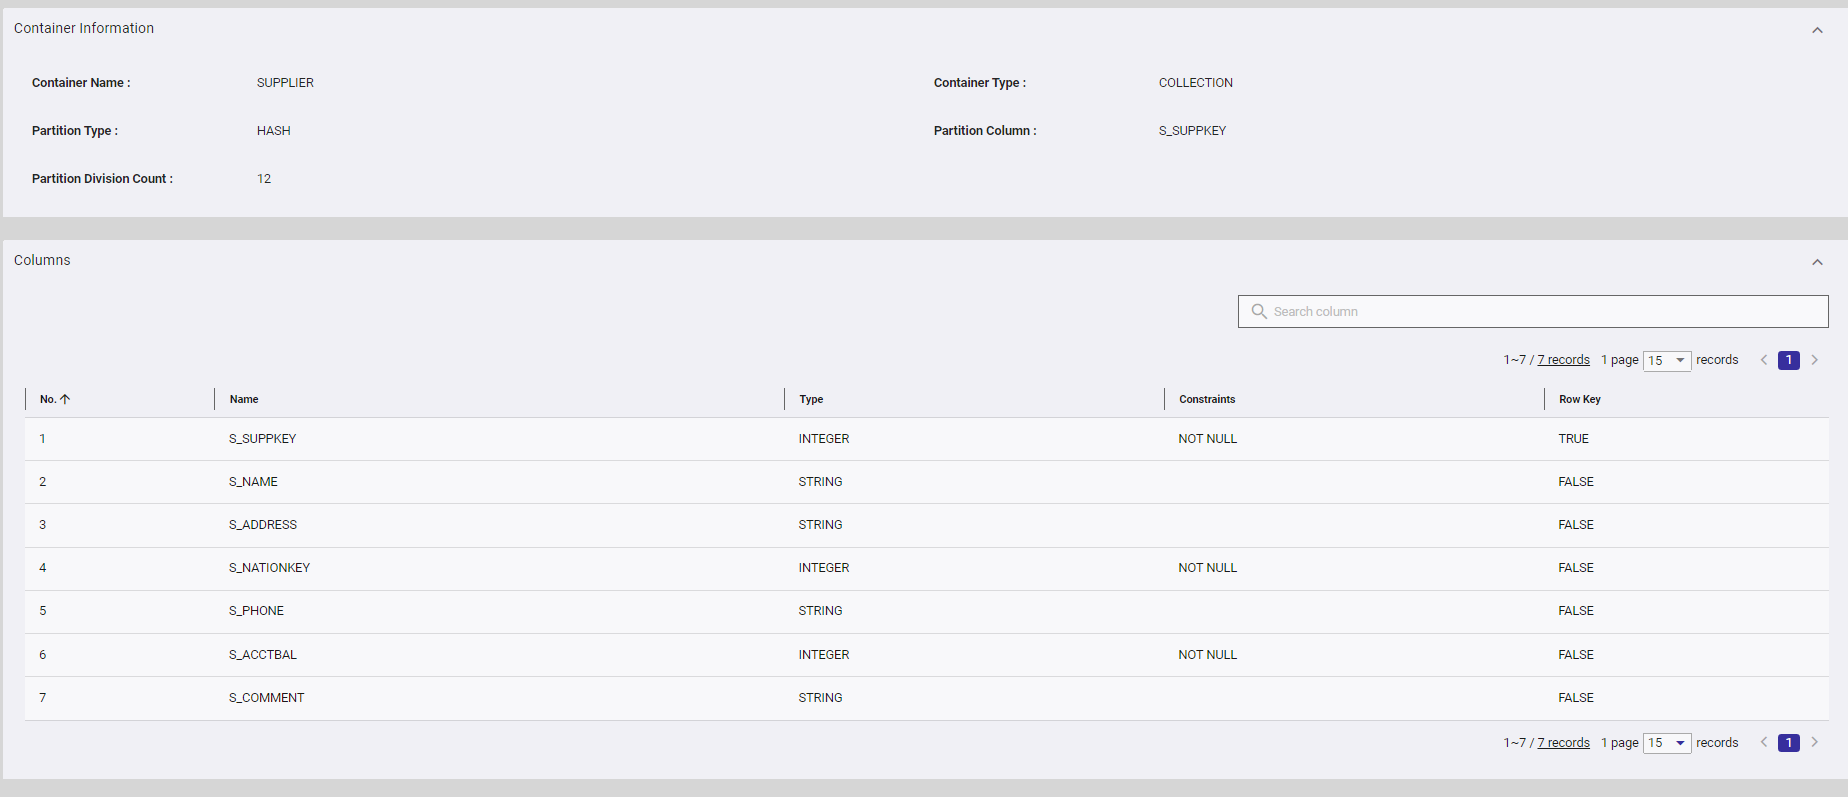
Once all of that information is OK, it will run whatever SQL code you chose to include with your file onto the cloud. In this case, I made a series of tpch tables in the cloud:
[ ][8]
][8]
Connecting to GridDB Cloud with Python and JayDeBeApi
In this next section, we will connect to our Cloud instance using Python and the JDBC library called JayDeBeApi. Basic instructions be found in our previous blog.
To start, install the JayDeBeApi package:
$ python3 -m pip install JayDeBeApiFrom there, you’re ready to follow a similar concept to the Java JDBC Connection
You will need to set your environment variable of CLASSPATH pointing to all of the .jar files from the cloud download section for this python JayDeBeApi to work. For example:
$ export CLASSPATH=${CLASSPATH}:/GridDB/lib/gridstore-advanced-5.2.0.jarYou will need to include the advanced jar, the the gridstore jar, and the jdbc jar.
import jaydebeapi
import urllib.parse

notification_provider = "https://dbaasshareextconsta.blob.core.windows.net/dbaas-share-extcon-blob/trial1602.json?sv=2015-04-05&sr=b&st=2023-03-14T00%3A00%3A00.0000000Z&se=2073-03-14T00%3A00%3A00.0000000Z&sp=r&sig=h2VJ0xAqsnRsqWV5CAS66RifPIZ1PDCJ0x%2FiXb2FOhA%3D"
np_encode = urllib.parse.quote(notification_provider)

cluster_name = "gs_clustertrial1602"
cn_encode = urllib.parse.quote(cluster_name)

database_name = "public"
dbn_encode = urllib.parse.quote(database_name)

sslMode = "&sslMode=VERIFY"
sm_encode = urllib.parse.quote(sslMode)

username = "israel"
password = "israel"

url = "jdbc:gs:///" + cn_encode +  "/" + dbn_encode + "?notificationProvider=" + np_encode + sm_encode
First, we import the necessary libraries. From there, we can simply encode and build our JDBC Url which we will use to make our connection. And then we simply call the correct API method and add our ever important connectionRoute parameter.
conn = jaydebeapi.connect("com.toshiba.mwcloud.gs.sql.Driver",
    url,
    {'user': username, 'password': password,
     'connectionRoute': 'PUBLIC'}
    , "../lib/gridstore-jdbc.jar")
And from there we can run any sort of SQL command we’d like to run:
curs = conn.cursor()

curs.execute("DROP TABLE IF EXISTS Sample")
curs.execute("CREATE TABLE IF NOT EXISTS Sample ( id integer PRIMARY KEY, value string )")
print('SQL Create Table name=Sample')
curs.execute("INSERT INTO Sample values (0, 'test0'),(1, 'test1'),(2, 'test2'),(3, 'test3'),(4, 'test4')")
print('SQL Insert')
curs.execute("SELECT * from Sample where ID > 2")
print(curs.fetchall())

curs.close()
conn.close()
print('success!')
Run and verify
$ python3 app.pyJDBC URL = jdbc:gs:///gs_clustertrial1602/public?notificationProvider=https%3A//dbaasshareextconsta.blob.core.windows.net/dbaas-share-extcon-blob/trial1602.json%3Fsv%3D2015-04-05%26sr%3Db%26st%3D2023-03-14T00%253A00%253A00.0000000Z%26se%3D2073-03-14T00%253A00%253A00.0000000Z%26sp%3Dr%26sig%3Dh2VJ0xAqsnRsqWV5CAS66RifPIZ1PDCJ0x%252FiXb2FOhA%253D%26sslMode%3DVERIFY
SQL Create Table name=Sample
SQL Insert
[(3, 'test3'), (4, 'test4')]
success!
Connecting with R and RJDBC
This section will be extremely similar to the previous two, the chief difference of course being the connecting programming language.
You will need to install R and then install the libraries needed
$ R
> install.packages("RCurl", dependencies = TRUE)
> install.packages("RJDBC", dependencies = TRUE)
Once your R environment is set, let’s set up the (familiar) code.
library(RJDBC)
library(RCurl)

drv <- JDBC("com.toshiba.mwcloud.gs.sql.Driver",
            "../lib/gridstore-jdbc-5.2.0.jar",
            identifier.quote = "`")
RJDBC is our library to forge our connection to the GridDB cloud instance and the RCurl library is to encode our URLs for our notification provider.
All of this code is exactly same as before:
url <- "https://dbaasshareextconsta.blob.core.windows.net/dbaas-share-extcon-blob/trial1602.json?sv=2015-04-05&sr=b&st=2023-03-14T00%3A00%3A00.0000000Z&se=2073-03-14T00%3A00%3A00.0000000Z&sp=r&sig=h2VJ0xAqsnRsqWV5CAS66RifPIZ1PDCJ0x%2FiXb2FOhA%3D"
provider_encode <- curlEscape(url)

cluster_name <- "gs_clustertrial1602"
cn_encode <- curlEscape(cluster_name)

database_name <- "public"
dbn_encode <- curlEscape(database_name)

sslMode <- "&sslMode=VERIFY"
sm_encode <- curlEscape(sslMode)

username <- "israel"
password <- "israel"

protocol <- "jdbc:gs:///"
And then we concatenate our strings, add in our ever-important connectionRoute, and make the connection:
jdbc_url <- paste(protocol, cn_encode, "/", dbn_encode, "?notificationProvider=", provider_encode, sm_encode, sep="",collapse=NULL)

print(jdbc_url)

conn <- dbConnect(drv, jdbc_url, username, password, connectionRoute="PUBLIC")

rs <- dbGetQuery(conn, "SELECT * from Sample where ID > 2")

print(rs)
Here we are simply making the same query as our Python file earlier, it should of course spit out the same results.
Conclusion
And with that, we have successfully connected our local machine directly to our instance of the GridDB Cloud. With this set up, you don’t need to worry about managing any servers, you can simply write your java/python/R applications and utilize the full, awesome power of GridDB.