Introduction
This blog will walk through the process of installing and using authlib with GridDB. Authlib is a Python library for installing OAuth (and others) to your server and applications.
What is Authlib
Open Authorization (OAuth) is an open standard predicated on using a token system for securing applications. The general flow of things is that a user logs in via their username and password, and the application will provide a special token that will expire after X amount of time. That token will then be checked everytime that user wishes to access the application. Once the token expires, the user will then be required to log in again and be to be issued a brand new token.
Normally, this sort of implementation is done via SQL-based databases, meaning unders some circumstances, the developer may be forced into juggling multiple different databases for just one application.
When to use Authlib
Generally, when an application needs to be secure in some way — there is no better option than OAuth. This is mostly because it is an open-standard with a vast track record of flexibility and effectiveness. It works via HTTP which means it can used in a wide variety of applications and is understood by a large majority of developers. Strictly speaking, there are very cases in which OAuth (and by extension Authlib) is not the best option for a new application.
Using GridDB with Authlib
As already alluded to, the main reason as to why a developer or organization would want to use GridDB to handle their users/authentication for their application, is simply reducing the amount of databases in use. If your application is already using GridDB because of the numerous benefits, then adding in functionality for authentication will be of a great benefit.
How it’s Implemented
To implement Authlib with GridDB, we can follow along with the Sample OAuth Server and make a few key changes to get it working; the purpose of most of the changes made will be altering from using a SQL-based database to the specific code GridDB requires.
First, the obvious (griddb.py):
import griddb_python
griddb = griddb_python
factory = griddb.StoreFactory.get_instance()

gridstore = factory.get_store(
    host="239.0.0.1",
    port=31999,
    cluster_name="defaultCluster",
    username="admin",
    password="admin"
)
oauth.py
The oauth.py file is responsible for handling password and token and checking for veracity against the database.
First we need to import the GridDB credentials.
from .griddb import griddb, gridstore And then it’s making sure the OAuth functionality works. First it needs to check for the user and its password in the DB to ensure the credentials match. To do this with GridDB, we simply run a query to check for the saved user:
        try:

            con = gridstore.get_container("USERS")
            q = con.query("select * where username = '"+username+"'")
            rs = q.fetch(False)
            if rs.has_next():
                u = rs.next()
        except:
            print("Exception finding user")
            abort(401, "UNAUTHORIZED")
        if u:
            user = User(u)
            if user.check_password(password):
                return user
            print("pass doesnt match")

        abort(401, "UNAUTHORIZED")
Next, our application needs to be able to save the OAuth-issued tokens into GridDB.
To start the saving process, we create the schema for a collection container called TOKENS. This container needs to have 4 saved rows: token string, expires time, issued time, and the user id associated with the token. The nice thing is that with the GridDB Python container, we can set the container’s schema as a variable like so:
def save_token(token, request):

    conInfo = griddb.ContainerInfo("TOKENS",
        [["token", griddb.Type.STRING],
        ["expires_at", griddb.Type.TIMESTAMP],
        ["issued_at", griddb.Type.TIMESTAMP],
        ["userid", griddb.Type.STRING]],
        griddb.ContainerType.COLLECTION, True)
    cn = gridstore.put_container(conInfo)

    cn.set_auto_commit(False)
    cn.create_index("token")
    cn.put([token['access_token'], datetime.datetime.utcfromtimestamp(time.time()+token['expires_in']), datetime.datetime.utcnow(), request.user.username])
    cn.commit()
The server also needs to be able to check the validity of the token passed to it. To do so, we once again make a query to our GridDB server with our BearerTokenValidator class
class MyBearerTokenValidator(BearerTokenValidator):
    def authenticate_token(self, token_string):
        try:
            cn = griddb.get_container("TOKENS")
            q = con.query("select * where token = '"+token_string+"'")
            rs = q.fetch(False)
            if rs.has_next():
                return OAuth2Token(rs.next())
            else:
                return None
        except:
            return None
        return None
If the passed token exists in the GridDB TOKENS container, then the application accepts the token as valid, if not, it will return as invalid.
And so, everytime a user logs in these functions will run to make sure first the password matches, and then once the token is issued, if the user tries to access content that is secured, it will also make sure the token is valid.
routes.py
The routes.py file handles our server’s endpoints/API calls. For our specific example, we will focus on three different endpoints: the home endpoint (“/”), the endpoint used to sign up (“/sign_up”), and the endpoint used to verify our token works (“/private”).
First, let’s take a look at the /sign_up endpoint. To test this out on your own, you can clone the repo and run the API server: flask run --host=0.0.0.0. Once it’s running, you can try signing up. This process will create the USERS collection container on your GridDB server and save the credentials of the user you POST.
So, once you’ve got your API server running, try this curl command:
curl --request POST
--url 'http://52.250.124.168:5000/sign_up'
--header 'Content-Type: application/x-www-form-urlencoded'
--data 'grant_type=password'
--data 'scope=all'
--data 'username=israel'
--data 'password=imru'
Here I am creating a new user israel with password imru.
Whether the command was successful or not will be apparent via the server logs. Once you’ve got your user signed up and registered, we can try to log in. To do, we use the / endpoint along with our credentials to test if the user is present in our database.
curl --location --request POST 'http://52.250.124.168:5000/'
--form 'username="israel"'
--form 'password="imru"'
--form 'grant_type="password"'
--form 'scope="all"'
If all is successful, you should get back a token string. This is your OAuth-issued token for accessing the /private endpoint. So first, we can try accessing the endpoint without our token. If the token is invalid, or not found in your DB, you will receive a 401 server error code:
{
    "error": "invalid_token",
    "error_description": "The access token provided is expired, revoked, malformed, or invalid for other reasons."
}
And now to see if make sure that the entire system is working as expected, you can make the request again but with the token attached as an authentication header like so:
curl --location --request GET 'http://52.250.124.168:5000/private'
--header 'Authorization: Bearer ZcoI1Rxgcw8rx8z0uFjCArdqacjM8lyE0K6fNWf2zz'
If successful, your API server should respond with the following message: This is a private page only viewable if you're logged in. This is working as intended.
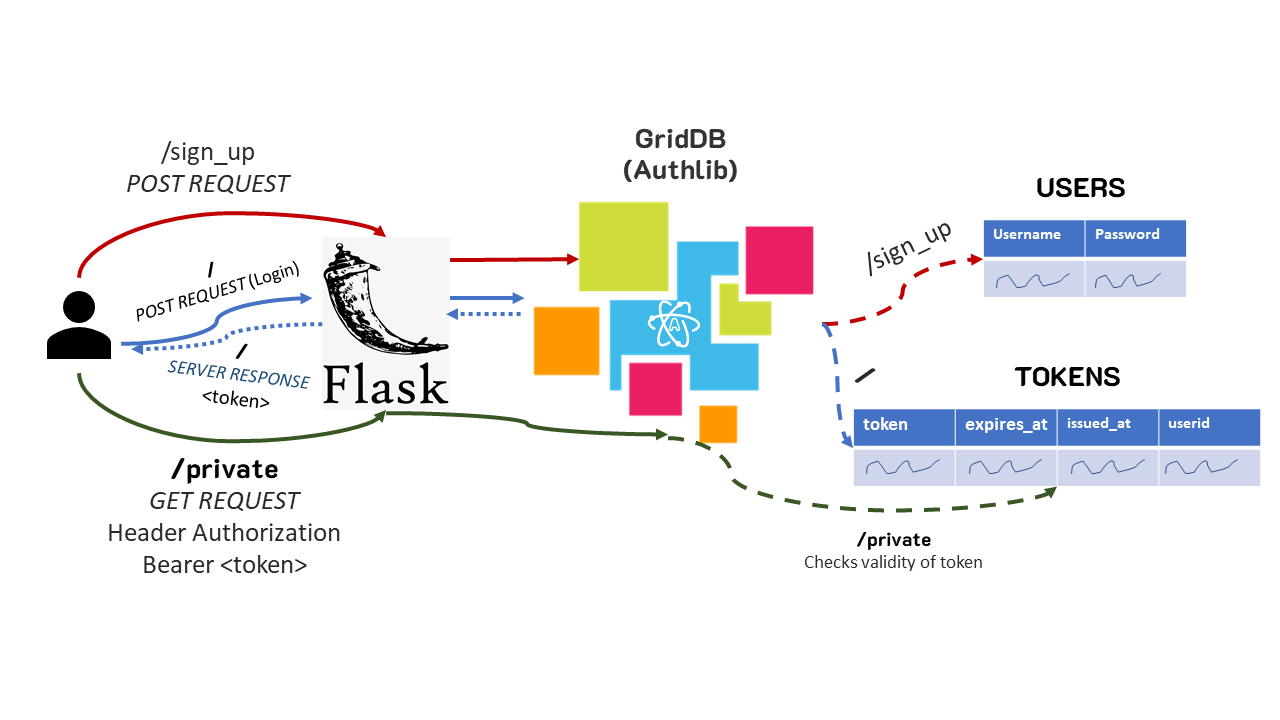
Here is a diagram of the general flow of things:
Conclusion
When creating a backend API server, oftentimes Authlib will be in use to help secure the application. If GridDB is already being used to store the application’s data, it can make sense to pool resources and use the same database to handle authentication as well. Following along with this blog, you can now do so.
Full code for this project is available in our GridDBnet GitHub Repo.